How to Change Windows Startup Settings in Windows 11


Windows Startup Settings is a boot menu in Windows 11 for fixing a PC that fails to start properly. From it you can open Safe Mode, which loads only the basic drivers and services. That makes it easier to remove a broken app or find a faulty piece of hardware.
These options help you track down the cause of system crashes and blue screen errors. Each mode keeps extra background programs from loading, so you can see whether the problem is still there without them.
The menu is available on both Windows 11 Home and Pro. You do not change these settings permanently. Each choice applies to one boot only, and the next normal restart returns Windows to its usual behavior.
Access Startup Settings by holding Shift while clicking Restart from the Power menu. Navigate to Troubleshoot, then Advanced options, and finally Startup Settings to choose your preferred boot mode, like Safe Mode.
Getting to Windows Recovery Environment (WinRE)
To reach Startup Settings, you first have to enter the Windows Recovery Environment, or WinRE. This is a small diagnostic environment that runs outside your main copy of Windows, so it still works when Windows itself has trouble.
Windows usually opens WinRE on its own after a few failed startups. If your PC still boots to the desktop or the sign-in screen, you can open it yourself with the steps below.
Start a Restart
If you can reach the desktop or the sign-in screen, start WinRE like this:
- Open the Start menu and select the Power icon. On the sign-in screen, the Power icon is in the bottom-right corner.
- Hold down the Shift key.
- While you keep holding Shift, click Restart.
- Keep holding Shift until the blue recovery screen appears. This can take several seconds. If you let go too early, the PC restarts normally and you have to try again.
You can also get there from Settings System Recovery. Select Restart now next to Advanced startup. Save your work first, because the PC restarts straight away.
Go to Startup Settings
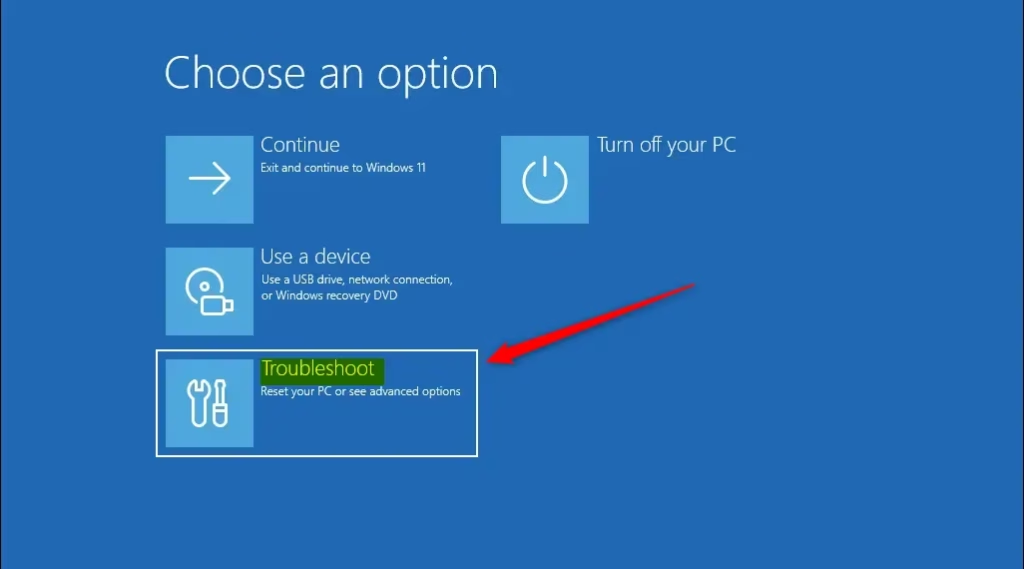
The recovery screen shows several tiles. Use them to reach the diagnostic tools:
- Click Troubleshoot.
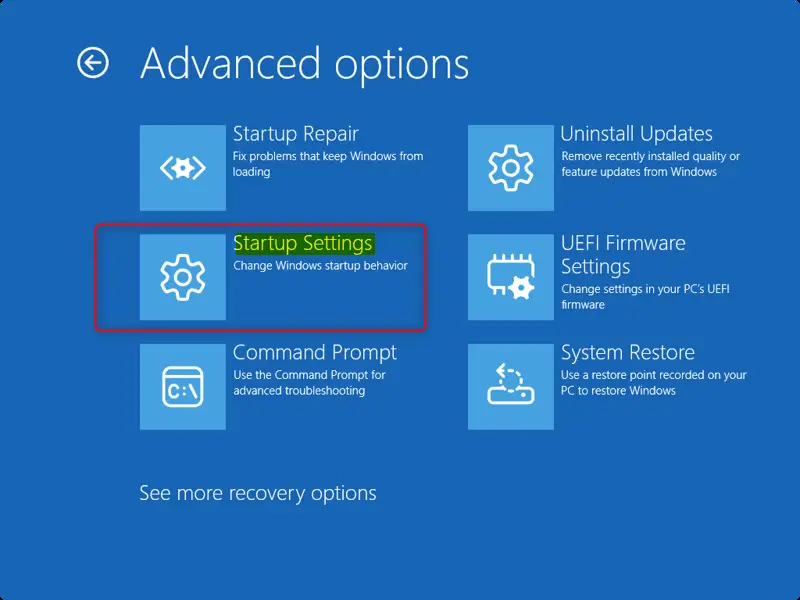
- Click Advanced options.
- Click Startup Settings.
If you do not see Startup Settings on the Advanced options screen, click See more recovery options to show the rest of the tiles. If your drive is encrypted with BitLocker, Windows may ask for your recovery key at this point. Have it ready before you start.
Get Ready to Reboot
The next screen describes what Startup Settings can change, including the Safe Mode variants. Click the Restart button to reboot the PC into the menu. The screen goes dark for a moment while the PC restarts.
Exploring Your Startup Options
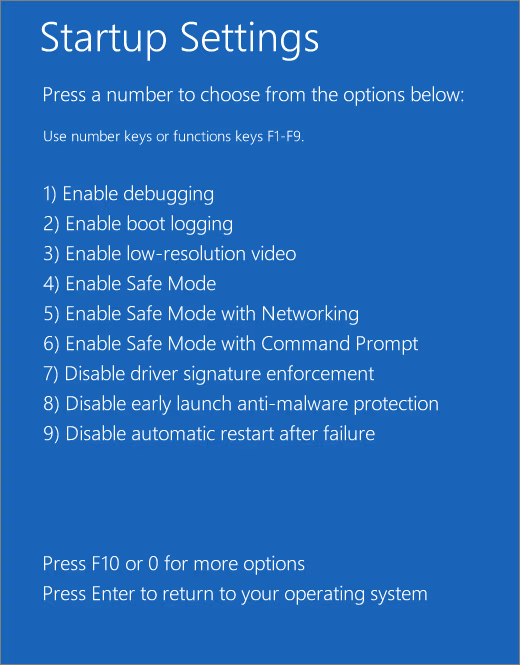
After the reboot, a numbered list of startup options appears. Choose one like this:
- Read the list and find the option you want.
- Press its number key (1-9) or its function key (F1-F9). For example, press 4 or F4 for Safe Mode.
- Wait for Windows to load. It starts with the option you picked applied.
If you press Enter without choosing anything, Windows boots normally. Use this if you opened the menu by mistake.
Common Startup Settings
The common startup settings change how your PC boots so you can get past stubborn errors and crashes. They load Windows with restricted settings, turn on Safe Mode with minimal drivers, and help you narrow down what stops a normal startup.
In general, start with the least drastic option. Try Safe Mode first. Move on to the more advanced options only if Safe Mode does not help or does not match your problem.
Option 4Enable Safe Mode
This option starts Windows with only minimal drivers and services. It removes background processes and gives you a clean environment for testing. You will notice a low screen resolution, a black desktop background, and the words "Safe Mode" in the screen corners.
Why use it: If the PC keeps crashing during normal use, a software conflict is a likely cause. If it stays stable in Safe Mode, a recently installed app, driver, or setting is probably responsible. From Safe Mode you can uninstall that app, roll back the driver, or undo the setting. Then restart normally to check that the problem is gone.
To leave Safe Mode, restart the PC without holding any keys. It boots normally unless you chose a startup option again.
Option 5Safe Mode with Networking
Safe Mode with Networking works like Safe Mode but also loads the drivers and services needed for internet access. The same core restrictions still apply.
Network access lets you download replacement drivers or software patches without leaving the diagnostic environment. Getting an updated graphics driver or a system utility this way often makes recovery much easier. Use it only when you need the internet, because a loaded network connection also means more of the system is running.
Option 6Safe Mode with Command Prompt
This option replaces the usual graphical desktop with a text-based Command Prompt window. Experienced administrators use it for direct control of the system when the desktop will not load or is the source of the problem.
Why use it: The terminal lets advanced users repair corrupted system files, check the health of a disk, and run low-level recovery commands. If you are not comfortable typing commands, choose one of the other Safe Mode options instead. Mistakes here are easy to make and harder to undo.
Advanced Startup Settings (Use Carefully)
The advanced startup settings give you low-level troubleshooting tools, such as debugging mode, for serious system failures. Handle them with care. A wrong choice can leave your PC unable to boot or put data at risk.
Here is what the other options on the list do:
- Enable boot logging records which drivers load during startup, so you can see where a failing boot stops.
- Enable low-resolution video starts Windows with a basic display mode. It helps when a bad display driver or screen setting leaves you with an unreadable screen.
- Disable driver signature enforcement lets Windows load drivers that are not digitally signed. Use it only for a driver you trust, and only for that one session.
- Disable early launch anti-malware protection turns off the check that runs before other drivers load. Use it only if a trusted driver is being blocked wrongly.
- Disable automatic restart after failure keeps the PC from rebooting after a crash, so you have time to read the blue screen error.
Because every option applies to a single boot, a normal restart puts everything back as it was. If you are unsure about an option, leave it alone and press Enter to boot normally.
Option 1Enable debugging
Debugging mode establishes a live connection to a host machine over a network. Developers leverage this channel to transmit crash data and analyze complex kernel faults.
Option 2Enable boot logging
Enabling boot logging forces Windows to write every loaded driver into a text file during startup. Analyzing this log isolates malfunctioning drivers.
Option 3Enable low-resolution video
Low-resolution video mode forces a standard 800x600 pixels display using basic drivers. Corrupted display settings or incompatible monitor resolutions render this option essential for regaining visual control.
Option 7Disable Driver Signature Enforcement
The operating system normally enforces strict cryptographic checks on all loaded drivers. Disabling this requirement permits unsigned software installation, though it significantly lowers security.
Option 8Disable early launch anti-malware protection
Early Launch Anti-Malware (ELAM) initializes security software prior to standard driver loading. This mechanism blocks malicious code from executing during early boot stages.
Bypassing this protection helps isolate conflicts where third-party security suites interfere with the boot sequence. Temporarily disabling anti-malware services determines if security software triggers the crash.
Option 9Disable automatic restart on system failure
A serious system error triggers a Blue Screen of Death (BSOD), which can cause an endless reboot loop if the fault occurs during early boot. Disabling the automatic restart feature stops this loop. Disabling the automatic restart lets you view the specific error message on the blue screen to diagnose the underlying failure.
Startup repair halts recurring crash loops by identifying missing files. This mechanism exposes error codes to streamline troubleshooting.
Exiting Safe Mode
Exiting diagnostic environments and returning to normal operations requires a standard system reboot.
Restart Your PC
Restarting your PC is the quickest way to exit Safe Mode and return to your standard Windows desktop after troubleshooting. You just open the Start menu, select the Power icon, and choose Restart to boot back into normal operations with all your files and apps intact.
Reference:
Summary
Recovery environments and boot configurations provide vital mechanisms for resolving software failures. Mastering diagnostic environments resolves misconfigurations and software conflicts effectively. Rebooting the system normally restores standard functionality once troubleshooting concludes.
Did this guide fix your problem?

About the Author
Richard
Tech Writer, IT Professional
Richard is a writer at Geek Rewind who turns complex IT tasks into clear, step-by-step guides. He draws on years of hands-on experience in system administration and enterprise IT operations, focusing on Windows, Linux and WordPress: the problems people actually run into, and the fixes that work. His server and WordPress guides come from systems he runs himself. Richard builds and maintains the platform behind Geek Rewind, from its Ubuntu servers and Nginx configuration to its custom WordPress plugins. Many new tutorials start with readers' questions, and he's always glad to answer them in the comments.
No comments yet — be the first to share your thoughts!