How to Back Up and Restore with Windows Backup in Windows 11

Windows Backup is a built-in tool in Windows 11 that saves your personal files, app settings, and Wi-Fi networks to your OneDrive account. It protects your photos, documents, and credentials if the hardware fails or a laptop is lost.
You can set it up from the Settings app on any Windows 11 device. It saves your desktop folders, your list of installed apps, and your saved credentials. When you sign in to a new PC with the same account, Windows can bring most of that back, so setup goes much faster.
Open Settings , go to Accounts, then Your info, and sign in with a Microsoft account. Next, open Windows Backup from the Start menu search and toggle on the folders you want to back up.
What Happens When You Back Up?
Windows Backup copies core files, such as photos and documents, along with preferences such as your wallpaper and saved Wi-Fi passwords. Everything goes to your Microsoft account and OneDrive, not to an external drive.
It is not a full system image. It does not copy every program and every file on the disk. Think of it as a way to rebuild your PC quickly, not as a clone of it. Your files only count as backed up if they sit in the folders you select, so check that list before you rely on it.
Step 1Get Your Microsoft Account All Set
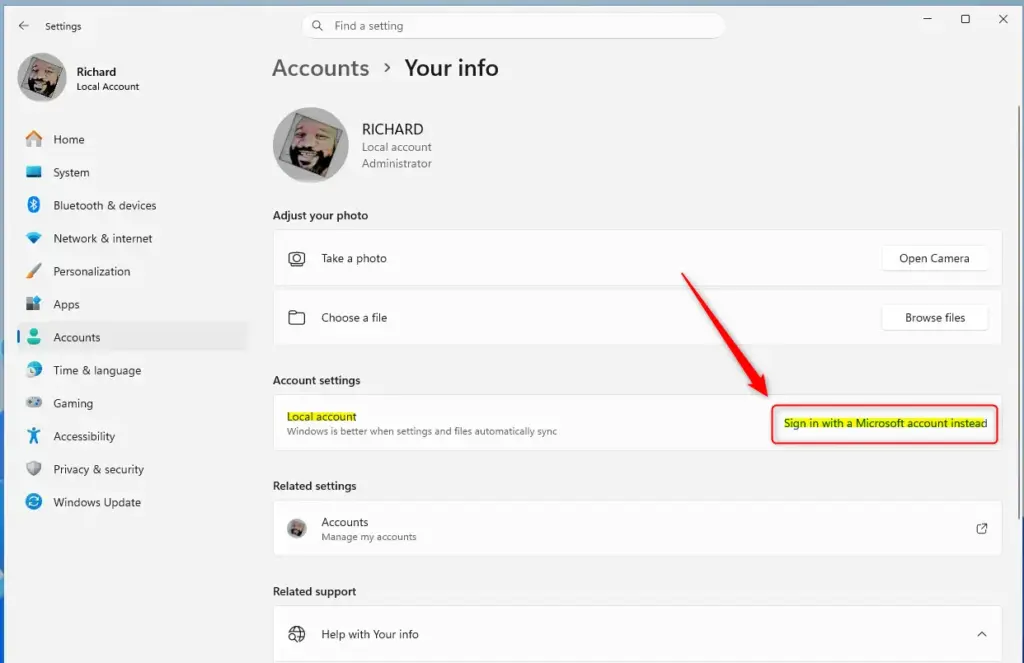
You need a Microsoft account before you can use Windows Backup. A local account will not work, because the backup is stored under your Microsoft account in OneDrive. Check which account you are using first. This takes about a minute.
Here is how to check, or switch to a Microsoft account:
- Open the Settings app. Click the Start button and select the gear icon, or press
Windows key + Ion your keyboard. The Settings window opens. - Click Accounts in the left-hand sidebar.
- Select Your info from the Accounts panel. Your account name appears at the top. If an email address appears under it, you are already signed in with a Microsoft account and can skip the next step.
- Look for the option Sign in with a Microsoft account instead. If you see it, you are on a local account. Click it and follow the prompts, using your Microsoft account email and password. If you don't have an account yet, you can create one on the sign-in screen.
After you switch, Windows may ask you to enter your old local password once, and then to set up a PIN. Your files stay where they are. If you ever want to go back, the same page shows a Sign in with a local account instead option.
Step 2Back Up Your Most Important Folders
You choose which of your default user folders are saved to OneDrive. Once a folder is included, its files are stored in the cloud and stay safe if something happens to the PC. You pick the folders in the Windows Backup app.
Keep in mind that OneDrive's free storage is 5 GB. If your Pictures and Documents folders are larger than that, the backup will stall until you free up space or buy more storage. Check the size of your folders first.
Here is how to choose your folders:
- Click the Start button.
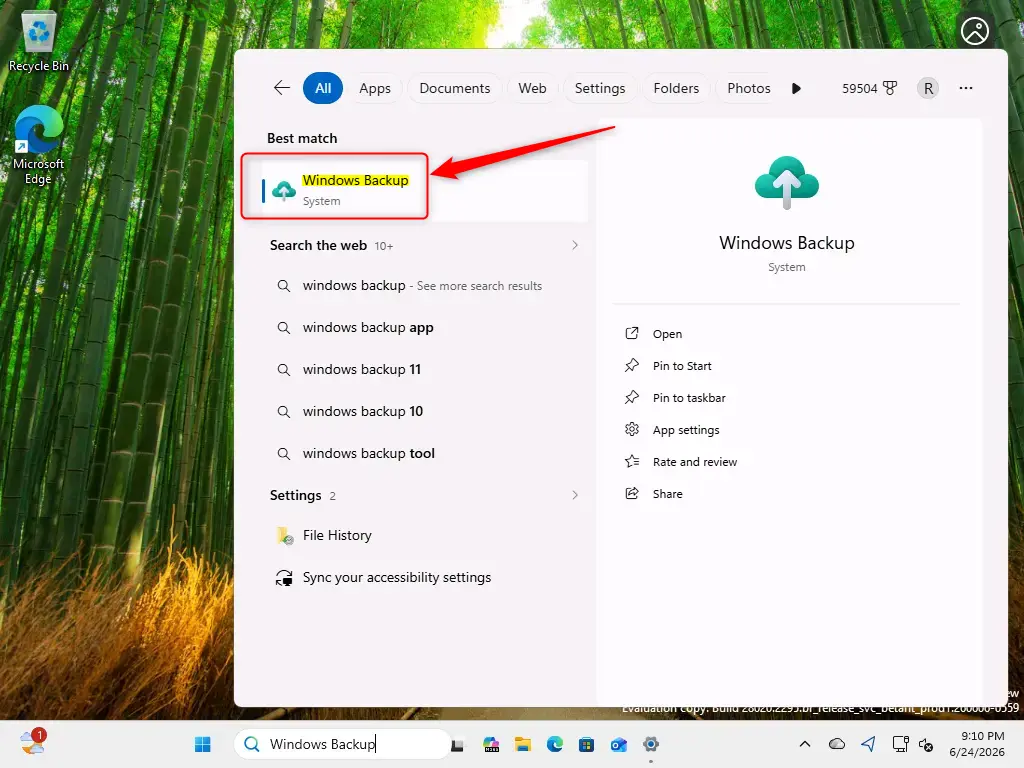
- Type "Windows Backup" in the search box and select Windows Backup from the results. The app opens.
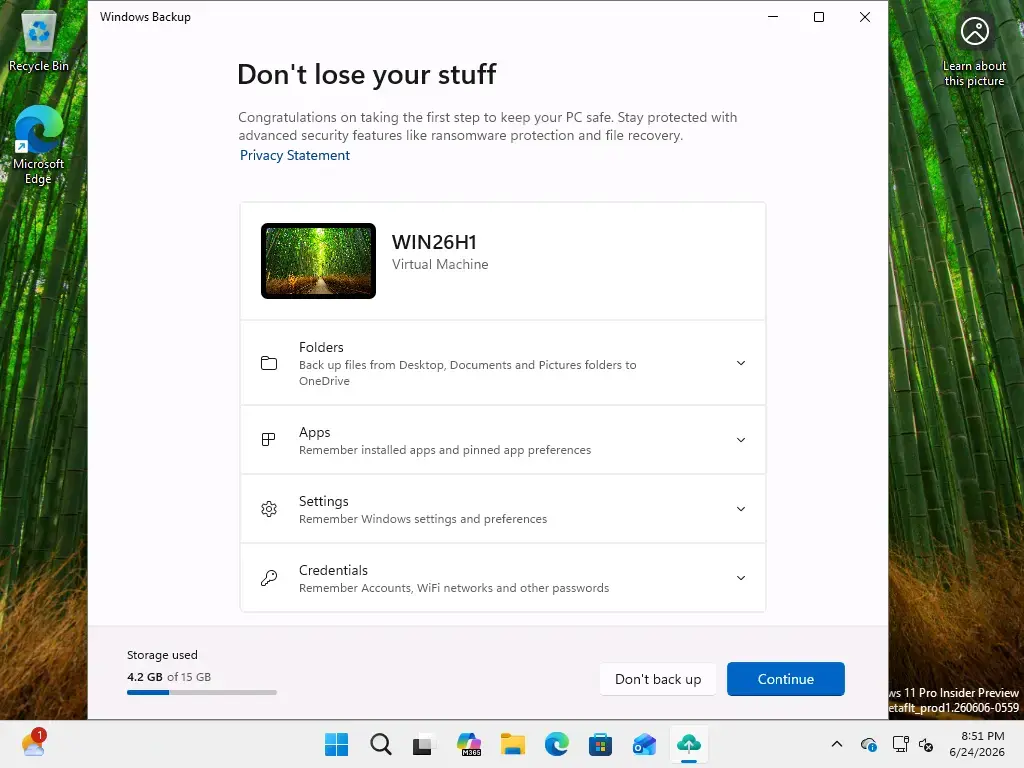
- Find the Folders section and click it to expand it. The list of folders appears.
- Review the list: Desktop, Documents, Pictures, Videos, and Music. For each folder you want to protect, switch the toggle next to it to On. A folder you leave Off is not saved.
If a toggle is greyed out or the app asks you to sign in, go back and confirm that you are using a Microsoft account. Turning a toggle back to Off later stops that folder from being backed up. Your existing files stay on the PC.
Step 3Saving Your Settings and Preferences
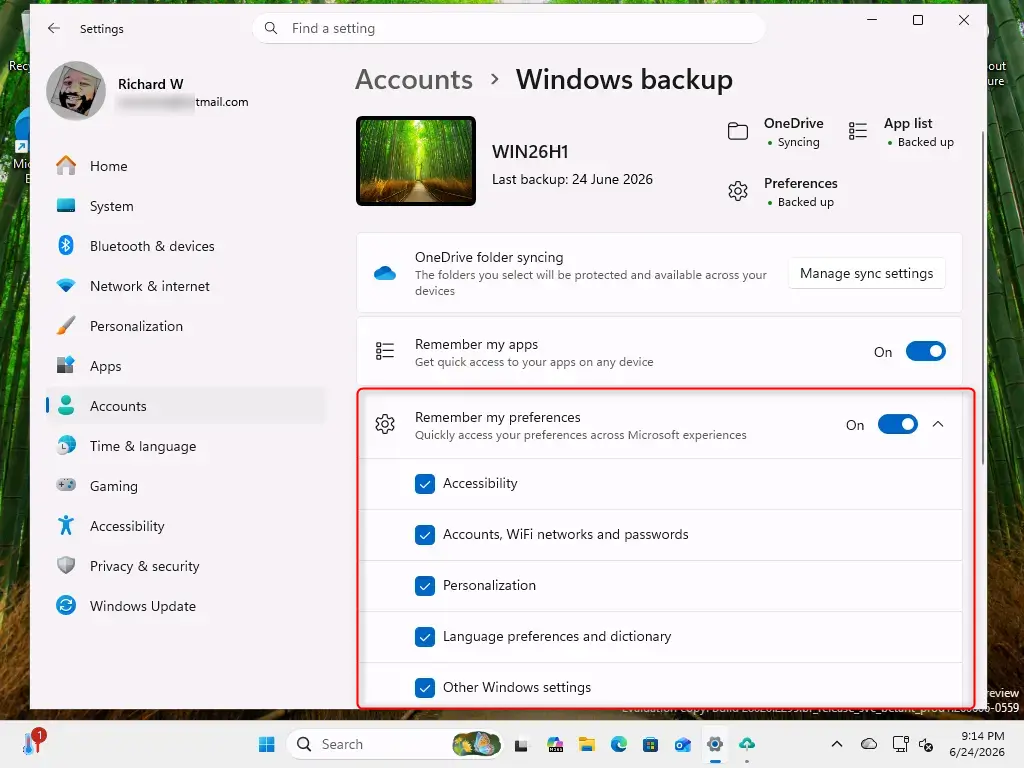
Windows Backup can also save your preferences, so your apps, Wi-Fi networks, and display layout carry over to a new PC. Windows remembers which apps you installed, your saved passwords, and your accessibility options, so you do not have to set everything up again from scratch. You can review these choices inside the backup tool before you start.
Here are the kinds of settings you can back up:
- Installed apps: Windows remembers which apps you had installed. On the new PC it can list them again so you can reinstall them, which saves you from remembering what you used.
- Accessibility settings: This covers display settings, text size, and other options that make your PC easier to use.
- Accounts, Wi-Fi network and passwords: Your saved Wi-Fi networks and passwords can be backed up, so the new PC joins your home network without asking for the password again.
- Personalization: This covers your look and feel: wallpaper, accent colors, themes, and the layout of your Start menu.
- Language preferences and dictionary: Your language settings and any custom words you added to your dictionary.
- Other Windows settings: A range of other system settings that tailor Windows to your liking.
To back these up:
- In the Windows Backup app (or in Settings Accounts Windows backup), find the Settings section. In the Settings app, the same choices appear as toggles such as Remember my apps and Remember my preferences.
- Expand each category of settings you want to back up. The options for that category appear underneath.
- Switch the toggle to On for each setting you want to protect.
- Once you have chosen all the folders and settings you want, click the Back up now button. The label can differ slightly between Windows versions, so click the main backup button if you do not see this exact wording. Windows starts saving everything to your Microsoft account, and you will see a progress indicator while it works.
The first backup takes the longest, especially with large photo folders. Leave the PC on and connected to the internet until it finishes. After that, Windows only uploads what has changed. No restart is needed.
The usual ones are no active sign-in, not enough storage space, or a temporary sync interruption. Check the OneDrive status in the taskbar notification area, confirm you have enough free storage, and run the backup again. If errors keep coming back, troubleshoot OneDrive sync itself, since Windows Backup depends on it.
Step 4Sit Back and Relax – You're All Set!
Check your backup status now and then to confirm that your files and preferences are stored and up to date. You can open the Windows Backup app, or go to Settings Accounts Windows backup. Either one shows that protection is active, and it confirms your saved items are available on any other computer you sign in to with the same account.
To restore on a new or reset PC, sign in with the same Microsoft account during setup. Windows offers to restore from a previous backup, and you can choose which one. Your folders sync back through OneDrive, and your settings and app list come back too. If you skip that step during setup, you can still turn the same folders on in the Windows Backup app afterward.
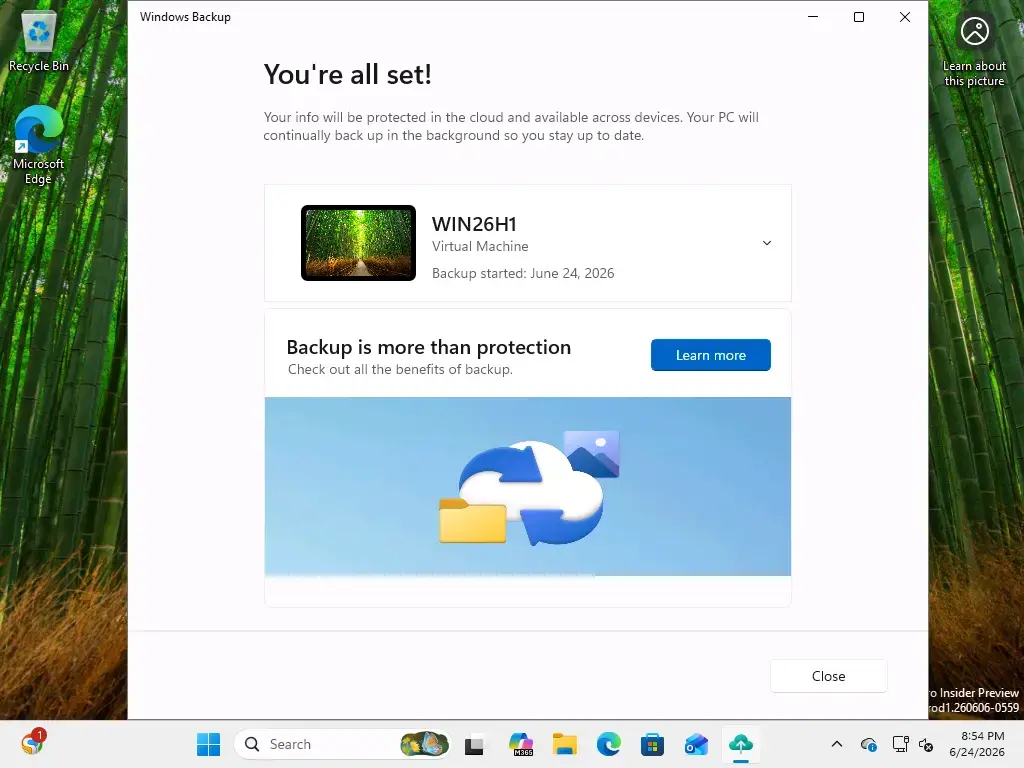
You can run a status check any time from the Windows Backup app or from Settings Accounts Windows backup The page shows which protections are active and which items are secured. If a folder you expected is missing from the list, switch it to On and run the backup again.
References:
Summary
This guide covered how to set up Windows Backup in Windows 11 to protect your files and settings through OneDrive and a Microsoft account. It also covered how to check the backup status and how to restore on a new PC.
Have a question about this guide?
Answered by AI from this guide. Good questions may be added to this page — please don't include personal details.
Did this guide fix your problem?

About the Author
Richard
Tech Writer, IT Professional
Richard is a writer at Geek Rewind who turns complex IT tasks into clear, step-by-step guides. He draws on years of hands-on experience in system administration and enterprise IT operations, focusing on Windows, Linux and WordPress: the problems people actually run into, and the fixes that work. His server and WordPress guides come from systems he runs himself. Richard builds and maintains the platform behind Geek Rewind, from its Ubuntu servers and Nginx configuration to its custom WordPress plugins. Many new tutorials start with readers' questions, and he's always glad to answer them in the comments.
No comments yet — be the first to share your thoughts!