How to Enable or Disable System Restore in Windows 11

This tutorial shows you how to turn System Restore on or off in Windows 11. You need to be signed in as an administrator. Either method takes about a minute.
Open Windows Terminal as administrator, then run reg add “🗝️HKLM\
What is System Restore?
System Restore takes a snapshot of your computer, called a restore point. If a change causes problems, you can roll the system back to that earlier state.
Windows creates restore points before important changes, such as installing a driver or an update. Each restore point stores what Windows needs to put the system back the way it was.
How Long Are Restore Points Kept?
System Restore also manages the disk space used for restore points on its own. When space runs low, it deletes the oldest restore points to make room for new ones. How much space it can use depends on the size of your drive and your version of Windows.
What Gets Restored and What Doesn’t?
System Restore can undo recent system changes, such as a newly installed app, driver or Windows update . It never touches your personal files. Your documents, emails, browsing history and favorites are not removed.
It also does not bring back personal files you deleted. Any apps, drivers or updates installed after the restore point was made will be removed.
System Restore also works from the Windows Recovery Environment and from safe mode. That helps when Windows won't start normally and you need to roll back a bad change.
Default Setting and Disabling
System Restore is turned on by default in Windows 11, but you can disable it if you need to. Disabling it does not delete your existing restore points.
Good to know: You can still use your existing restore points at startup or in PowerShell after you disable System Restore. If you turn System Restore back on later, you get the same behavior as before.
You must be signed in as an administrator to enable or disable System Restore. If you are signed in with a standard account, sign out and sign back in with an administrator account first.
Option 1Use Local Group Policy Editor
If you run Windows 11 Pro, Enterprise or Education, you can use the Local Group Policy Editor. Windows 11 Home does not include it, so Home users should use the second method below.
- Open the Local Group Policy Editor. Type
gpedit.mscin the search bar and press Enter. The Local Group Policy Editor window opens. - In the left pane, go to this location:
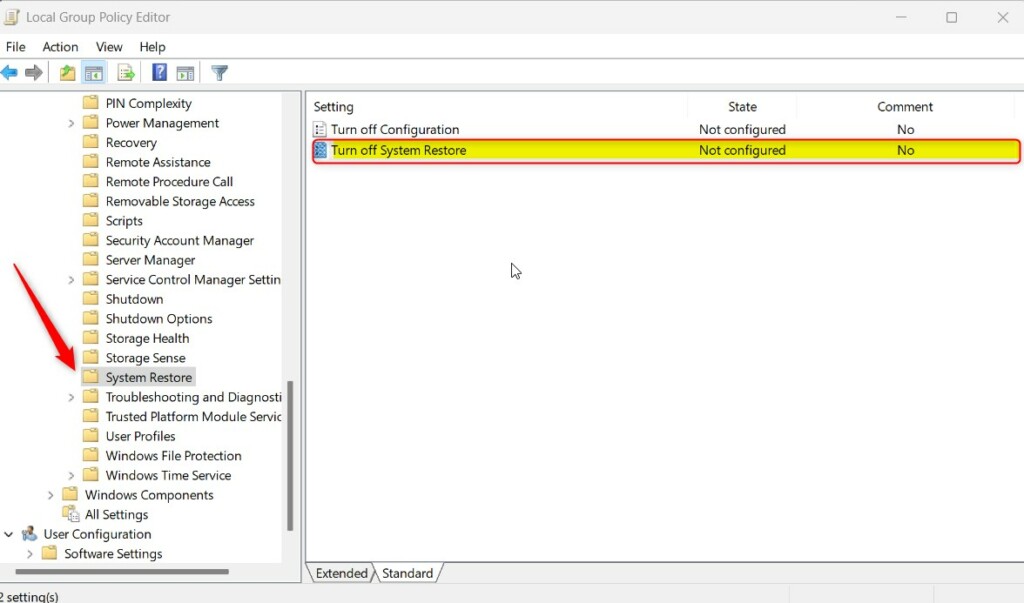
Computer Configuration > Administrative Templates > System > System Restore. Expand each folder by clicking the arrow beside it. - In the right pane, find the policy called
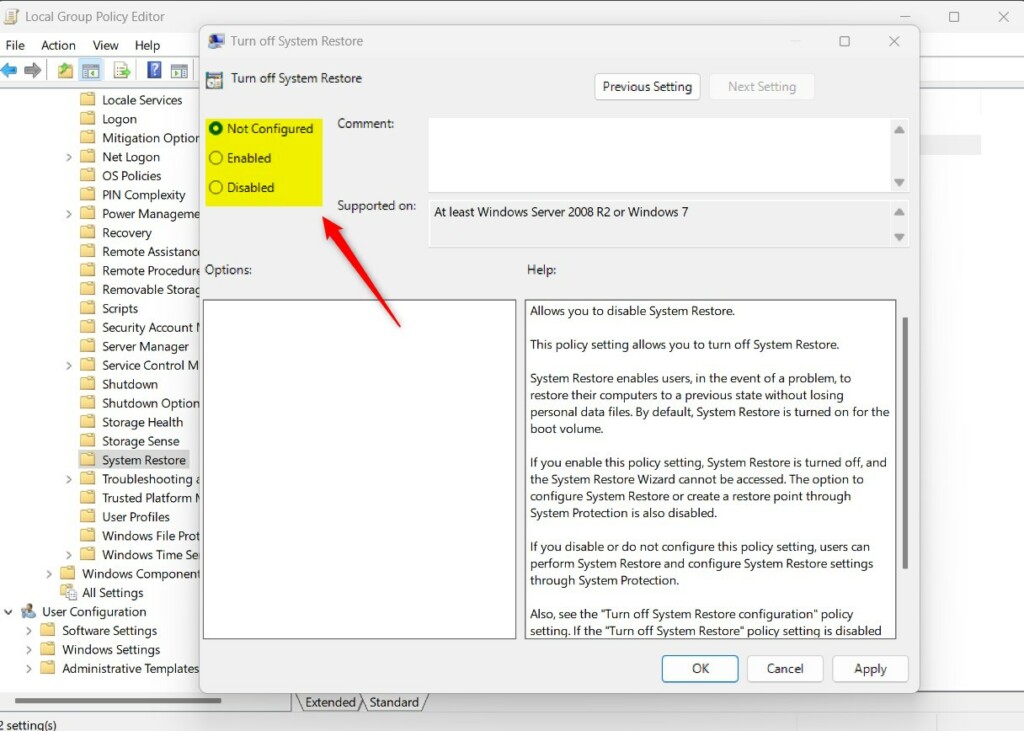
Turn off System Restoreand double-click it. Its settings window opens. - To enable System Restore (the default setting):
- A) Select the dot next to
Not Configured. - B) Click
OK.
- A) Select the dot next to
- To disable System Restore:
- A) Select the dot next to
Enabled. - B) Click
OK.
- A) Select the dot next to
- [REQUIRES ADMIN] Close the Local Group Policy Editor. The policy normally applies without a restart. If System Restore still behaves as before, restart the PC and check again.
If you can't change the setting or it looks locked, a policy from your workplace or school may be managing the PC.
Option 2Use Registry Editor (Works on All Editions)
This method works on any Windows 11 edition, including Home. It makes the change through the registry, using commands you run in Windows Terminal. You don't need to browse the registry by hand.
- [REQUIRES ADMIN] Open Windows Terminal as administrator. Right-click the Start button, choose Terminal (Admin), and click Yes if User Account Control asks. A terminal window opens with administrator rights.
- To enable System Restore (the default setting): run the command below. Paste it in and press Enter.
reg delete "HKLM\SOFTWARE\Policies\Microsoft\Windows NT\SystemRestore" /v DisableSR /f
- To disable System Restore: run the command below instead. Paste it in and press Enter.
reg add "HKLM\SOFTWARE\Policies\Microsoft\Windows NT\SystemRestore" /v DisableSR /t REG_DWORD /d 1 /f
Run only one of the two commands, depending on what you want. To undo a change, run the other command. If the terminal reports an access error, it was not opened as administrator, so close it and repeat step 1.
Summary
System Restore saves snapshots of your system, called restore points. Windows 11 version 24H2 keeps them for 60 days. Restoring one does not affect your personal files.
Was this guide helpful?

About the Author
Richard
Tech Writer, IT Professional
Richard is a writer at Geek Rewind who turns complex IT tasks into clear, step-by-step guides. He draws on years of hands-on experience in system administration and enterprise IT operations, focusing on Windows, Linux and WordPress: the problems people actually run into, and the fixes that work. His server and WordPress guides come from systems he runs himself. Richard builds and maintains the platform behind Geek Rewind, from its Ubuntu servers and Nginx configuration to its custom WordPress plugins. Many new tutorials start with readers' questions, and he's always glad to answer them in the comments.



No comments yet — be the first to share your thoughts!