How to Pause or Resume Recall Snapshots in Windows 11


Recall snapshots in Windows 11 take a picture of your screen every few seconds. Together they build a searchable visual history of what you have done on the PC. You can type everyday words into Recall’s search box to find an app, website, or document you used earlier.
Pausing Recall stops Windows from saving your screen during sensitive tasks, such as online banking or entering passwords. You can pause it at any time from the taskbar . Windows turns it back on automatically at midnight. Recall is only available on Copilot+ PCs, and it needs Windows Hello set up. If you don’t see any of the options below, your PC probably doesn’t meet those requirements or Recall isn’t enabled on it.
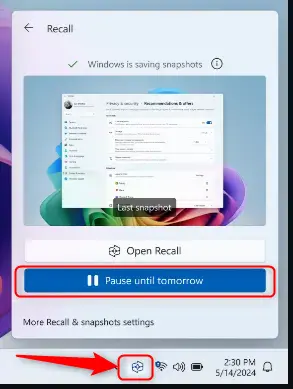
Click the Recall icon in the system tray at the right end of the taskbar , then select Pause until tomorrow. Windows stops taking snapshots immediately and resumes automatically at midnight.
Pause and resume Recall snapshots
The quickest way is from the system tray . If you want to check your preferences first, use the Settings app.
To pause snapshots:
- Find the Recall icon in the system tray at the right end of the taskbar . If you don’t see it, click the up arrow (Show hidden icons) to open the overflow area.
- Click the Recall icon. A small menu opens.
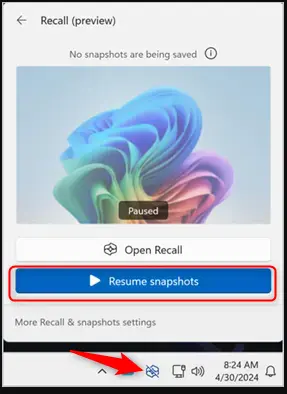
- Choose Pause until tomorrow. Windows stops saving snapshots, and the menu now offers Resume snapshots in place of the pause option.
To resume snapshots later the same day:
- Click the Recall icon in the system tray again.
- Click Resume snapshots. Windows starts saving your screen activity again.
If you are not sure whether Recall is running, open Settings Privacy & security Recall & snapshots The page shows your current snapshot settings. If Recall is active, the tray menu shows Pause until tomorrow. If it is paused, the menu shows Resume snapshots.
Recent Updates
- Recall feature initially launched on Copilot+ PCs.
- Microsoft has responded to privacy concerns by adding more user controls and transparency.
Managing Recall Settings
The Settings app is the main place to manage Recall. From there you can pause or resume snapshots, view your history, delete snapshots, and set which apps and websites Recall should not capture. Changes apply right away, and you don't need to restart.
To open the Recall settings:
- Open
Settings. The Settings window appears. - Navigate to
Privacy & security. The privacy options for Windows open. - Select
Recall & snapshots. You now see the Recall controls, including the options for deleting snapshots and excluding apps and websites.
If Recall & snapshots is missing, the PC is not a Copilot+ PC or Recall isn't available on your build of Windows 11. A work or school PC may also have it turned off by policy, in which case you need to ask your administrator.
Manually Resume Snapshots
If you paused Recall and want Windows to start saving your screen again before midnight, you can resume snapshots from the Recall app.
- Open the Start menu and select the Recall app. Windows may ask you to confirm your identity with Windows Hello. The Recall window opens.
- Click the Resume snapshots button at the top of the window. Background recording starts again immediately.
If you would rather not open the app, you can use Resume snapshots from the Recall icon in the system tray, as described earlier.
If you don't, Windows resumes on its own at midnight, so anything you do for the rest of that day is not recorded.
Managing Recall helps protect your privacy and frees up local storage space. Snapshots are stored on your PC, so a long history takes up disk space.
- Managing Recall snapshots on Windows 11 is essential for privacy and storage management.
- Pausing and resuming snapshots gives you control over when Recall captures sensitive information.
- Stay vigilant of storage limits and regularly delete unnecessary snapshots to optimize performance.
- Use the Recall feature to quickly search and retrieve saved snapshots on your PC.
How Windows Recall Works
Recall saves snapshots of your screen activity and stores them in a local database on your PC. When you search, Recall analyzes those snapshots to find the item you typed. Microsoft receives no telemetry from this process. Because everything stays on the local device, your history is not sent elsewhere.
Was this guide helpful?

About the Author
Richard
Tech Writer, IT Professional
Richard is a writer at Geek Rewind who turns complex IT tasks into clear, step-by-step guides. He draws on years of hands-on experience in system administration and enterprise IT operations, focusing on Windows, Linux and WordPress: the problems people actually run into, and the fixes that work. His server and WordPress guides come from systems he runs himself. Richard builds and maintains the platform behind Geek Rewind, from its Ubuntu servers and Nginx configuration to its custom WordPress plugins. Many new tutorials start with readers' questions, and he's always glad to answer them in the comments.

[…] recall options are available to users, such as disabling saving snapshots, temporarily pausing, filtering applications and websites, deleting snapshots, and […]
[…] are screenshots of your activity on your Windows 11 device. When Recall is enabled, you can temporarily pause it, filter apps and websites, delete your snapshots, and […]
[…] are other options too, like pausing snapshots temporarily, excluding certain apps, or deleting all […]
[…] Pause the snapshots anytime (learn how here). […]