How to Improve Recall Snapshots Filtering on Windows 11

This guide shows you how to turn the “Help improve Recall snapshots filtering” setting on or off in Windows 11. You can do it in Settings, or with the Registry Editor if you prefer to work at that level. Both methods are short, and the Settings method is the safer one for most people.
Open Settings Privacy & security Recall & snapshots, then toggle Help improve Recall snapshots filtering On or Off. The change applies immediately. To disable it via Registry Editor, create a DWORD value IsFilteringTelemetryEnabled under 🗝️HKEY_CURRENT_USER\
What Is Recall & Snapshots?
Recall is an AI feature that takes snapshots of your screen as you work. It acts like a memory log for your PC, so you can look back at things you have seen or done before.
Recall stores these snapshots locally on your computer, and it needs your permission before it saves anything. It is not available on every PC. Recall and this setting only appear on Copilot+ PCs, which have a supported NPU (neural processing unit). On a device without one, the Recall & snapshots page will not appear in Settings, and no registry edit will change that. If you can’t find the page, check this first.
Windows Hello is also part of the picture. You need to set up Windows Hello (a biometric sign-in or a PIN) to use Recall. You must use it to open Recall and view your snapshots. This is why Windows may ask you to verify your identity while you work through the steps below.
What Can You Do with Recall?
You stay in control of what Recall saves. You can do the following:
- Pause the snapshots anytime (learn how here).
- Choose which apps or websites you want to exclude from being saved (apps) and (websites).
- Delete all snapshots whenever you want (steps here).
In short, you can pause saving when you need privacy, skip certain apps or websites, and wipe your saved snapshots at any time.
There is one more way to control Recall. It is an optional feature, so you can turn it off or remove it completely. Open Settings System Optional features, or open the Windows Features dialog, and look for Recall in the list. This is a bigger step than the settings above. It switches off the whole feature instead of tuning it. If you want Recall back later, you can add it again from the same place. A restart may be needed for the change to take effect.
What Does "Help Improve Recall Snapshots Filtering" Mean?
The snapshot filtering option lets you share your list of blocked apps and websites with Microsoft. The sharing is anonymous, so Microsoft cannot identify you from it. Microsoft uses this data to improve Recall's filtering for everyone.
Turning this setting off does not change what Recall saves on your PC. It only stops your filter list from being shared.
How to Turn On or Off "Help Improve Recall Snapshots Filtering"
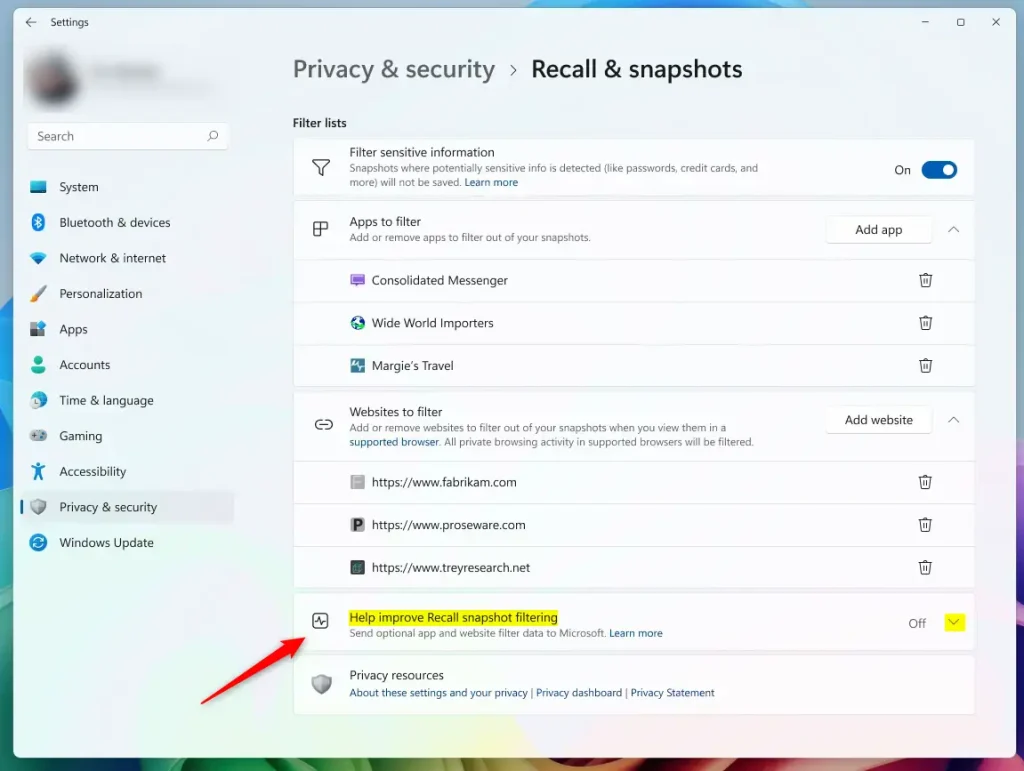
The setting is in Settings Privacy & security Recall & snapshots. Follow these steps:
- Open the Windows Settings app. You can click the Start menu and choose Settings, or press
Windows key + Ion your keyboard. The Settings window should open. - Click Privacy & security in the left menu. The privacy options now appear on the right.
- On the right, click the Recall & snapshots option. If you don't see it, your PC is probably not a Copilot+ PC with a supported NPU, or the Recall feature isn't installed or has been removed.
- Turn on Save snapshots if it isn't already on. You may be asked to verify your identity with Windows Hello, using your biometric sign-in or PIN. The other options on the page may be unavailable until snapshots are on.
- Click Help improve Recall snapshots filtering to open it. The toggle for the setting appears.
- Set the switch to On to share your filter list, or Off to stop sharing. The change applies right away, with no restart needed.
To undo the change, come back to the same page and flip the switch again.

When you're done, close the Settings app. There is no Save button, because the switch applies as soon as you flip it.
Extra: How to Turn This Feature On or Off Using the Windows Registry
Advanced users can control the same setting from the Registry Editor. You go to a specific key and create a new DWORD value. You need an administrator account for this. The same hardware rule applies here: on a PC that doesn't support Recall, the value has no visible effect.
- [Admin] Open the Registry Editor. Search for "regedit" in the Start menu and approve the User Account Control prompt if it appears. The Registry Editor window should open.
- Go to this key:
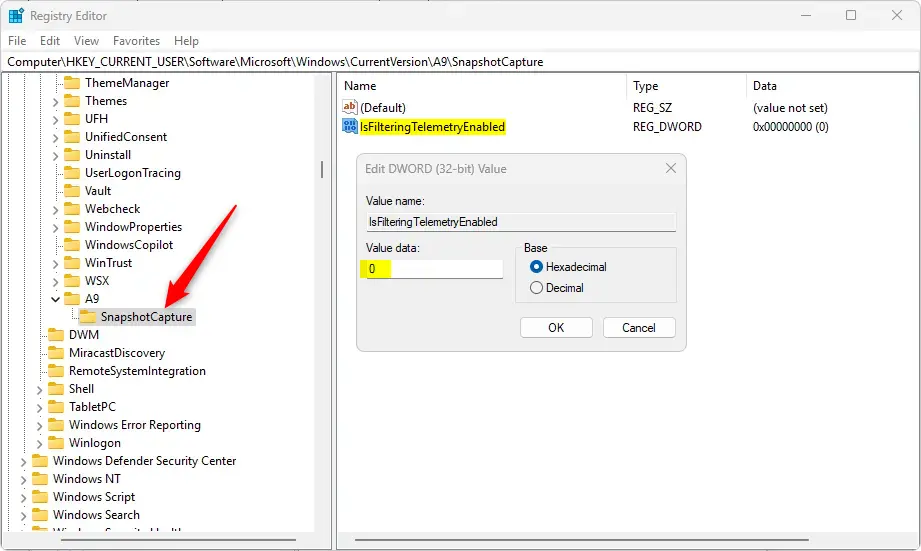
Computer\HKEY_CURRENT_USER\Software\Microsoft\Windows\CurrentVersion\A9SnapshotCapture. You can paste the path into the address bar at the top of the Registry Editor. If the key isn't there, double-check the path rather than guessing. - Right-click SnapshotCapture, then select New DWORD (32-bit) Value. A new value appears in the right pane with its name ready to edit.
- Name the new DWORD
IsFilteringTelemetryEnabled. - Double-click the new DWORD and set its value data to:
1to turn ON the feature.0to turn OFF the feature.
- Click OK and close the Registry Editor. If the Settings page doesn't show the new state, sign out and back in, or restart the PC.
To undo the change, open the same DWORD and set it to the other value.
A wrong edit can cause problems, so back up your registry (File Export) or create a restore point before you make changes.
Summary
Managing the 'Help improve Recall snapshots filtering' option in Windows 11 is simple through Settings, and your snapshot data stays private and encrypted on your device, ensuring your information is secure.- Turning on or off the "Help improve Recall snapshots filtering" option is easy from the Windows Settings.
- You can help Microsoft improve Recall by sharing your excluded apps and sites anonymously.
- Your data stays private and safe because snapshots are encrypted and only stored on your device.
- Check your settings regularly to control your snapshot preferences.
- Use the links in this guide if you want more detailed help.
Reference
Learn more from Microsoft Support.
Have a question about this guide?
Answered by AI from this guide. Good questions may be added to this page — please don't include personal details.
Did this guide fix your problem?

About the Author
Richard
Tech Writer, IT Professional
Richard is a writer at Geek Rewind who turns complex IT tasks into clear, step-by-step guides. He draws on years of hands-on experience in system administration and enterprise IT operations, focusing on Windows, Linux and WordPress: the problems people actually run into, and the fixes that work. His server and WordPress guides come from systems he runs himself. Richard builds and maintains the platform behind Geek Rewind, from its Ubuntu servers and Nginx configuration to its custom WordPress plugins. Many new tutorials start with readers' questions, and he's always glad to answer them in the comments.
No comments yet — be the first to share your thoughts!