How to Exclude Websites from Recall Snapshots in Windows 11
Windows 11’s Recall feature takes screenshots of your PC activity to help you find things later.
Recall works by saving copies of your screen securely on your computer, acting like a searchable history of what you’ve done.
You can stop Recall from saving screenshots of certain websites to protect your privacy. This means private browsing sessions won’t be captured by the feature.
Which Browsers Work with This Feature?
- Microsoft Edge: Blocks websites and private browsing activity
- Firefox: Blocks websites and private browsing activity
- Opera: Blocks websites and private browsing activity
- Google Chrome: Blocks websites and private browsing activity
- Other Chromium-based browsers: Can filter private browsing activity but cannot block specific websites
Most popular web browsers support Windows 11’s Recall snapshots feature, letting you exclude websites. Microsoft Edge, Firefox, Opera, and Google Chrome can all block specific sites from being saved. Other Chromium-based browsers: These can filter private browsing activity but can’t block specific websites.
- Filtering specific websites only works fully in browsers like Microsoft Edge or Chrome.
- Private browsing sessions won’t be saved by Recall in supported browsers.
- When you open Recall and click the Now button, it shows your current screen without saving a new snapshot.
How to Exclude Websites from Recall Snapshots
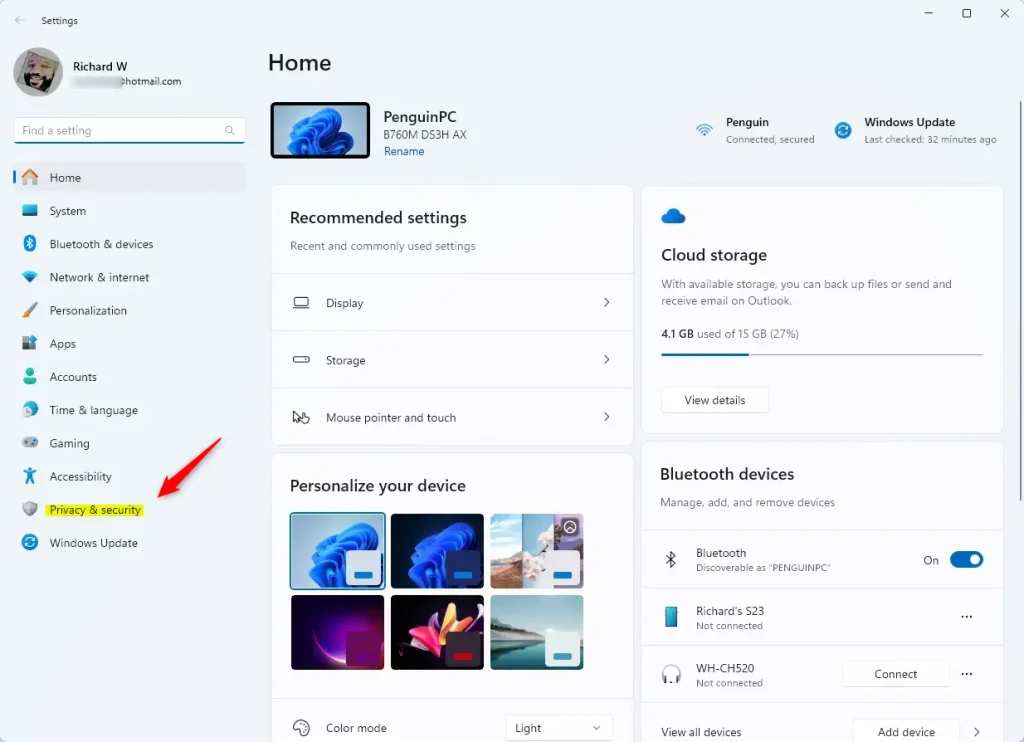
Excluding websites from Recall snapshots in Windows 11 is a privacy control you can manage through the Settings app. Open Settings by clicking the Start menu (the Windows icon at the bottom left) and selecting Settings, or by pressing the Windows key on your keyboard. Next, navigate to Privacy & Security by clicking it in the left-hand menu. Then, find and select Recall & snapshots on the right side. Ensure that “Save snapshots” is turned on. Finally, scroll down to the Filter lists section and click the Add website button. Type the website address into the box that appears (for example, ), and then click Add. This website will now be excluded from Recall snapshots.
- Open Settings: Click the Start menu (Windows icon at the bottom left) and select Settings, or press
Windows key + Ion your keyboard. Learn more about opening Settings - Go to Privacy & Security: In the left menu, click Privacy & security.
- Open Recall & Snapshots: On the right side, find and click Recall & snapshots. Make sure “Save snapshots” is turned on.
- Add Websites to Filter: Scroll to the Filter lists section and click the Add website button. A box will appear where you can type the website address (for example,
example.com). - Confirm: After typing the website, click Add. That website will now be excluded from Recall snapshots.
Windows 11 Privacy & Security menu in Settings
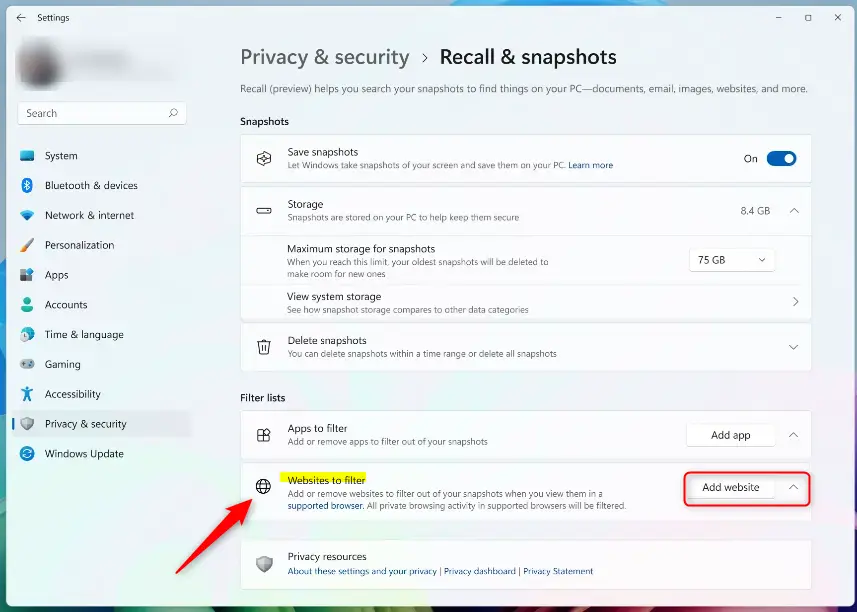
Adding websites to filter in Recall & Snapshots settings (Image: Microsoft)

Type website name and click Add to exclude it (Image: Microsoft)
Windows 11 Recall will no longer save snapshots of websites you add to the filter list. This exclusion prevents sensitive browsing history from being recorded. For example, if you add “mybank.com” to the list, Recall will ignore any activity on that site, ensuring your financial information remains private.
Why Use This Feature?
- Keep your private or sensitive websites out of Recall’s saved snapshots.
- Control what information your PC stores about your browsing history.
- Improve your privacy and feel more secure when using your computer.
Using the feature to exclude websites from Recall snapshots helps keep your private or sensitive sites out of your PC’s saved history. It gives you better control over what information your computer stores about your browsing habits, improving your overall privacy and making you feel more secure.
Summary
Windows 11’s Recall feature saves snapshots of your screen, but you can exclude websites you want to keep private by adjusting settings in most modern browsers and within Windows itself.
How do I disable Recall snapshots?
You can turn on or off saving snapshots at any time by going to Settings > Privacy & security > Recall & snapshots.
Does Recall take screenshots?
Recall is an AI feature that creates a searchable visual timeline of your PC activity. It takes periodic screenshots of your screen while you're working and indexes them locally using your device's NPU (Neural Processing Unit), a special chip designed for AI tasks.
Was this guide helpful?

About the Author
Richard
Tech Writer, IT Professional
Richard, a writer for Geek Rewind, is a tech enthusiast who loves breaking down complex IT topics into simple, easy-to-understand ideas. With years of hands-on experience in system administration and enterprise IT operations, he’s developed a knack for offering practical tips and solutions. Richard aims to make technology more accessible and actionable. He's deeply committed to the Geek Rewind community, always ready to answer questions and engage in discussions.


No comments yet — be the first to share your thoughts!