How to Reset Recall Feature in Windows 11

Resetting Recall in Windows 11 deletes all your saved snapshots and returns the feature to its original settings. This only applies to Copilot+ PCs, because other Windows 11 machines don’t have Recall at all. Recall is a built-in AI tool that takes pictures of your screen over time so you can search your past activity later. Microsoft stores these snapshots locally on your drive instead of sending them to the cloud, which is a large part of its privacy design.
Open Settings , go to Privacy & Security, select Recall & snapshots, click Advanced settings, then click Reset Recall and confirm. All saved snapshots are permanently deleted and Recall returns to its original state. No restart required.
Latest Update
It stays off until you choose to turn it on during setup. Once it is on, it saves a snapshot of your screen every few seconds so you can find past work later. A reset throws that history away completely. It gives you a clean slate when something breaks or when you are no longer comfortable with what has been captured.
Snapshots build up quickly because they are taken every few seconds. A reset removes that whole history, and Recall starts recording new activity from zero.
There are a few good reasons to reset:
- Recall is malfunctioning, for example search returns odd results or snapshots stop appearing.
- Old data has piled up and you want it gone.
- You have privacy concerns about what was captured in the past, such as a banking session or a private document.
A reset gives you a clean baseline for any future screen recording.
How to Reset Recall in 🪟 Windows 11
To reset Recall you start in the main Settings app . Press Win+I to open it right away. This action permanently deletes all saved snapshots and history, and there is no way to undo it. Before you go further, make sure you don’t need anything Recall has stored, such as a page or a document you meant to find again.
If your PC is managed by an employer or school, your administrator may control Recall through policy. In that case some options can be greyed out or missing, and you will need to ask your IT team. This applies to both Home and Pro editions.
- Open Windows Settings: Click the Start menu (the Windows icon on the taskbar), then click Settings. Or press Windows key + I to open Settings directly. You should now see the Settings window with a menu down the left side.
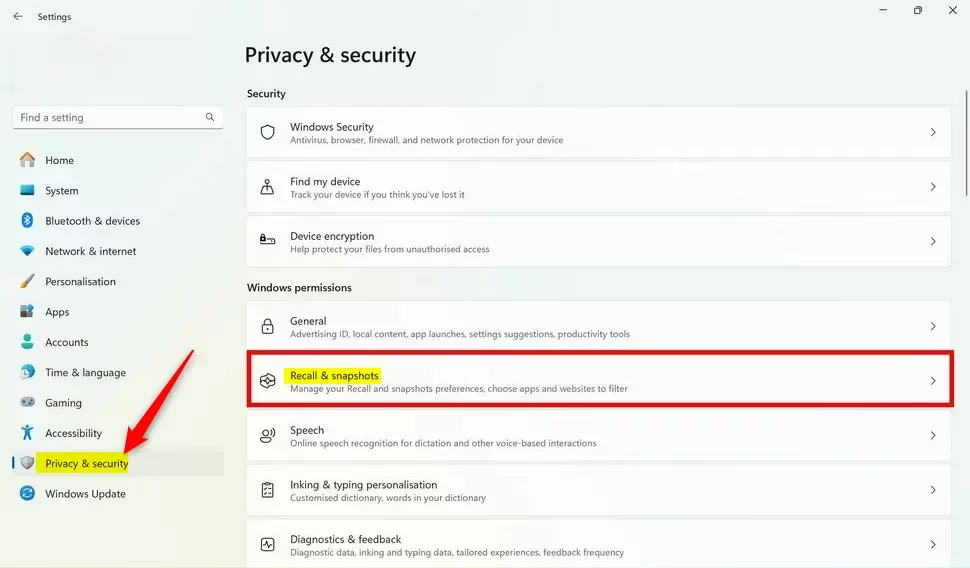
- Go to Privacy & Security: In the Settings window, look at the menu on the left side and click Privacy & security. The page on the right changes to a list of privacy categories.
- Select Recall & Snapshots: On the right side, find and click the Recall & snapshots section. Windows may ask you to verify your identity with Windows Hello (face, fingerprint or PIN) before it shows the page. If you don't see this section at all, your PC is probably not a Copilot+ PC, or Windows needs updating. Run Windows Update and check again.
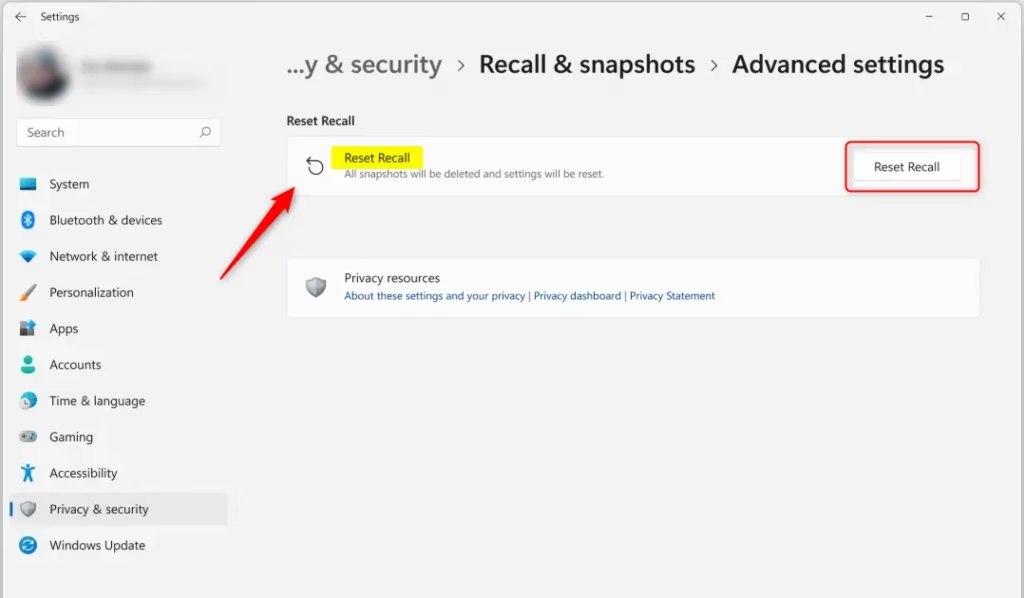
- Open Advanced Settings: Inside the Recall & snapshots page, click Advanced settings to see more options. The page expands or opens a further page with the extra controls.
- Click Reset Recall: Find and click the Reset Recall button. If the button is missing, the layout can differ between Windows 11 builds. In that case, look on the same Recall & snapshots page for the option to delete your saved snapshots.
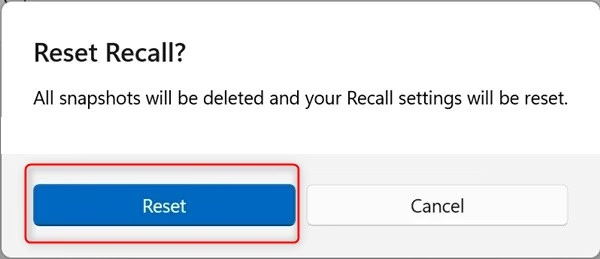
- Confirm the Reset: A prompt will appear asking if you want to reset. Read it, then click Reset to finish. Windows removes the snapshots and puts Recall back to its original settings.
The reset is now complete, and you can close the Settings app. A restart is normally not needed. If Recall still behaves oddly afterwards, restart the PC and open the Recall & snapshots page again to check its state. The deleted snapshots cannot be recovered. You can turn Recall back on later and it will begin capturing from scratch.
Summary
- Open Settings: Use the Start menu or press Windows + I.
- Go to Privacy & Security: Find the Recall & snapshots settings.
- Reset Recall: Click Advanced settings, then Reset Recall.
- Confirm: Click Reset when asked.
- Manage Snapshots: After the reset, you can start using Recall fresh or pause it at any time from the same page.
In short, a reset means going through your privacy settings to clear all stored history. Open Settings, go to Privacy & security, and click Recall & snapshots. From there, select Advanced settings, click the reset button, and confirm your choice to start fresh.
If you want to stop Recall entirely rather than reset it, you need to disable it. Go to Settings > Privacy & security > Recall & snapshots and switch the toggle to Off. That stops new snapshots from being created and saves storage space. Existing snapshots can also be deleted from this same menu. To undo this later, return to the same place and switch the toggle back on.
Latest Update
Managing Recall granularly involves accessing additional configuration menus. Options for 'Snapshot Management' and 'Sensitive Information Filtering' let users control storage limits and block specific apps from being recorded.
What is Recall?
Recall is a feature built for Copilot+ PCs. It captures periodic screenshots of your activity and builds a searchable history of past screen sessions. Think of it as a visual memory aid: it indexes what you did earlier on the computer so you can find it again quickly. All of that history is what a reset clears.
Have a question about this guide?
Answered by AI from this guide. Good questions may be added to this page — please don't include personal details.
Did this guide fix your problem?

About the Author
Richard
Tech Writer, IT Professional
Richard is a writer at Geek Rewind who turns complex IT tasks into clear, step-by-step guides. He draws on years of hands-on experience in system administration and enterprise IT operations, focusing on Windows, Linux and WordPress: the problems people actually run into, and the fixes that work. His server and WordPress guides come from systems he runs himself. Richard builds and maintains the platform behind Geek Rewind, from its Ubuntu servers and Nginx configuration to its custom WordPress plugins. Many new tutorials start with readers' questions, and he's always glad to answer them in the comments.
No comments yet — be the first to share your thoughts!