Windows 11: Manage Sensitive Information in Recall Snapshots
Windows 11 Recall snapshots let you manage sensitive information directly on your PC.
Recall is a new feature in Windows 11 that takes screenshots, called snapshots, of your computer activity to help you find things later. These snapshots are stored on your computer, not in the cloud.
A special filter built into Recall automatically hides private details like passwords and credit card numbers from these snapshots. This filtering happens on your device, keeping your information private.
Recall snapshots use encryption, like BitLocker, for protection. You have full control over what this filter hides, ensuring your sensitive data stays private in the snapshots.
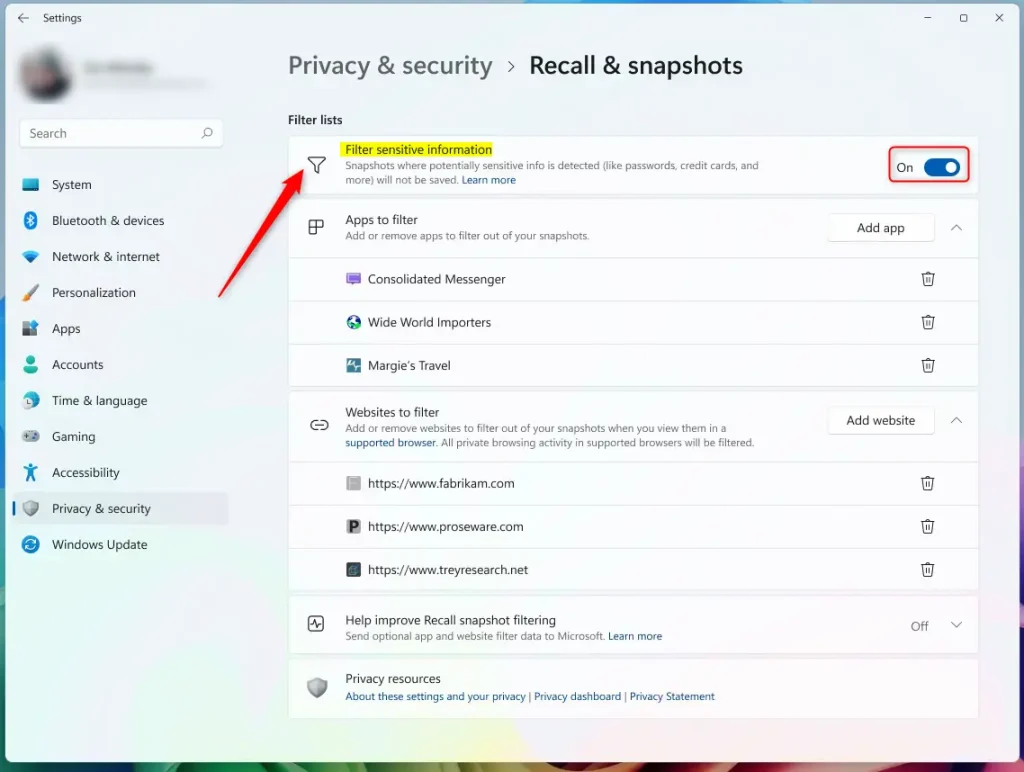
Enable the sensitive information filter in Recall Snapshots by going to Settings > Privacy & security > Recall & snapshots. Toggle “Filter sensitive information” to On. This hides details like passwords and credit card numbers from your snapshots.
Filter Sensitive Information in Recall Snapshots
You can stop Windows 11 Recall Snapshots from saving private details like passwords and credit card numbers. Turning on the sensitive information filter keeps your personal data out of your activity history, ensuring it stays safe and private. Here’s how to turn it on.
Here’s how to do it.
- Open the Windows Settings app. Click on the Start menu and select Settings. Or press the keyboard shortcut (Windows key + I) to launch the Settings app.
- When the Settings app opens, click the Privacy & security button on the left.

Windows 11 Privacy and Security settings menu for managing Recall snapshots - On the right, click the Recall & snapshots tile to open its settings.
- Under Filter lists, select the “Filter sensitive information” tile. [Requires Admin Privileges]
- Toggle the button to the On position to enable the filter.
Recall snapshots sensitive information - To disable it later, toggle the switch button to the Off position.
That’s all you need to do!
Reference
Summary
Windows 11 Recall Snapshots helps you see what you’ve done on your PC, and you can easily protect your privacy. The sensitive information filter hides passwords and credit card numbers from your snapshots, making it simple to keep your personal data safe while still using Recall.
- Better Privacy: The filter hides sensitive information like passwords and credit card numbers from your snapshots.
- Easy to Use: You can quickly enable or disable the filter through the Windows Settings app.
- Secure Storage: Recall stores your snapshots safely on your device only. Your data stays private.
- You’re in Control: You decide what gets saved. You can delete or pause the feature anytime.
- AI Power: This AI technology works like a photographic memory. It makes finding information much easier.
Where are Microsoft recall snapshots stored?
Snapshots and associated data are stored locally on the device. Recall does not share snapshots or associated data with Microsoft or third parties, nor is it shared between different Windows users on the same device.
How to see Windows Recall screenshots?
You can easily see your Windows Recall screenshots by clicking on the timeline in the Recall app’s navigation bar.
Was this guide helpful?

About the Author
Richard
Tech Writer, IT Professional
Richard, a writer for Geek Rewind, is a tech enthusiast who loves breaking down complex IT topics into simple, easy-to-understand ideas. With years of hands-on experience in system administration and enterprise IT operations, he’s developed a knack for offering practical tips and solutions. Richard aims to make technology more accessible and actionable. He's deeply committed to the Geek Rewind community, always ready to answer questions and engage in discussions.


No comments yet — be the first to share your thoughts!