How to Enable or Disable Windows Hello Fingerprint


Windows Hello fingerprint sign-in lets you unlock your Windows 11 PC and approve sign-ins to apps with one touch of your finger instead of typing a password. It works with any compatible fingerprint reader, whether it is built into a laptop or plugged in as a USB scanner.
Before you start, you need two things: a fingerprint sensor that supports Windows Hello, and a PIN already set up on your account. Windows requires the PIN as a fallback if the sensor fails or does not recognize your finger. Registering a fingerprint takes about two minutes in the Settings app.
Enable fingerprint sign-in by going to Settings, Accounts, Sign-in options, and selecting Fingerprint recognition (Windows Hello). Follow the on-screen prompts to set it up. To disable, turn off the Fingerprint recognition option in the same menu.
Why Use Windows Hello Fingerprint?
Biometric sign-in means using a physical trait, such as a fingerprint, to prove who you are. It is faster than typing a password. It also means someone who learns your password still cannot sign in to your PC without your finger.
How to Set Up Windows Hello Fingerprint
Windows Hello fingerprint setup uses the standard Settings app . You must already have a PIN set up before you can register a fingerprint. If the fingerprint option is greyed out or missing, check that your sensor is detected and that the PIN is in place. This is the usual cause.
- Open Settings. The Settings window appears with the system categories listed on the left.
- Go to Accounts Sign-in options The page lists every sign-in method available on your PC, such as facial recognition, fingerprint recognition, PIN and password.
- Select Fingerprint recognition (Windows Hello) to expand it. If this entry is not listed, Windows has not found a compatible sensor. Check that it is connected and that its driver is installed.
- Click Set up and follow the on-screen instructions. Windows asks for your PIN first. It then asks you to touch or swipe the sensor several times so it can capture different parts of your finger. When it finishes, you should see a message that the setup is complete.
After setup, lock the PC with Win+L and try the sensor on the sign-in screen. You can add more fingers or remove a saved fingerprint from the same Fingerprint recognition (Windows Hello) section. To turn the feature off for your own account only, remove your fingerprint there. The PIN keeps working.
Troubleshooting: Fingerprint Issues
Updating the device driver usually fixes a fingerprint sensor that does not respond. To do it:
- Right-click the Start button and select Device Manager.
- Expand Biometric devices. Your fingerprint sensor should be listed there.
- Right-click the sensor and select Update driver, then Search automatically for drivers.
- Restart the PC if Windows installs a new driver, then test the sensor again.
If Windows reports that the best driver is already installed, check the laptop or sensor maker's support site for a newer driver. Settings Windows Update Advanced options Optional updates can also list driver updates.
Advanced Control: Registry Editor
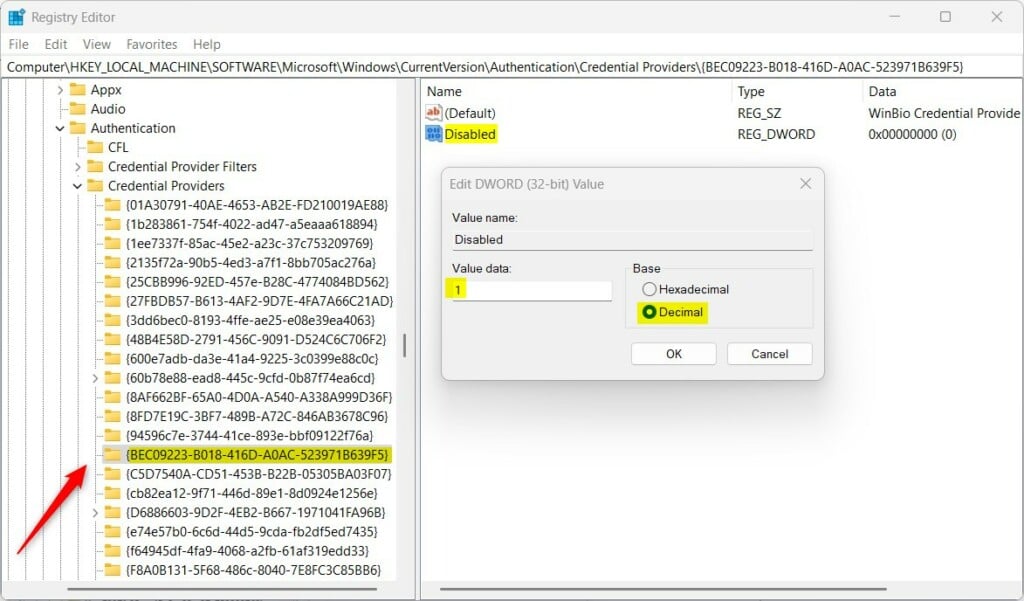
You can disable Windows Hello fingerprint for the whole computer with the Registry Editor, a database of low-level Windows settings. This blocks biometric sign-in for every user account. Because the change affects everyone who uses the PC, work carefully. Back up the registry or create a restore point first. You need an administrator account to make the change.
Follow these steps to disable fingerprint sign-in for all users:
This method is meant for system administrators. Once you have opened the key shown in the steps above, do the following:
- Look in the right-hand pane for a value named DomainAccounts or Disabled.
- If the value is there, double-click it, set the Value data to 1, and click OK.
- If you do not see the value, right-click an empty space in the right-hand pane, select New DWORD (32-bit) Value, and name it Disabled. Then double-click it, set the Value data to 1, and click OK.
- Close the Registry Editor and restart your computer to finish. After the restart, fingerprint sign-in should no longer be offered.
To undo the change, set the value back to 0 (or delete the value you created) and restart. If you manage a Pro, Enterprise or Education edition, Group Policy is a safer way to control biometrics than editing the registry by hand. Windows 11 Home does not include the Group Policy editor.
Summary
Windows Hello fingerprint is a quick and safe way to sign in to your computer. You can set it up in a couple of minutes from Settings. It is easy to remove again, either for one account or for the whole PC. Keep your PIN set up, because Windows needs it as a backup whenever the sensor cannot read your finger.
Have a question about this guide?
Answered by AI from this guide. Good questions may be added to this page — please don't include personal details.
Did this guide fix your problem?

About the Author
Richard
Tech Writer, IT Professional
Richard is a writer at Geek Rewind who turns complex IT tasks into clear, step-by-step guides. He draws on years of hands-on experience in system administration and enterprise IT operations, focusing on Windows, Linux and WordPress: the problems people actually run into, and the fixes that work. His server and WordPress guides come from systems he runs himself. Richard builds and maintains the platform behind Geek Rewind, from its Ubuntu servers and Nginx configuration to its custom WordPress plugins. Many new tutorials start with readers' questions, and he's always glad to answer them in the comments.
[…] It provides a more personal and secure way to sign into Windows using a PIN, facial recognition, fingerprint, passkey, and […]
[…] account sign-in screen, use your passkey by choosing the Sign-in options and then selecting face, fingerprint, PIN, or security […]
[…] use your passkey by choosing the Sign-in options and then selecting face, fingerprint, PIN, or security […]
[…] use your passkey by choosing the Sign-in options and then selecting face, fingerprint, PIN, or security […]
[…] How to Use Fingerprint Sign-In […]