Windows 11 Fingerprint Setup: Add More Fingers


Windows Hello fingerprint setup lets you store up to 10 different fingers on your PC, so you can sign in quickly without typing a password. Adding extra fingers from either hand gives you working backups when your main finger is wet, dirty, or hard to press against the scanner at an awkward angle.
You can set up multiple fingerprints in a few minutes in the Windows 11 Settings app . Extra prints mean you always have a reliable way to unlock your computer if your primary finger fails to read. The steps below cover the requirements, the setup itself, and what to check if the sensor misbehaves.
Windows 11 fingerprint setup lets you add more fingers in Settings Accounts Sign-in options. Open Settings with Win+I, select Fingerprint recognition (Windows Hello), then click Set up another finger and scan it. You can register up to 10 fingers, and you need your PIN and a TPM 2.0 chip enabled.
Prerequisites for 🪟 Windows 11 Fingerprint Setup
Your PC also needs TPM 2.0 (Trusted Platform Module 2.0, a security chip on your motherboard) enabled in the system firmware, which gives Windows Hello hardware-level protection for your sign-in data. Windows 11 already lists TPM 2.0 as a system requirement, so most PCs that run it have the chip. If it is switched off, you turn it on in the firmware (BIOS/UEFI) settings.
Before you start, check these things:
- Your fingerprint reader is plugged in (if it is a USB model) and shows no error in Device Manager.
- You are signed in with an administrator account. Windows asks you to verify your identity during setup.
- You already have a Windows Hello PIN on the account. Windows asks for it before it lets you change fingerprint settings.
- Your finger and the sensor are clean and dry.
Why use fingerprint recognition?
Fingerprints unlock your computer faster than typing a long password. Registering more fingers gives you flexibility, so you can still sign in if one hand is busy or dirty. It also helps when you share a laptop position, such as using it on the left side of a desk, where one hand is closer to the sensor. These benefits apply to Home and Pro alike.
What happens when done?
Once you finish the steps, Windows recognizes the new finger as a valid way to sign in. You can test it right away:
- Press the Windows key + L to lock the PC.
- On the lock screen, touch the sensor with the finger you just registered.
- Check that you land on your desktop. If Windows does not recognize the finger, use your PIN to sign in and repeat the setup for that finger.
How to Add More Fingers
In short, Windows 11 fingerprint setup lets you add extra fingers so you can sign in with whichever hand is free. The path is Settings Accounts Sign-in options From there you pick the fingerprint option and scan another finger. You can register up to ten fingers in total, which makes it easier to unlock your device from any angle.
- Open the Settings app.
- Go to Accounts.
- Select Sign-in options.
- Choose the fingerprint option and scan the new finger.
The next sections walk through each of these steps in detail.

Typing Settings into the taskbar search box is another way to open the app. Press Enter or click the Settings result when it appears. Pressing the Windows key + I also opens Settings directly.
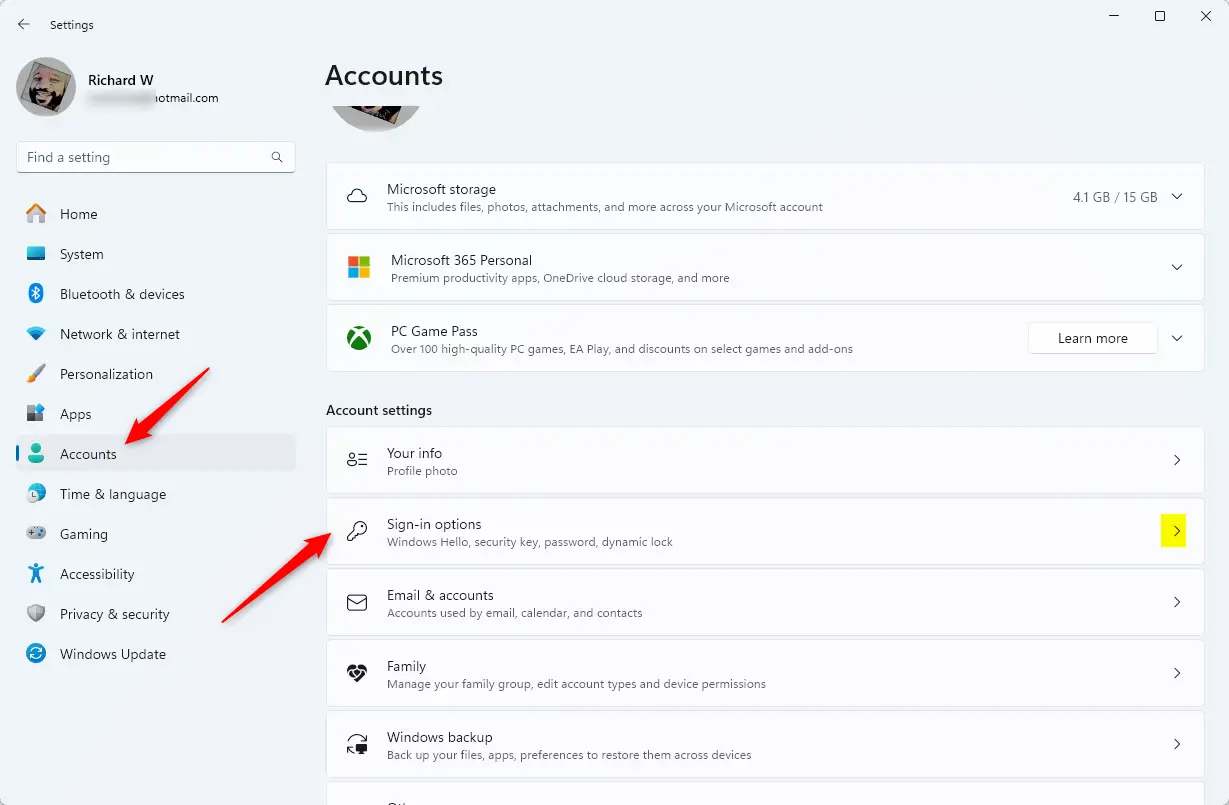
- Click Accounts in the list on the left side of the Settings window.
- Select the Sign-in options tile on the right. The page now shows the ways you can sign in to this PC, such as face recognition, fingerprint recognition, PIN and password.
If you do not see a fingerprint tile, Windows has not detected a compatible reader. Skip ahead to the troubleshooting section.
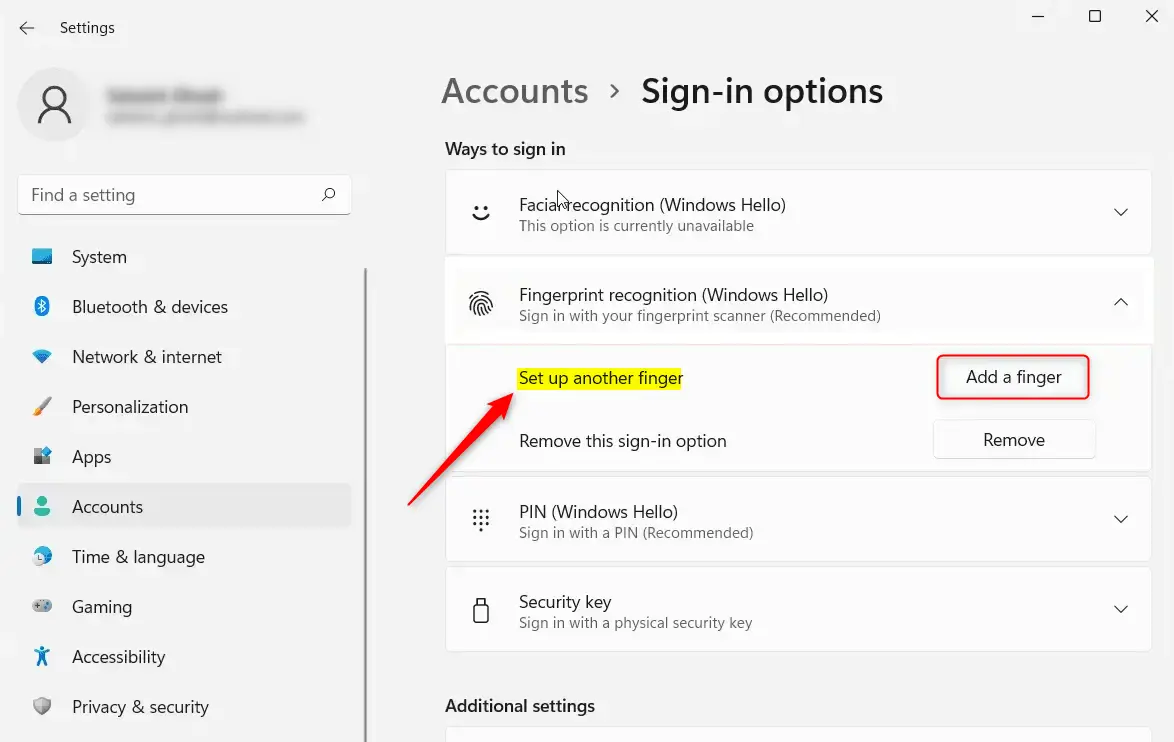
- Locate the Fingerprint recognition (Windows Hello) tile and click it to expand its options.
- Click the button that says Set up another finger. On some builds the button may read Add another finger, and on a PC with no registered fingers it may just say Set up. All three start the same process.
- Wait for the Windows Hello setup window to open.
If the button is greyed out, check that you are signed in as an administrator and that the sensor shows no errors.
- Enter your account PIN when Windows asks. This confirms you are allowed to make the change.
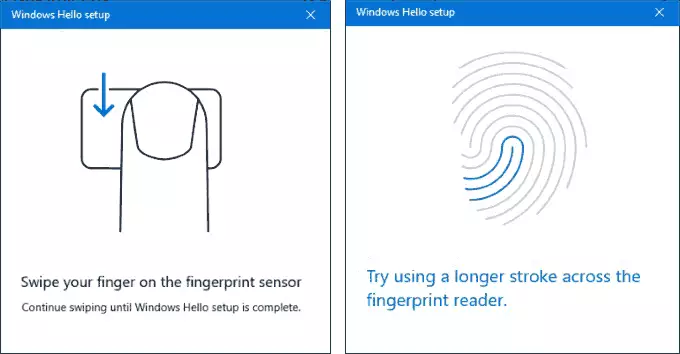
- Follow the instructions on the screen. Windows tells you when to touch the sensor.
- Place the finger you want to register on the fingerprint sensor.
- Lift the finger and touch the sensor again. Repeat this several times, moving the finger slightly each time so you capture the edges of the print as well as the center. Windows needs a complete scan, and the progress shows on screen as each touch is read.
If the scan stalls, wipe the sensor, dry your finger, and try again with a firmer, flatter touch.
When the scan finishes, a confirmation message tells you it worked. From here you have two options:
- Click the button to add another finger and repeat the steps for each one, up to ten in total.
- Close the window to finish.
To undo this later, return to Settings Accounts Sign-in options, open the fingerprint tile, and use the Remove option. Removing a finger does not affect your PIN or password.
Troubleshooting Common Issues
If the sensor is faulty or Windows does not offer fingerprint setup, start with Device Manager. Check the Biometric devices section for the reader. A warning icon next to it means the driver has a problem.
- Right-click the Start button and select Device Manager.
- Expand the biometric entry, right-click the fingerprint reader and choose Update driver.
- Pick the option to search for drivers automatically.
- Restart the PC if Windows asks.
If Windows finds nothing newer, visit the PC or sensor manufacturer's website for a driver made for your exact model. Also run Windows Update, since some fingerprint drivers arrive that way. If the reader is a USB device, try a different port.
Summary
Windows Hello makes signing in to a computer safe and personal. Following these steps in the Settings app registers multiple fingers for faster access. Your fingerprint data stays secure on the device, and you no longer need to type a password every time you sign in. Your PIN and password still work as backups if a fingerprint ever fails.
Have a question about this guide?
Answered by AI from this guide. Good questions may be added to this page — please don't include personal details.
Did this guide fix your problem?

About the Author
Richard
Tech Writer, IT Professional
Richard is a writer at Geek Rewind who turns complex IT tasks into clear, step-by-step guides. He draws on years of hands-on experience in system administration and enterprise IT operations, focusing on Windows, Linux and WordPress: the problems people actually run into, and the fixes that work. His server and WordPress guides come from systems he runs himself. Richard builds and maintains the platform behind Geek Rewind, from its Ubuntu servers and Nginx configuration to its custom WordPress plugins. Many new tutorials start with readers' questions, and he's always glad to answer them in the comments.
Dropped waivers biometrics controls access to people & others.