How to Add or Remove Widgets on Windows 11 Taskbar

The Widgets button sits on the taskbar next to the Start button . It opens a panel with live weather, news, sports and stock prices. Microsoft added the feature in Windows 11 build 22000 so you can see personal updates without opening a browser.
If you don’t use it, you can hide the button in under a minute. Turning it off removes the icon from the taskbar completely. You can turn it back on whenever you want the weather again. This guide covers two ways to do it: the Settings app , which works on every edition, and the Registry Editor, which is the fallback when Settings won’t cooperate.
To remove widgets from your Windows 11 taskbar, open Settings , go to Personalization, select Taskbar, and toggle Widgets to Off. You can also use the Registry Editor by navigating to 🗝️HKEY_CURRENT_USER\
What Are Widgets in 🪟 Windows 11?
Widgets are small cards that show live information at a glance, so you don’t have to open a full browser or app. The panel can show:
- Weather for your area.
- Current news.
- Stock market prices.
- Sports scores.
When you click the Widgets button on the taskbar , the widgets board opens with these cards. Hiding the button only removes the icon. It does not uninstall anything, so you can bring it back at any time.
Option 1The Easy Way Using Settings
The Settings app is the easiest way to show or hide the button. You don’t need to edit any system files, and it works the same on Windows 11 Home and Pro.
Step 1Open Windows Settings
- Press Win+I together on your keyboard.
- Or click the Start button, then click the Settings gear icon.
The Settings window should now be open.
Step 2Go to Personalization and Taskbar Settings
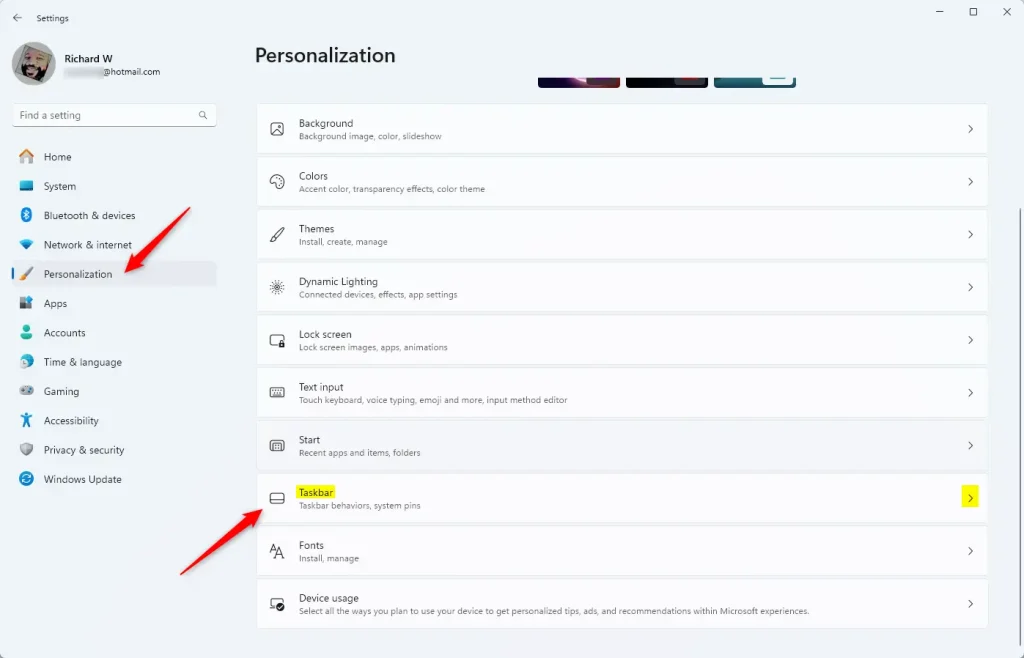
- In the left-hand menu, click Personalization.
- On the right side, click Taskbar.
You should now see the taskbar options. You can also reach this page by right-clicking an empty spot on the taskbar and choosing Taskbar settings.
Step 3Change Taskbar Items
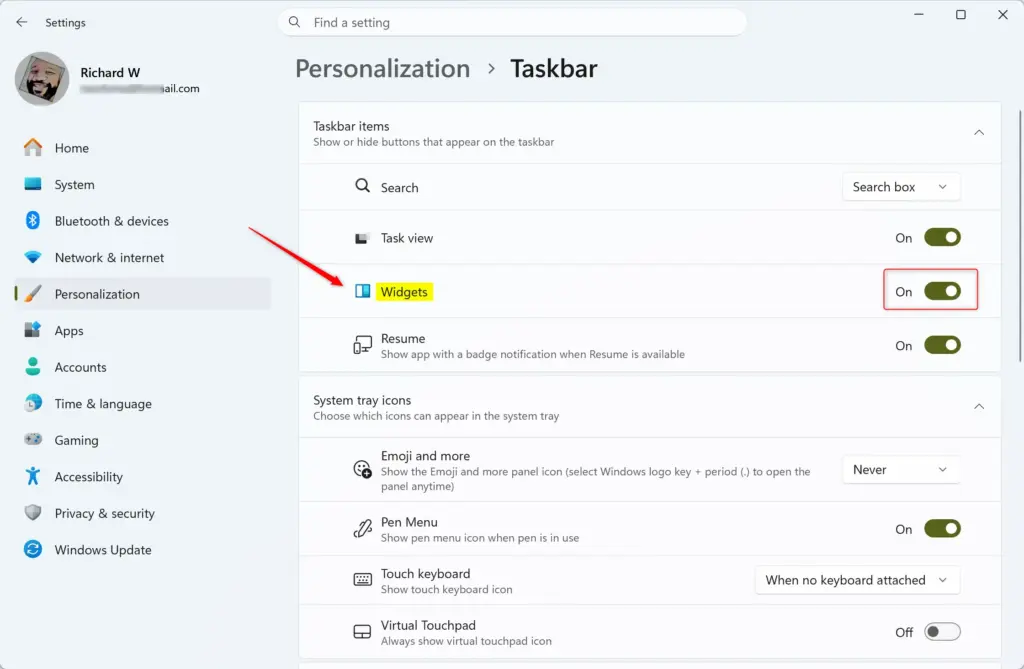
- Find the Taskbar items section at the top of the page.
- Find the switch labeled Widgets.
- Turn the switch On to show the Widgets button, or Off to hide it.
If the switch is greyed out, the PC is probably managed by a work or school administrator who has locked the setting. In that case, ask your IT department, or see the Registry method below if you manage the PC yourself.
The change shows on your taskbar straight away. You do not need to restart the computer. If you turned the switch on, the Widgets button should appear. If you turned it off, the button should be gone.
Step 4Close Settings
Close the Settings window. Your taskbar keeps the setting you chose. To undo it later, come back to the same page and flip the switch the other way.
Option 2Using the Registry Editor (For Advanced Users)
You can also add or remove the Widgets button by editing the Windows Registry, a database of low-level system settings. Use this method when the Settings toggle is missing or doesn’t work, or when you want to script the change.
Open Registry Editor, go to File Export, choose a location, and save a copy of the Registry somewhere safe. If something goes wrong, you can double-click that file to restore the saved settings.
Step 1Open the Registry Editor
- Press Win+R on your keyboard to open the Run box.
- Type
regeditand press Enter or click OK. - If a User Account Control message asks for permission, click Yes.
The Registry Editor window should now be open, with a folder tree on the left.
Step 2Go to the Right Location
In the Registry Editor, go to the key shown below.
HKEY_CURRENT_USER\Software\Microsoft\Windows\CurrentVersion\Explorer\Advanced
You can paste the path into the address bar at the top of the Registry Editor and press Enter. Or you can expand the folders in the left panel one by one. When you reach the right key, its values are listed in the right panel.
Step 3Find and Change the ‘TaskbarDa’ Value
In the right panel, look for a value called TaskbarDa. This value controls whether the Widgets button appears on the taskbar . If you don’t see it, you need to create it first as a new DWORD (32-bit) value. Right-click an empty area in the right panel, choose New DWORD (32-bit) Value, and name it exactly as shown.
Double-click TaskbarDa to open it. The Edit DWORD dialog should appear.
Step 4Set the Value Data
Enter the number in the Value data box, then click OK:
- To ADD the Widgets button: set the “Value data” to
1. - To REMOVE the Widgets button: set the “Value data” to
0.
The value works as a simple switch. A value of 1 turns the button on. A value of 0 turns it off and removes it from the taskbar completely. To undo your change, set the value back to the other number.
To restart Windows Explorer :
- Press Ctrl+Shift+Esc to open Task Manager .
- On the Processes tab, find Windows Explorer .
- Right-click it and select Restart.
The taskbar will disappear for a moment and then come back with your new setting. On some recent Windows 11 builds, the system may refuse to save changes to this value and show an error. If that happens, use the Settings method above instead.
Step 5Close the Registry Editor
You are finished with the Registry Editor, so you can close the window.
Summary
You can show or hide the Windows 11 taskbar widgets button with either the Settings app or the Registry Editor. Settings is the quickest and safest choice, and it takes effect immediately. The Registry method is there for cases where Settings isn't available, and it may need an Explorer restart. Either way, the change is easy to reverse.
Have a question about this guide?
Answered by AI from this guide. Good questions may be added to this page — please don't include personal details.
Did this guide fix your problem?

About the Author
Richard
Tech Writer, IT Professional
Richard is a writer at Geek Rewind who turns complex IT tasks into clear, step-by-step guides. He draws on years of hands-on experience in system administration and enterprise IT operations, focusing on Windows, Linux and WordPress: the problems people actually run into, and the fixes that work. His server and WordPress guides come from systems he runs himself. Richard builds and maintains the platform behind Geek Rewind, from its Ubuntu servers and Nginx configuration to its custom WordPress plugins. Many new tutorials start with readers' questions, and he's always glad to answer them in the comments.
[…] Widgets board is a new feature that provides quick access to news, weather, sports, and other information. It can […]
[…] Windows 11 is centered on the screen and shows the Start menu, Search, Task View, Widgets, Teams Chat, File Explorer, Microsoft Edge, and Microsoft Store buttons by […]
[…] When you swipe from the right edge of your screen, it opens the Notification Center. If you do the same from the left side, it opens Windows Widgets. […]
[…] change it, open the Widgets by pressing the Windows key + W on the […]
[…] post shows students and new users steps to sign in or out of the Widgets board in Windows […]
[…] The Widgets board is a new feature that provides quick access to news, weather, sports, and other information. It can be accessed by clicking the Widgets icon in the taskbar or pressing the Windows key + W shortcut. The board appears as a slide-out panel on the left side of the screen and can be customized to show or hide specific feeds. […]
[…] The Taskbar in Windows 11 is centered on the screen and shows the Start menu, Search, Task View, Widgets, Teams Chat, File Explorer, Microsoft Edge, and Microsoft Store buttons by […]