How to Switch HKCU and HKLM Registry Keys in Windows 11


Switching between HKCU and HKLM registry keys in Windows 11 lets you jump between user-specific settings and system-wide configurations in the Registry Editor (the database that stores Windows settings ).
🗝️HKEY_CURRENT_USER (HKCU) holds settings for whoever is signed in right now, while 🗝️HKEY_LOCAL_MACHINE (HKLM) contains settings that apply to every user account on the computer. Knowing how to move between these two areas helps you find and change Windows settings faster.
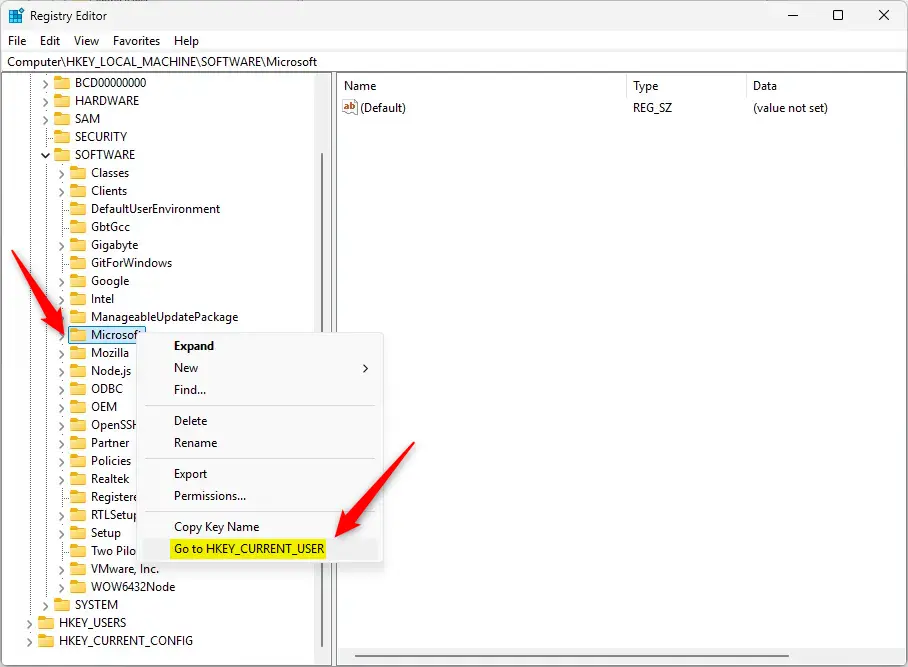
To quickly switch between HKCU and HKLM keys in Windows 11 Registry Editor, find a matching key in one branch, right-click it, and select “Go to”. This option will instantly jump you to the equivalent key in the other branch if the path exists in both.
How to Switch Between HKCU and HKLM
You can switch between HKCU and HKLM in Registry Editor by using a hidden shortcut that jumps straight to the exact same folder in the other section. This saves you from digging through long folder lists by hand when you need to compare user settings and system settings.
- Open the Registry Editor. You can do this by searching for “Registry Editor” in the Windows search bar .
- Navigate to a specific key (like a folder) in either the 🗝️HKEY_CURRENT_USER or 🗝️HKEY_LOCAL_MACHINE section.
- Right-click on that key.
- From the menu that appears, select “Go to”.
- A small window will pop up asking you to enter the path for the other section. Type the path for the same key in the other section (e.g., if you were in HKCU, type the HKLM path).
For example, if you are at HKEY_CURRENT_USER\Control Panel\Desktop and want to go to the same location in HKLM, right-click the key, select “Go to”, and then enter HKEY_LOCAL_MACHINE\Control Panel\Desktop.
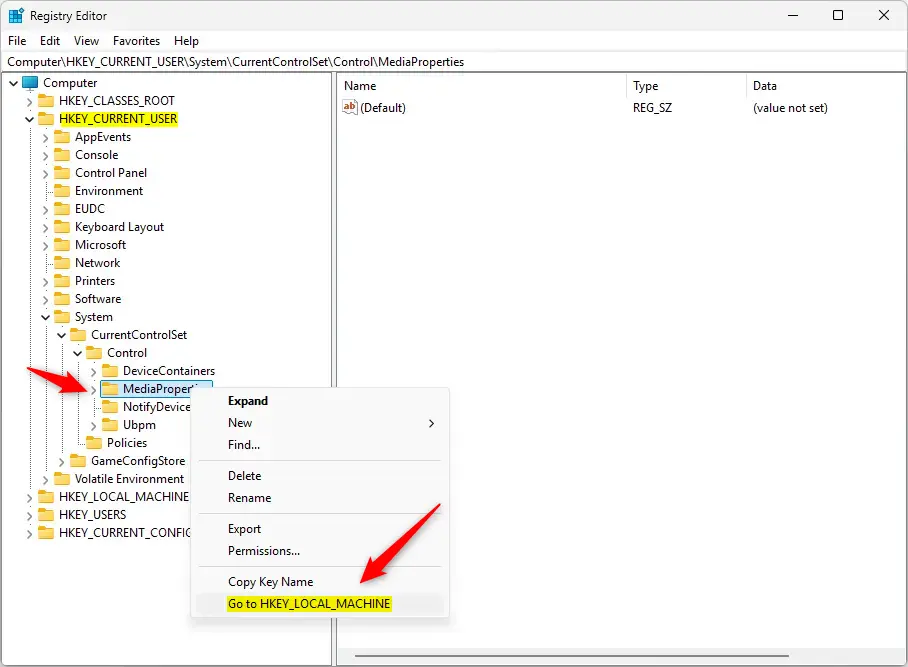
You can quickly switch between 🗝️HKEY_CURRENT_USER (HKCU) and 🗝️HKEY_LOCAL_MACHINE (HKLM) registry keys in both directions. This means if you begin in the HKLM registry hive, you can then navigate to the HKCU registry hive using the same shortcut.
Keep in mind, this trick only works if the exact same key path exists in both 🗝️HKEY_CURRENT_USER and 🗝️HKEY_LOCAL_MACHINE.
Summary
Registry Editor stores Windows settings in two main sections called HKEY_CURRENT_USER and HKEY_LOCAL_MACHINE. HKEY_CURRENT_USER stores settings for just your user account, while HKEY_LOCAL_MACHINE stores settings that affect every person who uses the computer.
The "Go to" command lets you quickly jump to the same key location in HKCU and HKLM, as long as the key exists in both.
Was this guide helpful?

About the Author
Richard
Tech Writer, IT Professional
Richard is a writer at Geek Rewind who turns complex IT tasks into clear, step-by-step guides. He draws on years of hands-on experience in system administration and enterprise IT operations, focusing on Windows, Linux and WordPress: the problems people actually run into, and the fixes that work. His server and WordPress guides come from systems he runs himself. Richard builds and maintains the platform behind Geek Rewind, from its Ubuntu servers and Nginx configuration to its custom WordPress plugins. Many new tutorials start with readers' questions, and he's always glad to answer them in the comments.



No comments yet — be the first to share your thoughts!