How to Configure Environment Variable Paths in Windows 11 Advanced System Settings

Environment variable paths in Windows 11 are text values that point programs to specific folders on your computer so apps can find the files they need to run. Set up correctly, they let you launch command-line tools and programs from any folder in Command Prompt or PowerShell without typing the full file path every time.
Windows splits these settings into 2 distinct scopes: User variables that apply only to your signed-in account, and System variables that affect every user account on the machine. This guide covers the graphical method, PowerShell, Command Prompt, safe editing of the Path variable, and fixes for changes that do not seem to work.
Open Settings , type Environment Variables, and select Edit the system environment variables. In the System Properties window, click Environment Variables at the bottom right. Under User variables or System variables, click New, enter the variable name and value, click OK twice. Close and reopen any open terminals or apps to apply the change.
What Are Environment Variables?
An environment variable is a named value that tells Windows and running programs where to find important files, folders, and system settings. Variables hold details such as system paths and temporary folder locations, so apps can run without hardcoded directory paths.
The Path variable is the one you will edit most often. It holds a list of folders. When you type a command such as a tool name in a terminal, Windows searches those folders, in order, for a matching program.
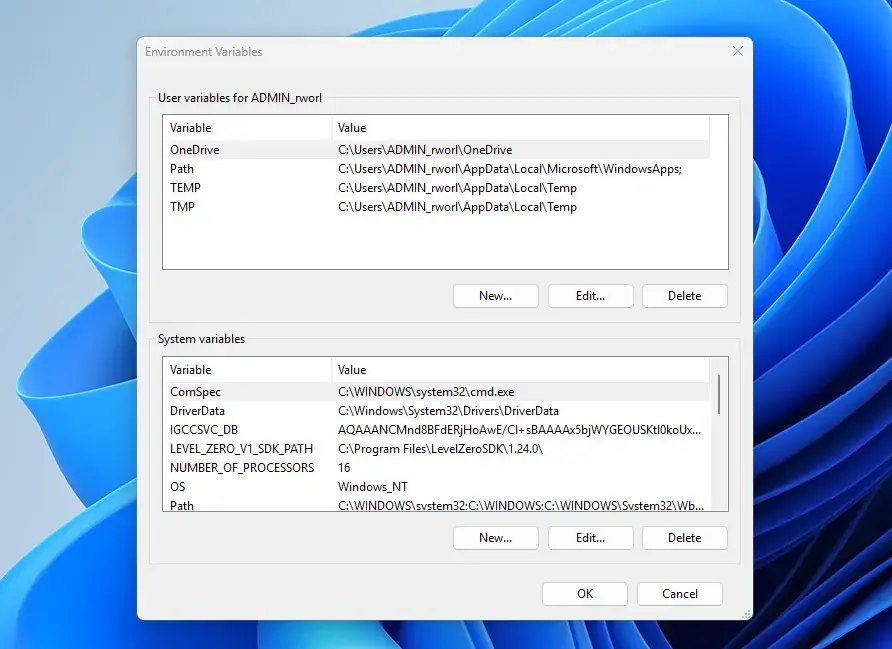
Windows splits variables into User variables and System variables. User variables remain exclusive to your profile, while System variables control system-wide behavior. If multiple accounts exist on one machine, each user profile keeps its own set of user-specific values.
When both scopes define the same variable, they do not simply override each other. For Path, Windows combines the two lists when you sign in, with the System entries first and your User entries after them. For most other variables, the User value takes priority over the System value.
As a rule, use User variables unless every account on the PC needs the setting. Changing System variables needs administrator rights, and a mistake there affects everyone.
How to Open Environment Variables in Windows
You open environment variables in Windows 11 from the System Properties window, which you reach through the Start menu search. This built-in window lets you view, add, and change both user-specific and system-wide values without third-party software.
- Press the Windows Key and type
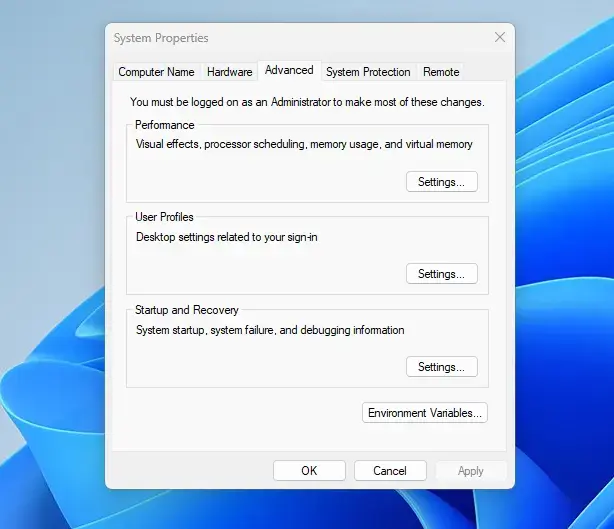
Environment Variables. The search results should show Edit the system environment variables. - Select Edit the system environment variables. The System Properties window opens on the Advanced tab. If you are not signed in as an administrator, Windows may ask for admin credentials first.
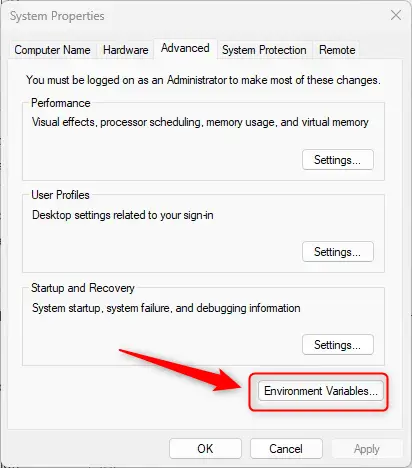
- Click the Environment Variables... button at the bottom right of the System Properties window. The Environment Variables window opens.
- Review the top section for User variables and the bottom section for System variables. If the buttons under System variables are greyed out or fail to save, your account is a standard account. Sign in with an administrator account to change them.
Set Environment Variables using the Graphical User Interface
You can set an environment variable using the graphical interface by editing the user or system lists in the Environment Variables window. Changes made this way are permanent. They survive closing the window and restarting the PC, and you do not have to type any commands.
- Open the Environment Variables window using the steps in the previous section.
- Choose the scope. Under User variables or System variables, click New... to create an entry. To change an existing variable instead, select it and click Edit.... A small dialog box opens.
- Type the name of the variable in the Variable name field.
- Type the directory path or configuration value in the Variable value field. If you are unsure of a folder path, copy it from the File Explorer address bar.
- Click OK to save the variable. It now appears in the list.
- Click OK again on the main window to apply the changes. If you click Cancel instead, nothing is saved.
Apps and terminals that were already open will not see the new value. Close and reopen them, as covered in the troubleshooting section. To undo a change, select the variable in the list and click Delete, or edit it back to its old value.
Set Environment Variables using PowerShell
You can set an environment variable in PowerShell by using command syntax to create or update values directly from the command line. This lets you manage variables quickly. Changing system-wide settings requires a terminal opened with administrator rights.
- Open the Start menu and type
PowerShell. - Right-click Windows PowerShell and select Run as administrator. Click Yes if the User Account Control prompt appears.
- Type
$env:VARIABLE_NAME="Value"and press Enter to set a temporary session variable, replacingVARIABLE_NAMEandValuewith your specific details. This value lasts only until you close the PowerShell window, which makes it handy for testing. - Type
::SetEnvironmentVariable("VARIABLE_NAME", "Value", "User")and press Enter to save a user-level variable permanently. It applies to your account only. - Type
::SetEnvironmentVariable("VARIABLE_NAME", "Value", "Machine")and press Enter to save a system-level variable permanently. This requires administrator privileges, which is why you opened PowerShell as administrator. - Type
Get-ChildItem Env:and press Enter to view a complete list of all currently active environment variables in your session.
A permanent variable saved this way is not picked up by the PowerShell window you are typing in. Open a new window to see it.
Set Environment Variables from Command Prompt
You can set an environment variable from Command Prompt with the built-in set and setx commands. set changes a variable for the current window only. setx writes a permanent change that is stored in the registry.
- Open the Start menu and type
cmd. - Right-click Command Prompt and select Run as administrator. Click Yes if the User Account Control prompt appears.
- Type
set VARIABLE_NAME=Valueand press Enter to create or modify a variable for the current command prompt session. It disappears when you close the window. - Type
setx VARIABLE_NAME "Value"and press Enter to write a user-level variable permanently to the registry. You should see a message that the value was saved. - Type
setx VARIABLE_NAME "Value" /Mand press Enter to write a system-level variable permanently. This requires administrator privileges. - Type
setand press Enter to list all active environment variables currently loaded in your command prompt session.
Open a new Command Prompt to see the result. Be careful using setx on the Path variable, because it replaces the whole value rather than adding to it. Use the graphical editor for Path instead.
Managing the Path Variable Safely
The Path variable tells Windows where to find executable files. A mistake here, such as deleting a system folder, can break standard network and system tools.
- Open the Environment Variables window.
- Select the Path variable under User variables or System variables, then click Edit.... The Edit environment variable window opens with each folder on its own line. Use User variables unless every account needs the folder.
- Click New to add a new folder path to the list. A blank line appears at the bottom, ready for typing.
- Click Browse to locate and select the folder visually rather than typing it manually. This avoids typos.
- Click Move Up or Move Down to change the search priority of the selected folder. Windows checks folders from the top down and uses the first match.
- Click Delete to remove an obsolete or broken directory reference. Only remove entries you recognize and know are no longer needed.
- Click OK to save your changes, then click OK again in the Environment Variables window. Open a new terminal window to test.
Before making large changes, click Edit text in the same window if it is shown, and copy the existing list into Notepad as a backup. If something breaks, you can paste the old list back in.
Troubleshooting Common Environment Variable Issues
Most environment variable problems come down to programs still holding the old values. Running programs read the variables once when they start and keep them, so newly saved variables often do not show up until those programs restart. Work through these steps in order, from least to most disruptive.
- Close and reopen any active Command Prompt, PowerShell, or third-party application windows to force them to read the newly updated environment table. This includes code editors with a built-in terminal.
- Sign out of your Windows account and sign back in if user-level changes fail to register across background desktop processes.
- Restart your computer if system-level changes or service modifications fail to take effect. Services read system variables when they start, so a restart is the reliable fix.
- Verify that folder paths do not contain trailing spaces, typos, or missing backslashes that break directory resolution. Open the folder in File Explorer and compare the path to what you entered.
- Run a registry check if persistent variables disappear after a reboot, and make sure third-party cleanup utilities are not stripping custom keys from the registry hive. Try disabling or removing the cleanup tool, then set the variable again.
What to do next
You should now see your newly configured variables active within your terminal sessions and applications. If a variable is still missing, open a fresh terminal window and check it again before changing anything else. Next, you can move on to configuring startup programs or setting up PowerShell profiles to automate your command-line environment.
Have a question about this guide?
Answered by AI from this guide. Good questions may be added to this page — please don't include personal details.
Did this guide fix your problem?

About the Author
Richard
Tech Writer, IT Professional
Richard is a writer at Geek Rewind who turns complex IT tasks into clear, step-by-step guides. He draws on years of hands-on experience in system administration and enterprise IT operations, focusing on Windows, Linux and WordPress: the problems people actually run into, and the fixes that work. His server and WordPress guides come from systems he runs himself. Richard builds and maintains the platform behind Geek Rewind, from its Ubuntu servers and Nginx configuration to its custom WordPress plugins. Many new tutorials start with readers' questions, and he's always glad to answer them in the comments.
No comments yet — be the first to share your thoughts!