How to Enable System Protection in Windows 11
System Protection in Windows 11 creates restore points, which act like a “save game” for your PC. This feature lets you roll back your computer to an earlier, working state if a new program, driver, or update causes problems.
Restore points are snapshots of important system files, settings, and the Windows registry. They use the Volume Shadow Copy Service to capture these snapshots.
You need to turn on System Protection for your drives, usually the C: drive, and decide how much space it can use. Windows 11 recommends reserving 5-10% of your hard drive space for these restore points.
Type ‘Create a restore point’ in the Windows search bar and select the result. In the System Properties window, select your drive, click Configure, choose ‘Turn on system protection’, and set the Max Usage slider.
Prerequisites
How to Enable System Protection
You can easily enable System Protection in Windows 11 to create restore points that help fix your PC if something goes wrong. Turning on System Protection means Windows will automatically save a version of your system files, settings, and registry, so you can go back to an earlier point in time if an update or new program causes problems.
- Open Settings by pressing Windows key + I.
- Click System, then scroll down and select About.
- Click the System protection link.

windows 11 start settings 
windows 11 about 
windows 11 system protection link - In the window that appears, select your drive (usually C:) and click Configure.

windows 11 restore point configure button - Select Turn on system protection.
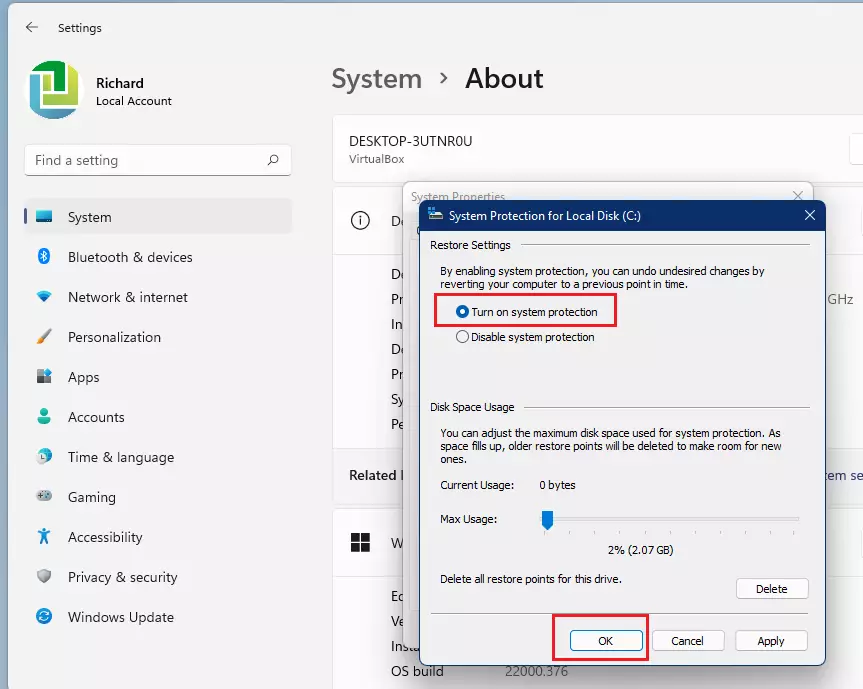
turn on system protection for drive windows 11 - Adjust the Max usage slider to set your disk space limit, then click OK.
Understanding Restore Point Management
Windows automatically makes restore points before big updates, but you can also make them yourself anytime.
Disk Space Allocation and SSD Lifespan
For System Protection, it’s good to set aside 5% to 10% of your drive space, and this won’t hurt your SSD’s life much.
Summary
Turning on System Protection is important for Windows 11 users because it lets you easily fix problems using restore points.
Does System Protection affect my personal files?
No. System Restore only affects system files, installed applications, and registry settings. It does not delete or change your personal documents, photos, or emails. However, it is always best practice to keep a separate backup of your important files on an external drive or cloud storage service.
Why can’t I turn on System Protection?
If the option is grayed out, you may not have administrative privileges. Alternatively, group policy settings managed by an organization might restrict this feature. Ensure you are logged in as an administrator and check that the Volume Shadow Copy service is enabled and running in your system services list.
What is the difference between System Restore and File History?
System Restore is designed to fix system-level issues like broken drivers or corrupt registry keys. File History is a separate tool specifically for backing up your personal files, such as documents and photos. Use System Restore to fix Windows, and File History to recover lost or deleted personal data.
Was this guide helpful?

About the Author
Richard
Tech Writer, IT Professional
Richard, a writer for Geek Rewind, is a tech enthusiast who loves breaking down complex IT topics into simple, easy-to-understand ideas. With years of hands-on experience in system administration and enterprise IT operations, he’s developed a knack for offering practical tips and solutions. Richard aims to make technology more accessible and actionable. He's deeply committed to the Geek Rewind community, always ready to answer questions and engage in discussions.


No comments yet — be the first to share your thoughts!