How to Enable or Disable System Restore in Windows 11

This tutorial shows you how to turn System Restore on or off in Windows 11.
Open System Properties and click Configure to enable or disable System Restore. You can also use the Local Group Policy Editor or Registry Editor for more advanced control. Disabling System Restore does not remove existing restore points.
What is System Restore?
System Restore is a helpful Windows tool that creates a snapshot, called a restore point, of your computer. This lets you turn back the clock to an earlier time if problems pop up after making changes to your system.
Restore points are created before important changes happen to your system. Each restore point saves all the information needed to bring your computer back to that earlier state.
How Long Are Restore Points Kept?
Windows 11 automatically keeps your System Restore points for up to 60 days, deleting older ones to free up storage space. It manages this disk space for restore points automatically, clearing out the oldest ones when space gets low.
System Restore automatically manages the disk space used for restore points. When space runs low, it deletes the oldest restore points to make room for new ones. The amount of disk space used depends on your hard drive size and which version of Windows you have.
What Gets Restored and What Doesn’t?
System Restore undoes changes like uninstalling recently added apps, drivers, or Windows updates, but it never affects your personal files. Your documents, emails, browsing history, and favorites are safe and are not removed by System Restore.
System Restore works in the Windows Recovery Environment and safe mode too. This makes it easier to fix your computer when problems happen.
Default Setting and Disabling
System Restore is turned on by default in Windows 11, but you can disable system restore windows 11 if needed. Turning it off doesn’t remove your existing restore points, which can still be used in other ways.
Good to know: Disabling System Restore will NOT delete your existing restore points. You can still use restore points at startup or in PowerShell even after disabling System Restore.
Option 1Use Local Group Policy Editor
If you have Windows Pro, Enterprise, or Education, you can disable System Restore using the Local Group Policy Editor. To do this, open the editor by typing gpedit.msc in your search bar and pressing Enter.
- Open the Local Group Policy Editor by typing
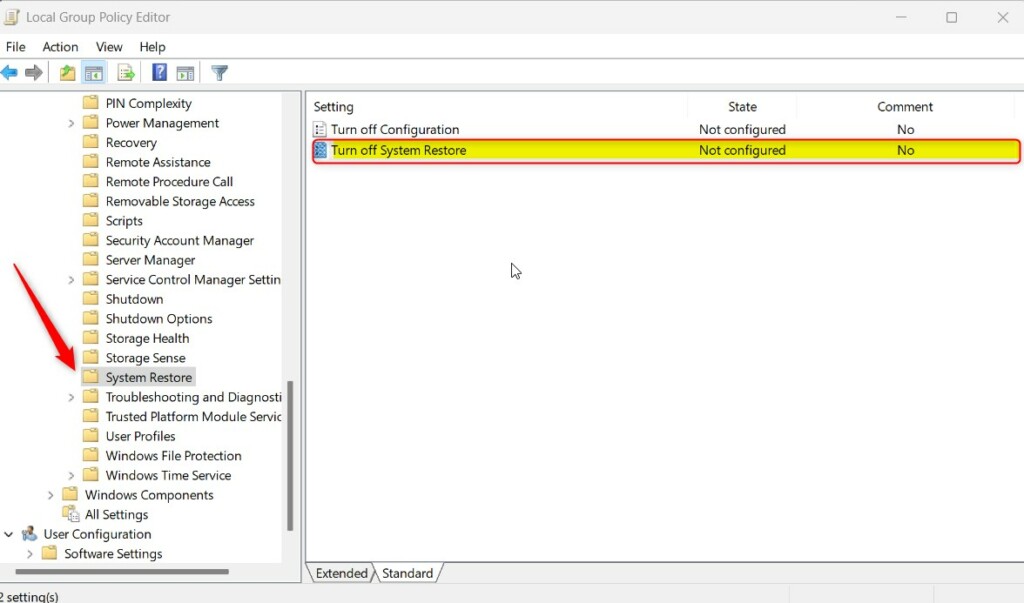
gpedit.mscin your search bar and pressing Enter. - In the left pane, navigate to this location:
Computer Configuration > Administrative Templates > System > System Restore - In the right pane, find the policy called
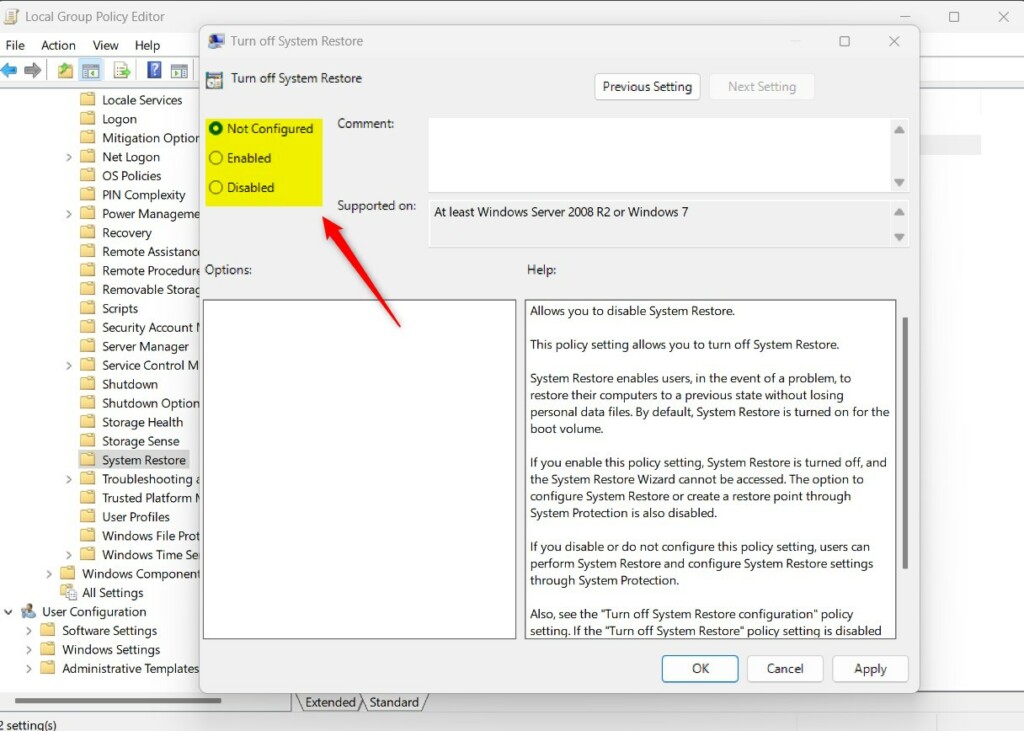
Turn off System Restore. Double-click it to open it. - To Enable System Restore (Default Setting):
- A) Select the dot next to
Not Configured. - B) Click
OK.
- A) Select the dot next to
- To Disable System Restore:
- A) Select the dot next to
Enabled. - B) Click
OK.
- A) Select the dot next to
- [REQUIRES ADMIN] After making your choice, you can close the Local Group Policy Editor.
Option 2Use Registry Editor (Works on All Editions)
You can disable System Restore on any Windows edition, including Home, by using the Registry Editor. First, open Windows Terminal as an administrator to access the necessary tools.
- [REQUIRES ADMIN] Open Windows Terminal as administrator.
- To Enable System Restore (Default Setting):
Run this command:
reg delete "HKLM\SOFTWARE\Policies\Microsoft\Windows NT\SystemRestore" /v DisableSR /f
- To Disable System Restore:
Run this command:
reg add "HKLM\SOFTWARE\Policies\Microsoft\Windows NT\SystemRestore" /v DisableSR /t REG_DWORD /d 1 /f
Summary
System Restore helps you fix problems by saving system snapshots, called restore points, which are kept for 60 days in Windows 11 version 24H2 and don’t affect your personal files.
How do I disable System Restore?
So go ahead and select that. And then there is an option to delete all restore points for this drive select delete select continue close out of here. Select okay. And that's all you have to do.
Can I cancel System Restore in 🪟 Windows 11?
A system restore can also not be canceled/rolled back until it has been completed, and it is important that you do not interrupt the process if it is in progress. Before making any changes to your Windows device, you should make a complete backup to a separate device.
Was this guide helpful?

About the Author
Richard
Tech Writer, IT Professional
Richard, a writer for Geek Rewind, is a tech enthusiast who loves breaking down complex IT topics into simple, easy-to-understand ideas. With years of hands-on experience in system administration and enterprise IT operations, he’s developed a knack for offering practical tips and solutions. Richard aims to make technology more accessible and actionable. He's deeply committed to the Geek Rewind community, always ready to answer questions and engage in discussions.


No comments yet — be the first to share your thoughts!