How to List Windows 11 Restore Points


Restore points are saved snapshots of your Windows 11 system files, apps, and registry settings. They let you roll your PC back to an earlier working state. Windows creates them automatically every 7 days when System Protection is turned on for your main 📁C:\
Listing your restore points shows which dates are available before you undo a broken update or a recent system change. You can use the built-in System Properties window or a quick PowerShell command. Both are covered below, followed by what to do when the list is empty and how to control the disk space restore points use.
You can list Windows 11 restore points by opening Settings, navigating to System About, and clicking System protection. Then, click System Restore and check “Show more restore points.” Alternatively, use PowerShell (Admin) and run the command Get-ComputerRestorePoint.
How to see restore points in Settings
The Settings app has a System protection link that opens the classic System Properties window. From there you can open the full list of restore points. Listing the points does not restore anything, as long as you cancel out at the end.
- Open the Windows Settings app. Press Win+I on your keyboard. The Settings window opens.
- Go to System, then click About.
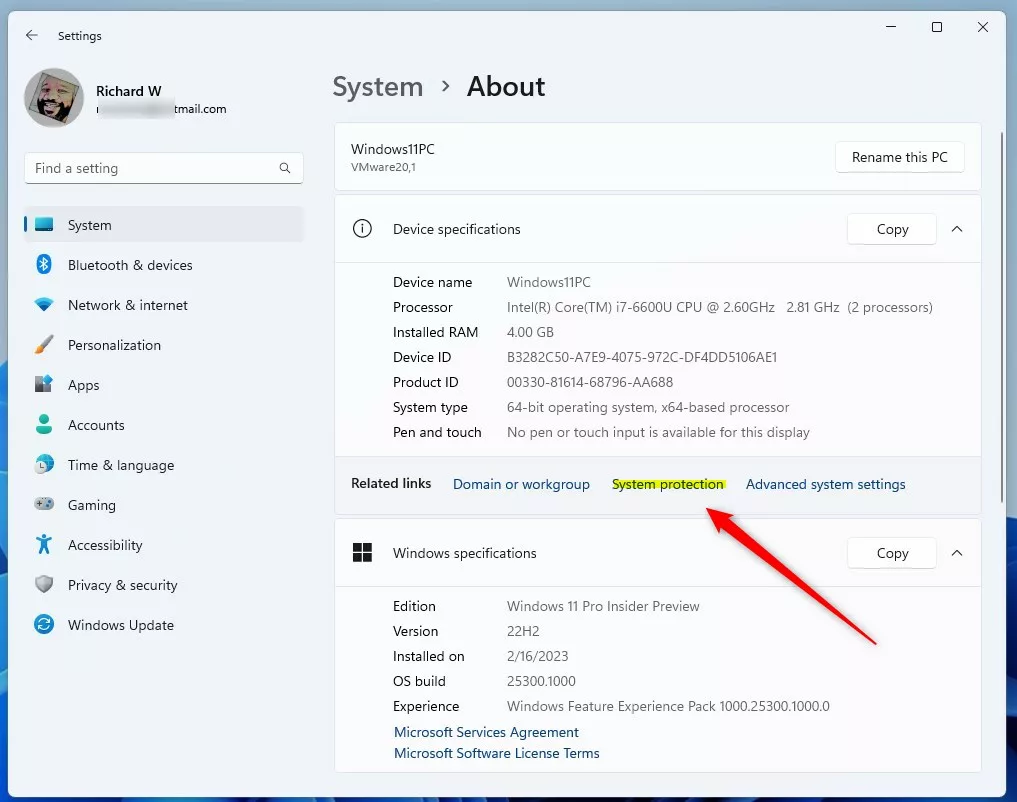
- Under Related links, click the System protection link. The System Properties window opens on the System Protection tab. Look at the Protection Settings box. If your C: drive shows On, restore points are being created for it.
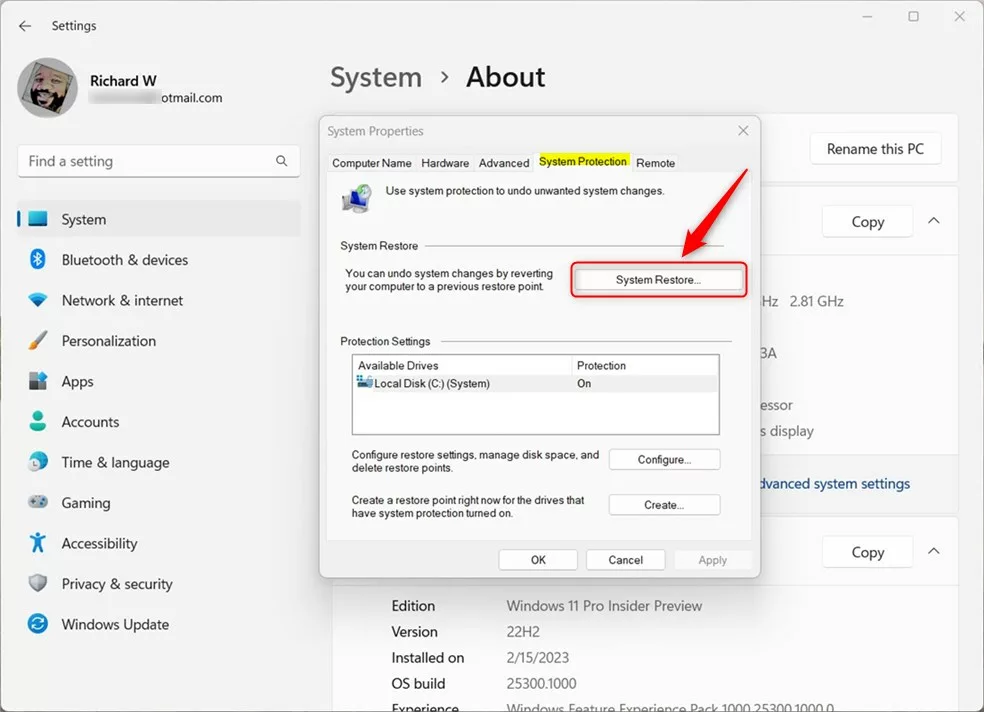
- In the System Properties window, click the System Restore button. The System Restore wizard opens. If the button is greyed out, System Protection is off or no restore points exist yet. See the troubleshooting section below.
- If the wizard offers a recommended restore point, select Choose a different restore point, then click Next.
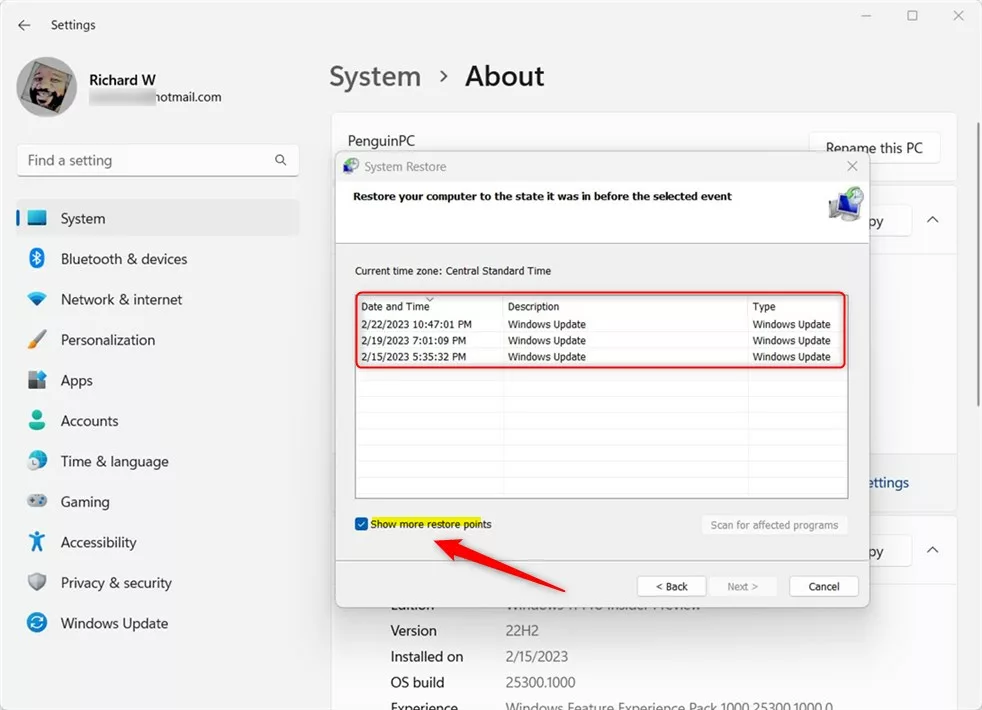
- Check the box that says Show more restore points. You will now see a list of dates you can choose from to revert your computer. Each entry shows the date and time, a description, and a type, such as System or Install.
- Click Cancel when you are done looking. Do not click Next and then Finish unless you really want to restore your PC to that point. Cancelling changes nothing on your system.
Windows restores to a point only after you confirm it at the last screen, so browsing the list is safe. If you want to see which apps a point would affect, select it and click Scan for affected programs before you decide.
How to see restore points using PowerShell
PowerShell lists every saved restore point in one table, with no menus to click through. You need an administrator terminal for it to work.
- [ADMIN REQUIRED] Right-click the Start button and select Terminal (Admin).
- Click Yes if User Account Control asks whether to allow the app to make changes. A terminal window opens. On Windows 11 it normally opens a PowerShell tab. If the prompt starts with 📁C:\
instead of PS, click the down arrow next to the tab bar and choose Windows PowerShell. - Paste the following command and press Enter:
Get-ComputerRestorePoint | Format-Table -AutoSize
The console displays a table showing the date, time, and description for each saved point. Compare those dates with the date your problem started, so you know which point to pick if you need to roll back. If the command prints nothing, there are no restore points on the PC, which usually means System Protection is off.
Troubleshooting missing restore points
Missing restore points typically indicate that System Protection, the background service responsible for tracking changes, is disabled for the target drive. On some PCs it is off by default, and a Disk Cleanup run or a full disk can also remove old points. To turn it on:
- Open System Properties on the System Protection tab, using the Settings steps above.
- Select your C: drive in the Protection Settings list and click Configure.
- Select Turn on system protection.
- Use the Max Usage slider to set how much disk space restore points may use, then click OK.
- Click Create, type a short description, and click Create again to make a first restore point right away. Windows tells you when it has finished.
Once protection is on, run either listing method again. Your new point should appear. If the Configure button is greyed out, sign in with an administrator account and try again. No restart is needed.
Managing disk space for restore points
Restore points take up disk space. Windows deletes the oldest ones on its own when the space limit you set is reached. You can also change that limit or clear points by hand to free space right away.
- Open System Properties on the System Protection tab, select your C: drive, and click Configure. The current usage is shown under Disk Space Usage.
- Drag the Max Usage slider to a smaller or larger limit, then click OK. A smaller limit means fewer, older points are kept.
Clicking the Delete button inside the Configure menu removes the restore points for that drive. Be careful with it: it deletes all of them, not only the old ones, and you cannot undo it. Create a fresh point afterward if you still want a safety net.
Disk Cleanup is a gentler option. It clears out older shadow copies (the underlying file backups utilized by restore points) and keeps the most recent restore point. In Disk Cleanup, click Clean up system files, open the More Options tab, and use the Clean up button in the System Restore and Shadow Copies section.
Summary
Both the Settings app and PowerShell provide reliable ways to audit restore points. Reviewing these backups prepares the workstation for future troubleshooting. Check the list now and then, especially before big updates, so you know a recent restore point exists if something goes wrong.
Was this guide helpful?

About the Author
Richard
Tech Writer, IT Professional
Richard is a writer at Geek Rewind who turns complex IT tasks into clear, step-by-step guides. He draws on years of hands-on experience in system administration and enterprise IT operations, focusing on Windows, Linux and WordPress: the problems people actually run into, and the fixes that work. His server and WordPress guides come from systems he runs himself. Richard builds and maintains the platform behind Geek Rewind, from its Ubuntu servers and Nginx configuration to its custom WordPress plugins. Many new tutorials start with readers' questions, and he's always glad to answer them in the comments.




[…] Windows lets you change how frequently a restore point is taken and list all available restore points. […]
[…] can also change how frequently a restore point is taken, list all available restore points, or delete all restore points except the latest […]