How to Uninstall AI Components on Windows 11 PC

Uninstalling AI components on your Windows 11 PC is directly manageable through the Settings app.
These AI components are programs that run AI models right on your computer, sometimes using special AI chips called NPUs.
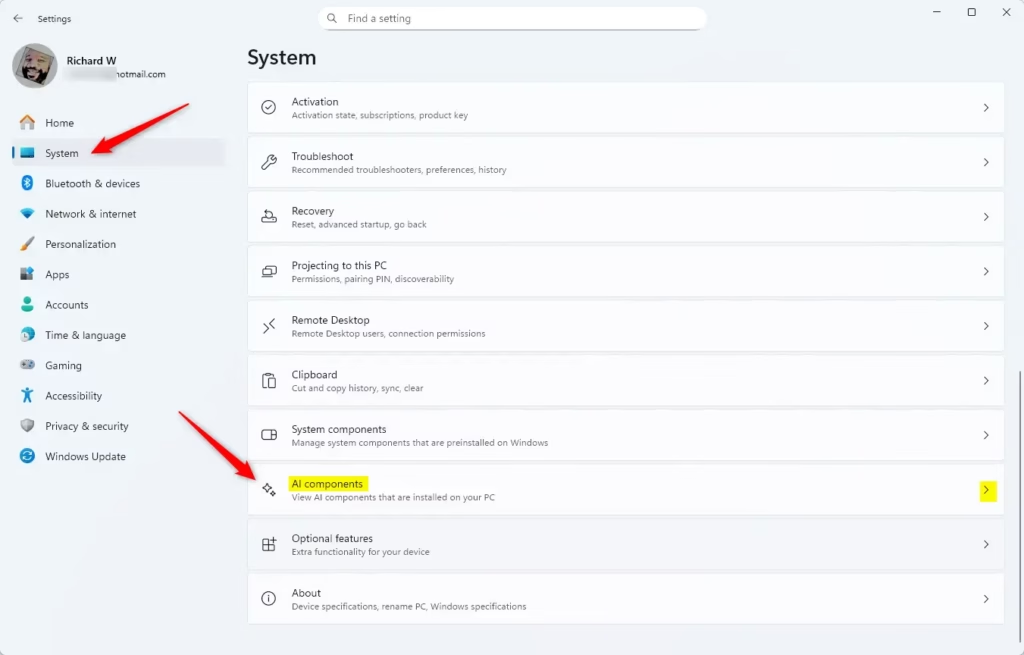
Recent Windows 11 updates, including preview build 26300, added a new section in Settings > System for “AI components.” This area helps you control AI features that come pre-installed.
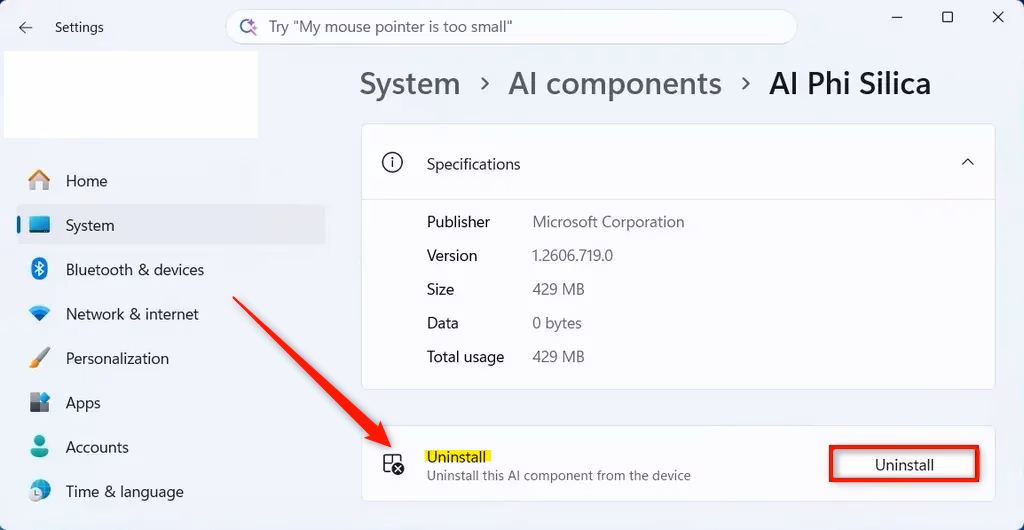
For instance, you can find and remove specific AI models like ‘AI Phi Silica’ if it’s installed and you no longer want it.
You need administrator rights to make these changes, which helps keep your system secure.
Navigate to Settings > System > AI components. Select the AI component you wish to remove, click Uninstall, and then confirm by clicking OK. A restart of your PC is required to complete the process.
Here’s How:
- Open Settings. You can do this by pressing the Windows key + I on your keyboard.
- On the left side, click on System. Then, on the right side, click on AI components.
- Click on the AI component you want to remove. For example, you might see ‘AI Phi Silica’.
- If the option is available, click the Uninstall button.
- Click OK to confirm.
- Restart your computer. This makes sure the changes are saved.
AI components on your Windows 11 PC can be uninstalled by going to Settings and finding the AI components section. Look for the specific AI component you wish to remove, select it, and then choose the Uninstall option if it’s available. Confirming the removal and restarting your computer will complete the process of uninstalling AI components.
Reference:
Summary
This guide walks you through how to uninstall AI components on Windows 11, a process found under Settings > System > AI components, requiring administrator rights and a PC with an NPU.
How to remove Windows AI components?
To remove Windows AI components, navigate to Settings > System > AI components. Pick the AI component you want gone, like ‘AI Phi Silica’, and click ‘Uninstall’. Confirm, then restart your PC to finish.
How to remove AI bloatware?
AI software you don’t need can be removed from Windows 11 by going to ‘AI components’ in Settings > System. If you see AI software you consider bloatware, pick it and click ‘Uninstall’. A restart of your computer will be necessary to fully remove it.
How to permanently remove AI mode?
Permanently removing an AI mode involves uninstalling specific AI components. Go to Settings > System > AI components, choose the AI element you want gone, click ‘Uninstall’, and confirm. A restart ensures the component is fully removed from your Windows 11 system.
How can I Uninstall AI?
To uninstall AI components on Windows 11, open Settings (Windows key + I), go to System, and then click ‘AI components’. Select the AI component you want to remove and click ‘Uninstall’. Confirm the prompt and restart your computer to finalize the uninstallation.
Was this guide helpful?
0% of readers found this helpful (3 votes)

About the Author
Richard
Tech Writer, IT Professional
Richard, a writer for Geek Rewind, is a tech enthusiast who loves breaking down complex IT topics into simple, easy-to-understand ideas. With years of hands-on experience in system administration and enterprise IT operations, he’s developed a knack for offering practical tips and solutions. Richard aims to make technology more accessible and actionable. He's deeply committed to the Geek Rewind community, always ready to answer questions and engage in discussions.


No comments yet — be the first to share your thoughts!