How to See System Restore Points in Windows 11


System restore points in Windows 11 are saved snapshots of your PC settings and system files. They let you turn back the clock when something breaks. To see them, open the System Properties window, go to the System Protection tab and start System Restore. The wizard lists every saved point on your drive.
Windows 11 creates these points automatically before big system updates, and you can also make them by hand whenever you want. Picking a restore point from yesterday or last week is often the fastest way to fix a broken app or bad driver, and your personal files stay where they are.
This guide covers two ways to see your restore points: the graphical route through Settings, and a command-line route for people who prefer a terminal. Both work on Windows 11 Home and Pro.
To see system restore points in Windows 11, open Settings System About, click System protection under Related links, then click System Restore on the System Protection tab. The wizard lists every saved restore point on your drive. If the button is greyed out, system protection is turned off for C:.
What Is a System Restore Point?
A restore point is like a photo of your computer’s settings and system files at one moment. Windows usually creates these automatically before big changes, such as installing an update or a driver, and on a regular schedule. You can also make your own whenever you want.
They are not a backup of your documents, photos or other personal files. Rolling back also removes any apps or drivers you installed after that point was made. Windows keeps restore points in a limited amount of disk space, so the oldest ones are deleted as that space fills up.
How to See Your Restore Points Using Settings
You can see your system restore points in Windows 11 by opening the System Protection menu. You can reach it from Control Panel , but the quickest route is through Settings, which is what the steps below use. This built-in feature lets you check whether system protection is turned on and see all currently saved restore points. You can also create a new restore point by hand before you install risky software or updates.
You need an administrator account for most of this. If System Protection is turned off for your drive, the list of restore points will be empty. You can turn it on from the same window, as described after step 5.
Follow these steps to see your system restore points in Windows 11, from opening Settings to reading the full list.
- Open Settings. Click the Start button and pick Settings, or press
Windows + Ion your keyboard. The Settings window should open with the categories listed on the left. - Click System. It is at the top of the list on the left side of Settings. The System page opens on the right.
- Click About. Scroll down the System page, because About is near the bottom. The path is Settings System About You should see your device name, processor and Windows edition.
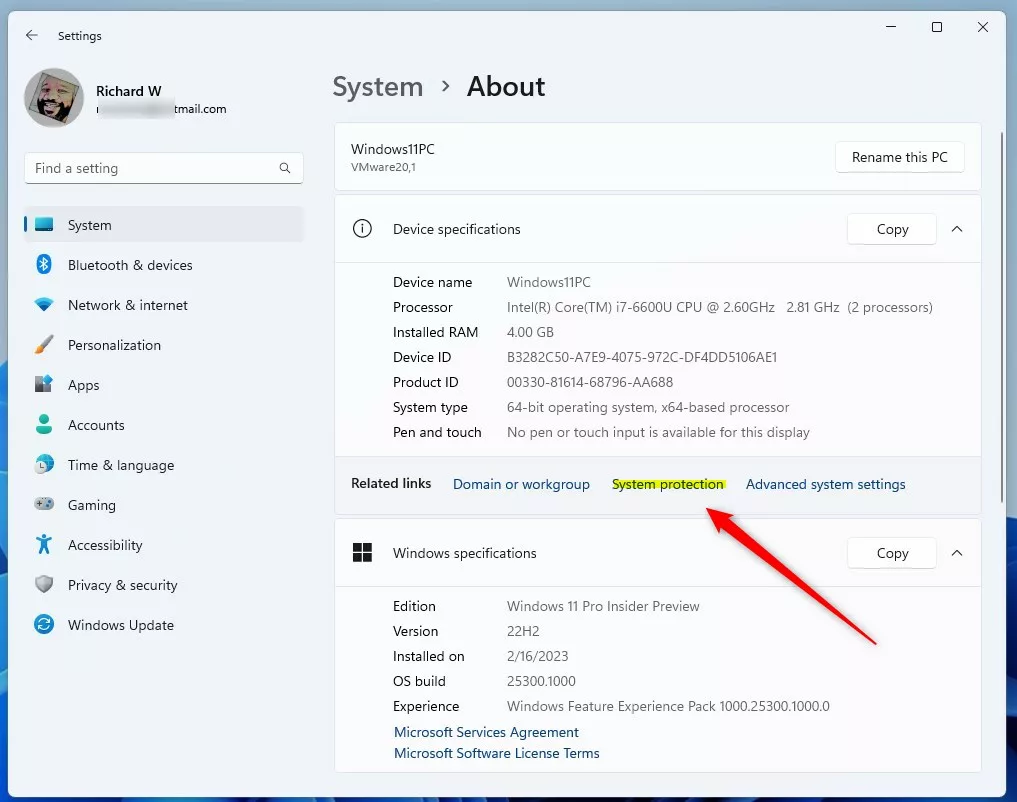
- Click the System protection link under "Related links." The System Properties window opens on the System Protection tab. If it opens on another tab, click System Protection at the top.
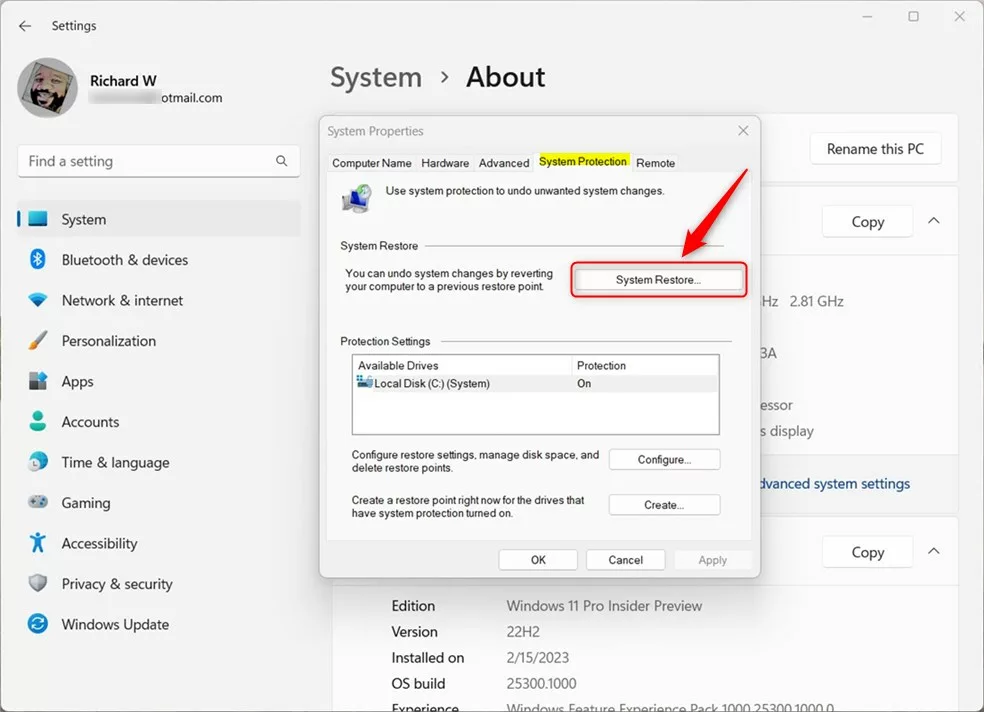
- Check that your system drive, usually C:, says On. Under "Protection Settings" you will see your drives and whether protection is On or Off for each one.
If it says Off, click that drive, then click Configure, choose Turn on system protection, and click OK. Windows will only start saving restore points from that moment, so older ones will not appear. If it already says On, move straight on to step 6.
- Click the System Restore button on the System Protection tab. If the button is greyed out, system protection is off for the system drive, or you are not signed in as an administrator. Otherwise the System Restore wizard opens.
- Select Choose a different restore point if the wizard offers it. The wizard shows this option when it has a recommended restore point. If you only see the "Restore system files and settings" page, there is nothing to select, so go on to step 8.
- Click Next. This takes you to the full list of restore points. Viewing the list does not change anything on your PC.
- Check the Show more restore points box. By default the list may show only recent points, so this makes older ones appear. Each entry shows a date and time, a description and a type, such as System or Manual.
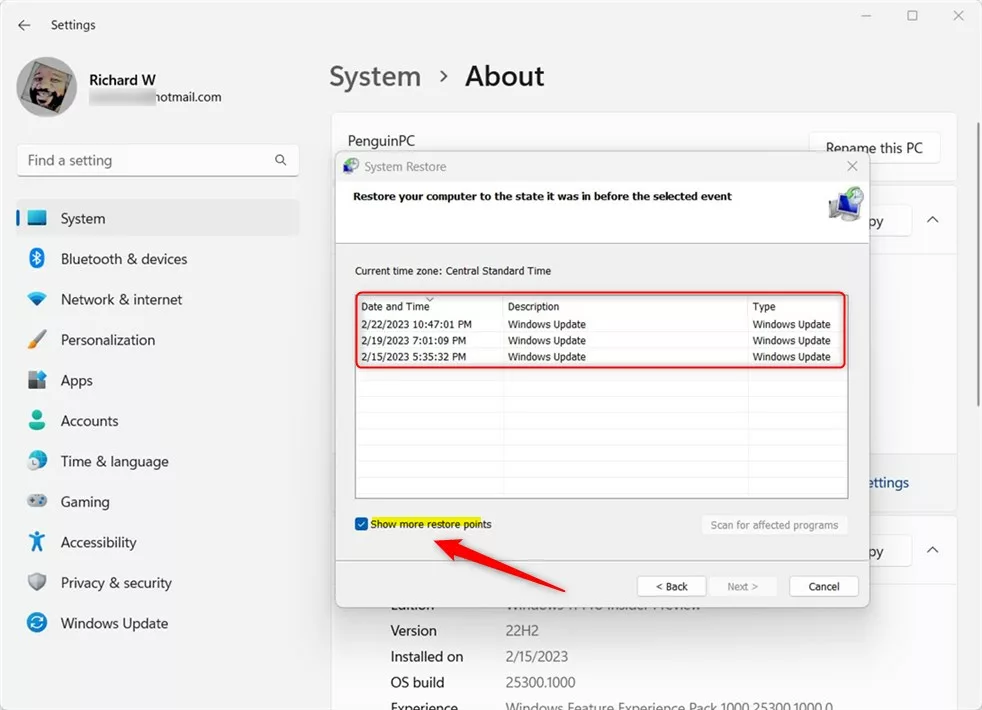
- Select a restore point in the list. This step is optional. Click an entry to highlight it, so you can check what it would change.
- Click Scan for affected programs. This lists the apps and drivers that would be removed or restored. Close the results window when you are done reading it.
- Click Cancel to close the wizard. Nothing is restored until you finish the wizard, so cancelling leaves your PC exactly as it was.
If the list is empty, protection was off or no restore point has been created yet. In that case, make one by hand from the System Protection tab with the Create button. Windows asks for a short description, so use something you will recognise later. The Create button stays greyed out until protection is on for that drive.
How to See Restore Points Using Commands
You can view your system restore points in Windows 11 with a quick command in PowerShell if you prefer not to use the graphical menus. The command prints a list of the restore points stored on your drive directly in the terminal window.
You need administrator rights for this. Without them, the command may return nothing or an access error. It works the same on Home and Pro, and it only reads the list, so it changes nothing on your PC.
- Right-click the Start button. A short menu of system tools appears.
- Select Windows Terminal (Admin). On some builds the entry is named Terminal (Admin).
- Click Yes if User Account Control asks for permission. Windows Terminal then opens with administrator rights. %%SC0%%
- Make sure the PowerShell tab is open. The prompt should start with "PS". If you see a different prompt, such as Command Prompt, open a new PowerShell tab from the tab bar.
- Type this command, then press Enter:
Get-ComputerRestorePoint | Format-Table -AutoSizeYou'll see a list of all your restore points with details like date and description. Each entry also has a sequence number and a type. Higher sequence numbers are newer restore points. If the command returns nothing, there are no restore points. The usual cause is that system protection is turned off, so check the System Protection tab as described above.
If you prefer Command Prompt, open it as administrator. Search for Command Prompt, then choose Run as administrator, and click Yes if User Account Control asks. Type this command instead and press Enter:
PowerShell Get-ComputerRestorePoint^|Format-Table -AutoSizeWhy Knowing About Restore Points Helps You
- Restore points help you fix your PC if problems happen after installing new software or updates. They roll back system files, drivers and settings, not your personal files.
- Knowing how to find restore points means you can quickly fix your computer when needed. If the list is empty, check that system protection is turned on for your system drive.
- It's smart to create your own restore point before making big changes to your system, such as installing a driver or software you don't fully trust.
Knowing how to find system restore points in Windows 11 helps you fix your PC quickly if a bad driver, app update or Windows patch causes crashes or errors. Restore points act like a safety net. They roll your system files back to an earlier date when everything worked properly, without deleting your personal files.
Keep in mind that restore points are not a replacement for a real backup of your documents and photos.
Summary
System restore points in Windows 11 are like saved versions of your computer that let you go back in time if problems occur, and you can view them using Settings or commands.
Have a question about this guide?
Answered by AI from this guide. Good questions may be added to this page — please don't include personal details.
Did this guide fix your problem?

About the Author
Richard
Tech Writer, IT Professional
Richard is a writer at Geek Rewind who turns complex IT tasks into clear, step-by-step guides. He draws on years of hands-on experience in system administration and enterprise IT operations, focusing on Windows, Linux and WordPress: the problems people actually run into, and the fixes that work. His server and WordPress guides come from systems he runs himself. Richard builds and maintains the platform behind Geek Rewind, from its Ubuntu servers and Nginx configuration to its custom WordPress plugins. Many new tutorials start with readers' questions, and he's always glad to answer them in the comments.
No comments yet — be the first to share your thoughts!