How to Reinstall Optional Features Using Settings System Optional Features in Windows 11

Optional features in Windows 11 are extra components such as legacy utilities, language-related tools and developer kits. They are kept out of the default install to save disk space. If one of these tools is broken, has bad settings, or was damaged by a failed update, you can remove it and add it back from the Settings app. Windows pulls fresh files from Windows Update or from your local component store.
Before you start, make sure you have an active internet connection and an account with administrator rights. This guide applies to Windows 11 version 22H2 or later. The Optional features page works the same way on Home and Pro. Windows 11 also has a separate older dialog called Turn Windows features on or off, which handles things like Hyper-V and Windows Sandbox. That dialog is outside the scope of this guide.
Open Settings , click System, then Optional features. Find the broken feature in your installed list, click Uninstall, restart if prompted, then click View features, search for the feature, check its box, and click Install. Windows downloads and reinstalls it from Windows Update .
How to Access Optional Features in Settings
The Optional features page is where you view, add and remove extra Windows components. It sits inside the System section of Settings, so you only need a few clicks to reach it.
- Press the Win+I to open Settings . You should see the Settings window with a navigation pane on the left.
- Click System in the left-hand navigation pane.
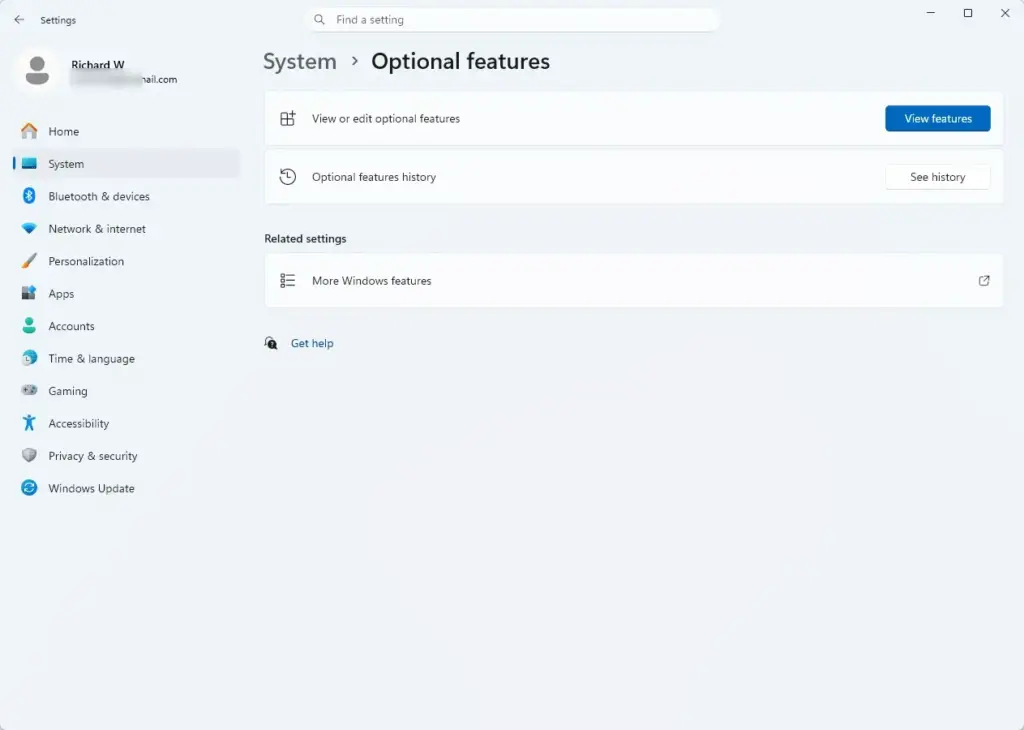
Settings › System › Optional features - Scroll down the right side of the window and click Optional features. The page that opens is the management dashboard. It shows an Add an optional feature section at the top and your installed features below it.
If the page opens but stays empty or keeps loading, close Settings and open it again. A stalled list usually clears after a fresh launch.
Checking Your Current Installed Features
Before you reinstall anything, confirm that the component is actually on the system and see what state it is in. The Installed features section on the Optional features page shows this.
- Scan the list of installed packages, or type the name of the feature into the Search installed features box to filter the results as you type.
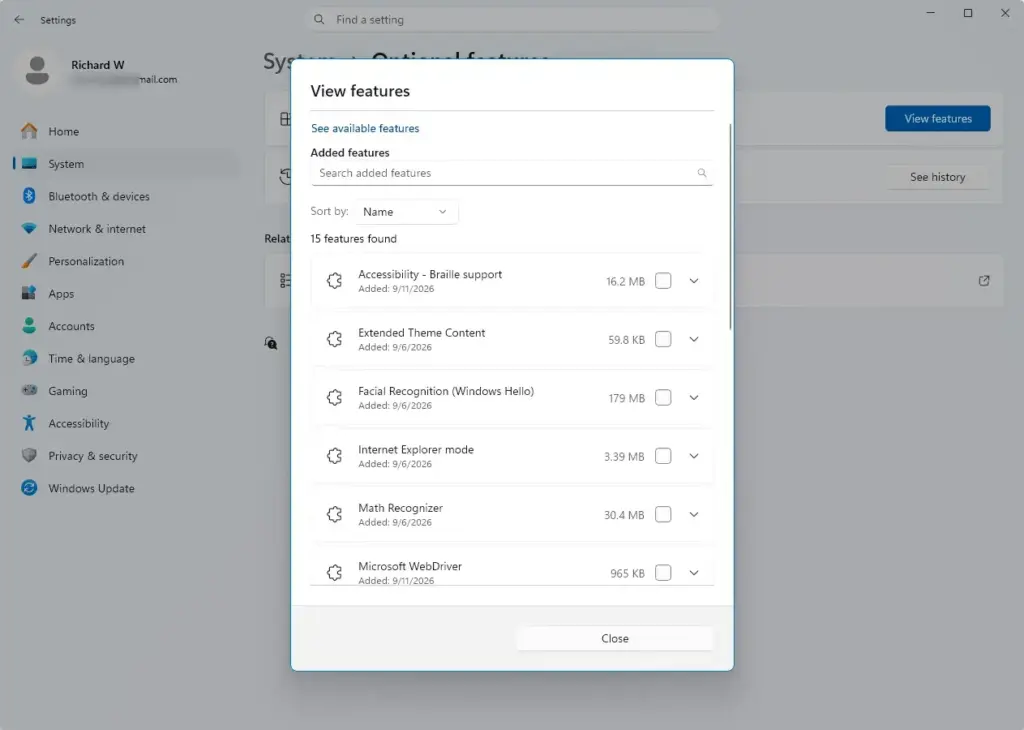
- Read the status text under each feature name. Look for error flags or pending actions.
Restart first and check again before you move on. If the feature is missing from the list, skip ahead to the reinstall steps. You have nothing to uninstall.
Uninstalling a Broken Optional Feature
That clears out the corrupted files, so the new install starts from a clean copy. You need administrator rights for this, and Windows may ask you to restart.
- On the Optional features page, find the broken feature in your installed list and click its entry to expand the options.
- Click the Uninstall button. Windows removes the package and its associated files.
- Wait for the status indicator to change. If Windows prompts you to restart, do it, because the restart releases system files that were locked while the feature was in use.
If the Uninstall button is greyed out or missing, the feature is probably required by Windows or by another component. Another cause is that you are not signed in as an administrator. Sign in with an admin account and try again.
Reinstalling an Optional Feature via Settings
Once the old copy is gone, you can add the feature back. Windows downloads the package and installs it, so you need an internet connection and administrator rights.
- Scroll to the top of the Optional features page and click View features next to Add an optional feature. A window opens with a list of available features.
- Type the name of the feature into the search box, or scroll through the alphabetical list.
- Select the check box next to the feature you want to reinstall, then click Next.
- Review your selection and click Install. Windows starts downloading and applying the package files.
- Watch the progress bar under Recent actions until the status changes to Installed.
If the feature does not appear in the list, it may already be installed, so check the installed list again. Some features also only appear on certain Windows editions. If you are on a metered connection, the download may pause until you allow it.
Alternative Method: Using DISM via Terminal
When the Settings app fails or hangs, you can use DISM instead. DISM is a command-line tool for servicing Windows system images. It skips the Settings interface, so it works even when the graphical page does not.
- Open the Start menu, type
cmd, right-click Command Prompt, and select Run as administrator. This step requires administrator privileges. Approve the User Account Control prompt if one appears. - Type
DISM /Online /Get-Capabilitiesand press Enter. This generates a complete list of all available optional features and their exact capability names. It can take a moment to finish. - Find the exact name of the broken feature in the command output.
- Type
DISM /Online /Add-Capability /CapabilityName:FeatureName~0~0.0.1.0, replacing FeatureName with the actual name from the list, and press Enter to install it.
Copy the name exactly as it appears in the list, because DISM will not accept a name that is close but not identical. Like the Settings method, this command needs internet access to fetch the files.
Troubleshooting Optional Feature Installation Errors
If an installation gets stuck or shows an error code, the cause is usually damaged Windows Update components or missing system files. Running two repair scans from an elevated Command Prompt fixes the underlying health of the system, and then you can try the install again.
- Open the Start menu, type
cmd, right-click Command Prompt, and select Run as administrator. This step requires administrator privileges. - Type
DISM /Online /Cleanup-Image /RestoreHealthand press Enter. This repairs the local component store using Windows Update files, so you need to be online. Let it run to the end, even if the progress seems to pause for a while. - Type
sfc /scannowand press Enter. This is System File Checker, a utility that scans and repairs damaged system files. It scans and replaces any missing or corrupted system files it finds. - Restart your computer once both scans finish. Then go back to the Settings app and try the optional feature installation again.
If the same error comes back after both scans, note the error code. Searching for that exact code will point you toward the specific fix.
Was this guide helpful?

About the Author
Richard
Tech Writer, IT Professional
Richard is a writer at Geek Rewind who turns complex IT tasks into clear, step-by-step guides. He draws on years of hands-on experience in system administration and enterprise IT operations, focusing on Windows, Linux and WordPress: the problems people actually run into, and the fixes that work. His server and WordPress guides come from systems he runs himself. Richard builds and maintains the platform behind Geek Rewind, from its Ubuntu servers and Nginx configuration to its custom WordPress plugins. Many new tutorials start with readers' questions, and he's always glad to answer them in the comments.



No comments yet — be the first to share your thoughts!