How to Delete Old Restore Points in Windows 11

Deleting old restore points in Windows 11 can free up several gigabytes by removing outdated snapshots of your system files and settings. System Restore is a built-in Windows tool that lets you roll your computer back to an earlier date if a bad app update or driver breaks your setup. These checkpoints pile up on your 📁C:\
Clearing out the older ones is safe. It does not touch your personal files or your installed apps. You need an administrator account and the built-in Disk Cleanup tool, and the whole job takes a few clicks. No restart is needed afterward.
Open the Start Menu , search for Disk Cleanup, click Clean up system files, go to the More Options tab, and under System Restore and Shadow Copies click Clean up. Confirm by clicking Delete, then Yes. Windows keeps your latest restore point and frees up gigabytes of storage.
What Are Restore Points?
Windows saves restore points automatically, usually before a major update, a driver install or the setup of some apps. They help you undo changes if something goes wrong. Think of a restore point as a “save” button for your computer: if a problem appears, you can return to that saved state.
The catch is that each restore point takes space on the drive. System Restore sets aside a share of the disk for them, and older points stay there until Windows needs the room or you remove them yourself.
Learn more about how to create restore points in Windows 11.
How to Delete Old Restore Points and Keep the Latest One
Disk Cleanup lets you delete old restore points while keeping the most recent one. This built-in tool removes the older system save files and frees up storage, but your computer still has one restore point to fall back on if you need to undo a recent change.
This works the same on Windows 11 Home and Pro.
- Open the Start Menu — Click the Start button, or press the Windows key on your keyboard. The Start menu opens with a search box ready for typing.
- Search for Disk Cleanup — Type
Disk Cleanupin the search box. Disk Cleanup should appear at the top of the results. - Open Disk Cleanup — In the search results, click the Disk Cleanup app. If a small window asks which drive to clean, choose C: and click OK. Disk Cleanup then calculates how much space it can free, which takes a few seconds.
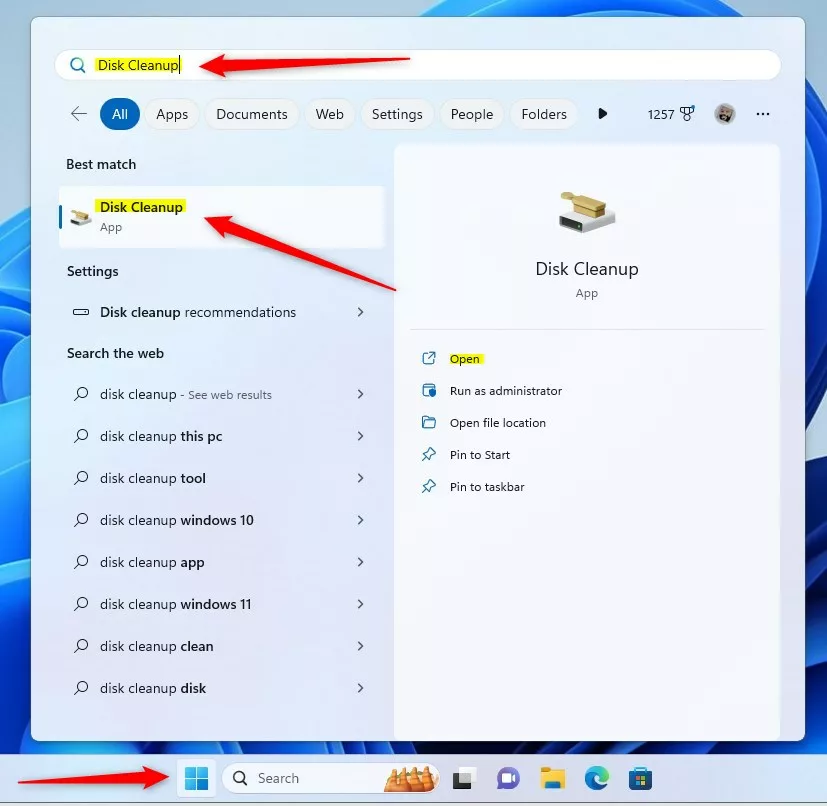
Windows Disk Cleanup app on start menu - Click "Clean up system files" — When Disk Cleanup opens, click the Clean up system files button. If a User Account Control prompt appears, approve it or enter an administrator password. Disk Cleanup rescans the drive, this time including system files. You may see the drive selection window again, so pick C: again if it asks.
[REQUIRES ADMIN PRIVILEGES]
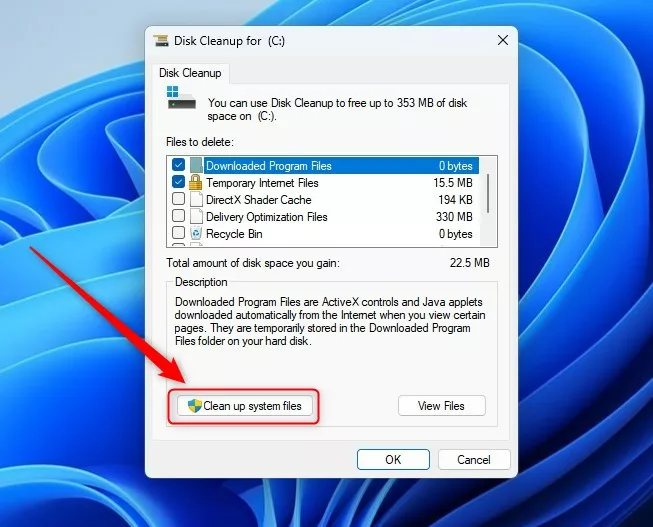
Windows Disk Cleanup clean up system files button - Go to the More Options tab — After the scan finishes, click the More Options tab at the top. If you don't see this tab, Disk Cleanup was not started with administrator rights. Close it and repeat the steps above, approving the prompt.
- Delete old restore points — Under System Restore and Shadow Copies, click the Clean up... button. If the button is greyed out, there is usually nothing to remove: either only one restore point exists, or System Protection is turned off for the drive.
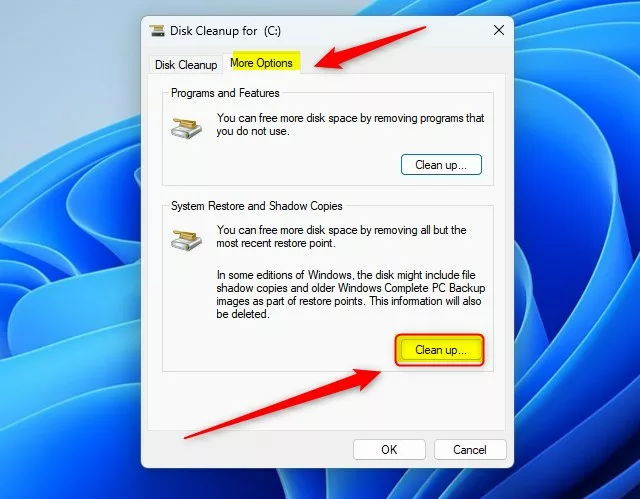
Windows Disk Cleanup clean up restore points - Confirm the deletion — A message will ask: "Are you sure you want to delete all but the most recent restore point?" Click Delete. This cannot be undone, so make sure you don't need an older restore point first.
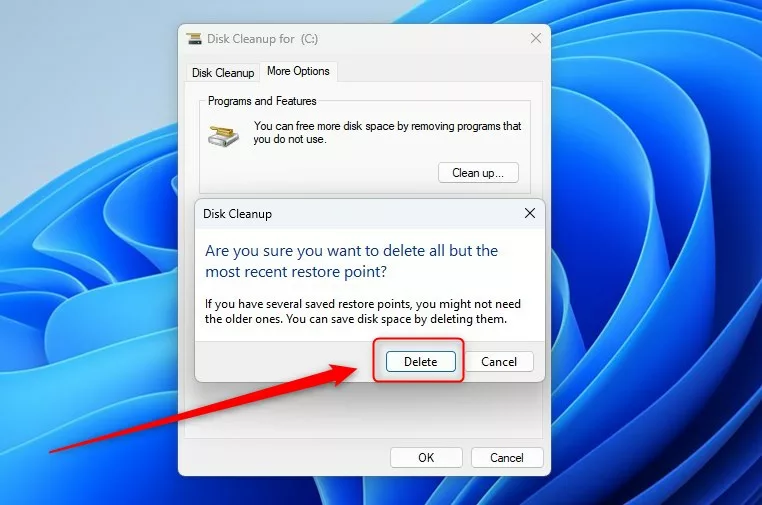
Windows Disk Cleanup clean up restore points delete button - Final confirmation — Another message will ask if you want to perform the actions. Click Yes to finish. Disk Cleanup runs for a short while and then closes on its own.
That's it. You have deleted all the old restore points, and only the latest one remains. The space they used is now free on your drive.
If you want to check the result, open File Explorer, right-click the C: drive and choose Properties to see the free space. If you want a fresh restore point before making a risky change, you can create one yourself from the System Protection tab in System Properties.
It removes every restore point, including the latest one, so use it only if you are sure you don't need any of them.
Why Should You Do This?
- Deleting old restore points frees up disk space, sometimes several gigabytes.
- Disk Cleanup keeps the latest restore point, so you still have something to roll back to if something goes wrong.
- It helps prevent low-disk-space problems, which can slow the system down and cause update failures.
Deleting old restore points in Windows 11 frees up storage your computer needs to run properly. Old system saves build up over time and fill the drive, so clearing them out helps prevent low-disk-space warnings while keeping one recent backup ready just in case.
Summary
To delete old restore points in Windows 11, use the Disk Cleanup tool. Open it, click Clean up system files, and use the Clean up... button on the More Options tab. You free up storage and keep your latest restore point as a safety net.
Was this guide helpful?

About the Author
Richard
Tech Writer, IT Professional
Richard is a writer at Geek Rewind who turns complex IT tasks into clear, step-by-step guides. He draws on years of hands-on experience in system administration and enterprise IT operations, focusing on Windows, Linux and WordPress: the problems people actually run into, and the fixes that work. His server and WordPress guides come from systems he runs himself. Richard builds and maintains the platform behind Geek Rewind, from its Ubuntu servers and Nginx configuration to its custom WordPress plugins. Many new tutorials start with readers' questions, and he's always glad to answer them in the comments.




No comments yet — be the first to share your thoughts!