How to Enable Point-in-Time Restore in Windows 11

Point-in-Time Restore in Windows 11 lets you rewind your computer to an earlier state, like going back in time to fix problems.
This feature, also called System Restore, undoes recent changes to your system files, apps, and settings. It’s useful if a new software update or driver causes your PC to act up, and it won’t delete your photos or documents.
To use it, you need to turn on System Protection. This is especially important for your C: drive, where Windows 11 lives.
Once System Protection is on, Windows 11 can create restore points automatically. You can also create them yourself before making big changes to your computer.
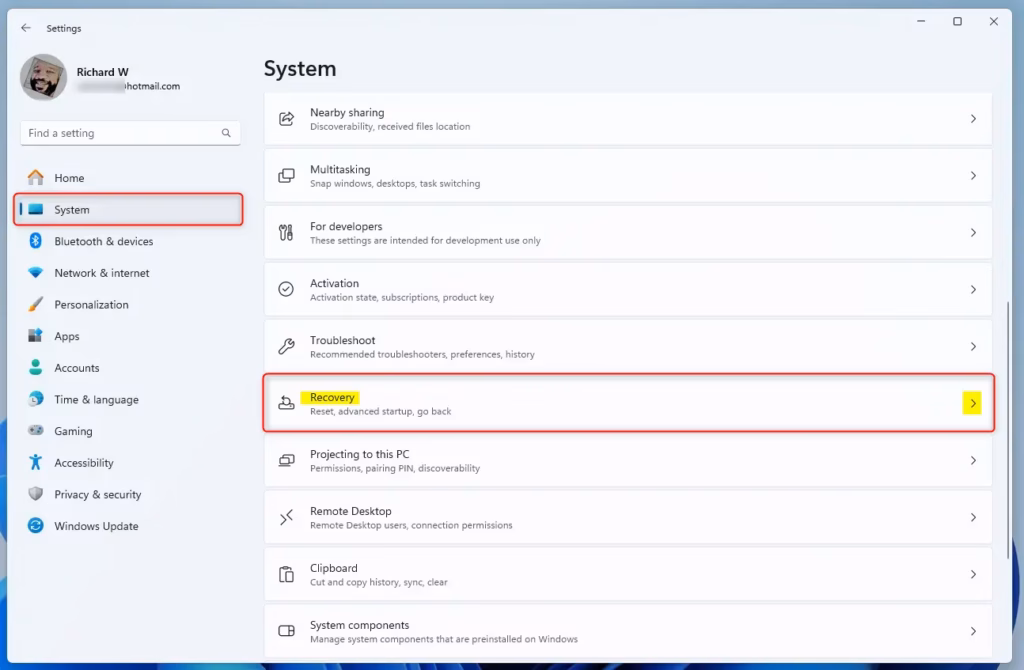
Enable Point-in-Time Restore in Windows 11 by opening Settings, navigating to System > Recovery, and toggling the “Point-in-time restore” option on. This feature allows you to revert your system to a previous state using automatically created restore points.
What is Point-in-Time Restore?
In Windows 11, Point-in-Time Restore is a handy tool that lets you go back to a previous working state if something goes wrong, like after a bad update or a mistake. It uses saved ‘restore points’—snapshots of your system—to help fix your PC without losing your recent files or settings.
Restore points are stored on your computer using a tool called the Volume Shadow Copy Service (VSS). This means if something goes wrong, you can quickly get your system back to a recent working state.
Why You Need This Feature
To enable Point-in-Time Restore in Windows 11 Settings, open Settings (Windows key + I), navigate to System > Recovery, and toggle the Point-in-time restore option on. This method requires no technical knowledge and takes under one minute to complete. You can disable the feature using the same steps by toggling it off.
How Restore Points Work
Restore points are like snapshots of your system that Windows takes automatically. These snapshots are saved using a tool called Volume Shadow Copy Service (VSS), which keeps them safe on your computer.How to Turn On or Off Point-in-Time Restore Using Settings
Turning Point-in-Time Restore on or off in Windows 11 through the Settings app is straightforward, offering simple management of this feature. Just open Settings, go to System, then Recovery, where you’ll find a clear switch to control restore point creation.
- Open the Settings app:
- Click the Start menu and choose Settings, or
- Press Windows key + I on your keyboard.
- In Settings, click System on the left side.
- On the right, click Recovery.
- Find the Point-in-time restore option and toggle it On or Off.
- Close the Settings app when done.

How to Enable or Disable Point-in-Time Restore Using Registry Editor
Advanced users can enable or disable Point-in-Time Restore in Windows 11 using the Registry Editor, but proceed with caution. First, open the Registry Editor by pressing Windows key + R and typing ‘regedit’, and it’s a good idea to back up your system before making any changes.
⚠️ Admin Privileges Required
Here’s how:
- Open the Registry Editor:
- Press Windows key + R, type
regedit, and press Enter.
- Press Windows key + R, type
- Navigate to this folder path:
Computer\HKEY_LOCAL_MACHINE\SOFTWARE\Microsoft\Windows\CurrentVersion\Setup\Recovery\PITRSettings - Right-click on Settings in the left panel, select New → DWORD (32-bit) Value.
- Name this new value
Active_UX. - Double-click
Active_UXand set its value to:1to enable Point-in-Time Restore0to disable it
- Click OK and close the Registry Editor.
- Restart your computer to apply the changes.

Summary
- Quick Fix: Easily restore your PC to a recent working state if something goes wrong.
- Automatic Backups: Windows creates restore points every 24 hours without you needing to do anything.
- Simple Control: Turn the feature on or off from Settings or the Registry.
- Temporary Storage: Restore points last for 3 days, giving you plenty of time to fix issues.
- Smart Space Use: Windows deletes old restore points when space is low, so your PC keeps running smoothly.
- Be Careful: Always back up before changing Registry settings.
Point-in-Time Restore in Windows 11 offers a quick fix to restore your PC to a recent working state if issues arise, with automatic backups created daily. You can easily control this feature through Settings or the Registry Editor, and restore points are kept for 3 days.
More info from Microsoft: Point-in-time restore official guide
Does 🪟 Windows 11 have a restore point option?
Type and search [Create a restore point] in the Windows search bar①, then click [Open]②. Select a drive that has system protection turned on③, and then click [Create]④. Type a description to help you identify the restore point⑤, then click [Create]⑥.
How long does it take to restore point in 🪟 Windows 11?
On most Windows 10 and Windows 11 PCs, a System Restore typically takes about 20 to 45 minutes. System Restore may take longer if you have an older system that has a hard drive instead of an SSD.
Was this guide helpful?

About the Author
Richard
Tech Writer, IT Professional
Richard, a writer for Geek Rewind, is a tech enthusiast who loves breaking down complex IT topics into simple, easy-to-understand ideas. With years of hands-on experience in system administration and enterprise IT operations, he’s developed a knack for offering practical tips and solutions. Richard aims to make technology more accessible and actionable. He's deeply committed to the Geek Rewind community, always ready to answer questions and engage in discussions.


No comments yet — be the first to share your thoughts!