How to Change Maximum Disk Usage for Point-in-Time Restore in Windows 11

Point-in-time restore in Windows 11 lets you roll your system files and settings back to an earlier date when something goes wrong. It relies on the Volume Shadow Copy Service (VSS), a background feature that takes snapshots of your drive and stores them as recovery points.
The storage limit controls how much drive space those snapshots can use. Set it well and Windows 11 keeps enough history to protect you without crowding out your own files. You can change it with built-in tools only, so you don’t need any extra software.
Note: Point-in-time restore is a newer feature. If you can’t find it in Settings, your Windows 11 build probably doesn’t include it yet. Run Windows Update , then check again.
Open Settings , go to System Recovery, click Point-in-time restore, and move the Maximum usage limit slider to your desired size between 2 GB and 50 GB. The change takes effect immediately without restarting.
Why manage disk usage for restore points?
Windows needs a set amount of space to hold these snapshots. If you don’t set a limit, VSS may take more space than you want. A limit lets you balance two things: enough recovery points to be useful, and enough free space for your own files.
This matters most on small drives. A 256 GB SSD loses a much bigger share to snapshots than a 2 TB drive does.
What happens when you change the limit?
Once the space limit is reached, Windows stops adding to that pool and deletes the oldest restore points to make room for new ones. So the limit also decides how far back you can go.
You may then find no restore point from before a problem started, which is exactly when you need one.
How to Change Maximum Disk Usage in Settings
The Settings app is the easiest way to change the limit. It lets you control how much drive space your recovery history takes up. You can stop old restore points from filling your drive and still keep enough backups to undo recent system changes.
- Press Win + I to open Settings.
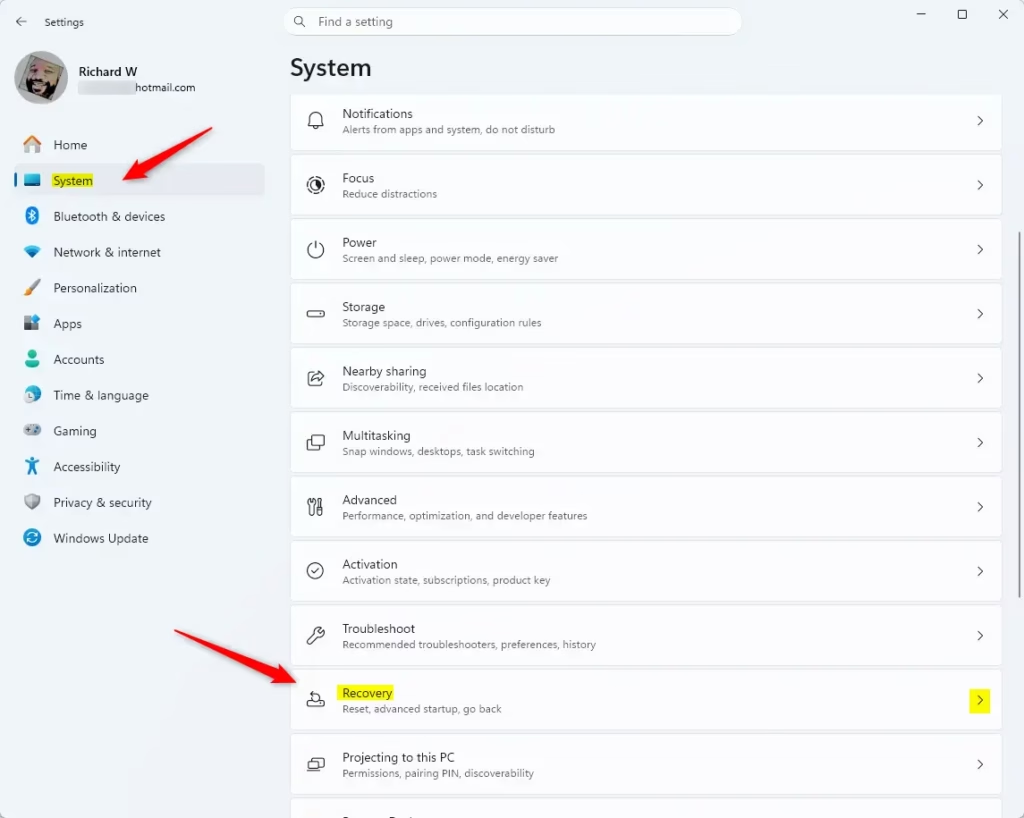
- Click System on the left, then select Recovery on the right. The page lists your recovery options.
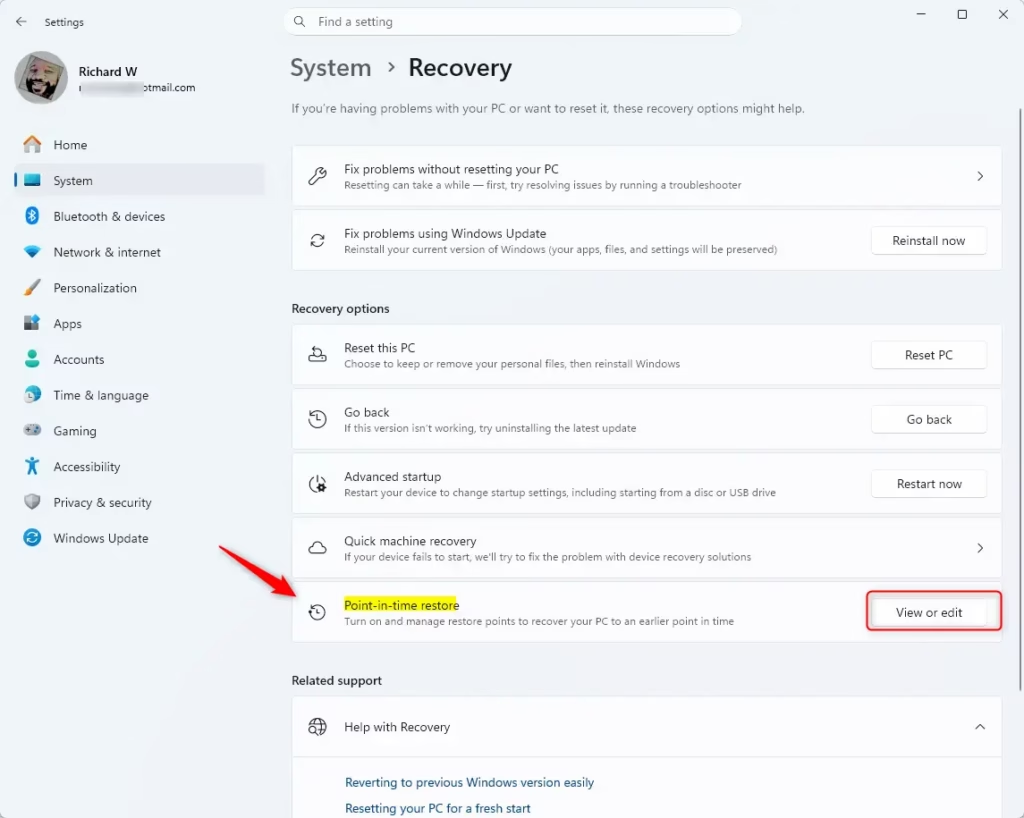
- Under Recovery options, click Point-in-time restore or the View or edit button. The point-in-time restore settings page opens. If neither option is there, your build doesn't have the feature yet.
- Move the Maximum usage limit slider to the size you want. It ranges from 2 GB to 50 GB.
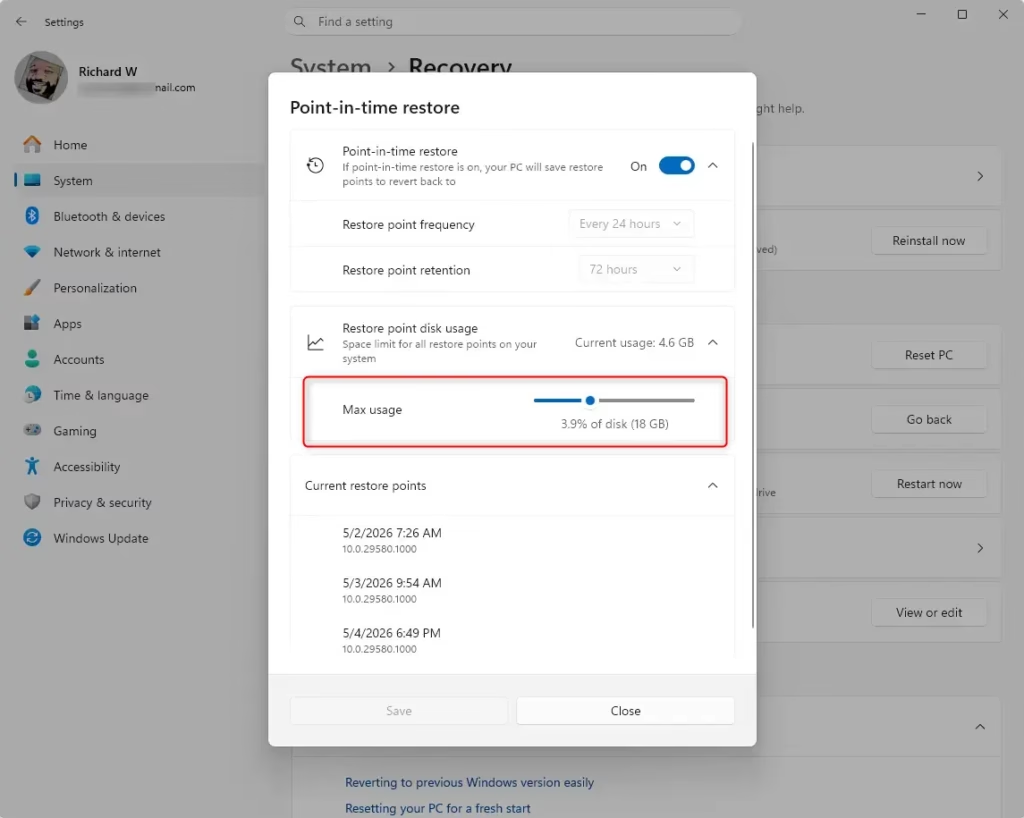
To undo the change, return to the same page and move the slider back to its earlier value. Lowering the limit may cause Windows to remove some of your older restore points.
Advanced Configuration via Registry Editor
The Registry Editor gives you more direct control than the Settings slider. It suits administrators who want to set the limit by hand, or who can't use the Settings page. The Registry Editor is available in both Windows 11 Home and Pro, but you need an administrator account. A wrong edit can cause problems, so back up the registry first (in Registry Editor, use File Export).
- Press Win + R, type regedit, and press Enter. Click Yes if User Account Control asks for permission. Registry Editor opens.
- Navigate to: HKEY_LOCAL_MACHINE\SOFTWARE\Microsoft\Windows\CurrentVersion\Setup\Recovery\PITR\Settings. You can paste the path into the address bar at the top of the window.
- Double-click MaxGlobalSize_UX in the right pane. An edit window opens.
- Select Decimal and enter your desired size in MB. For example, enter 10240 for 10 GB. Click OK.
Close Registry Editor afterwards. If the new limit doesn't show up in Settings, restart the PC. To undo the change, edit the value again and enter your old size. If the path or value isn't there, your build doesn't use this setting, so use the Settings method instead.
Troubleshooting: Volsnap Event ID 36
If you see Volsnap Event ID 36 in Event Viewer, shadow copy storage has run out of space, or the shadow copy was aborted because it couldn't grow. Here is how to fix it:
- Increase your Maximum usage limit using the steps above.
- Check that the drive has at least 15% free space. Below that, VSS can fail.
- If the drive is nearly full, free up space by removing files or moving them elsewhere.
Best Practices for Storage
The right limit depends on your total drive size and how far back you need to be able to undo changes. For most people, a limit between 10 GB and 20 GB is a good balance. It keeps enough history for recent problems without wasting space on unnecessary backups.
- Small drives (256 GB or less): stay near the low end of that range so snapshots don't squeeze your files.
- Larger drives: the upper end costs you little and gives you a longer history.
- Frequent driver or software changes: go higher, because each change can create a new restore point.
Summary
Managing the storage for restore points helps you avoid unexpected disk space shortages. It also keeps recovery points available when system errors happen. Check your maximum usage limit now and then, especially after your free space changes, so you always have enough recovery points ready without crowding your main drive.
Have a question about this guide?
Answered by AI from this guide. Good questions may be added to this page — please don't include personal details.
Did this guide fix your problem?

About the Author
Richard
Tech Writer, IT Professional
Richard is a writer at Geek Rewind who turns complex IT tasks into clear, step-by-step guides. He draws on years of hands-on experience in system administration and enterprise IT operations, focusing on Windows, Linux and WordPress: the problems people actually run into, and the fixes that work. His server and WordPress guides come from systems he runs himself. Richard builds and maintains the platform behind Geek Rewind, from its Ubuntu servers and Nginx configuration to its custom WordPress plugins. Many new tutorials start with readers' questions, and he's always glad to answer them in the comments.
No comments yet — be the first to share your thoughts!