How to View Point-in-Time Restore Points List in Windows 11


System Restore in Windows 11 lets you roll your PC back to an earlier working state. It does this by saving snapshots of your system files, apps, and settings. Point-in-time restore shows an exact list of saved restore dates, so you can pick the right moment to undo a bad update or a broken app.
Checking this list shows you every restore point currently saved on your drive. Before you start, make sure your main drive has at least 2% free disk space, because that is what keeps these snapshots active. Viewing the list only reads information. It changes nothing on your system, so you can look as often as you like.
Open Settings , click System Recovery, find Point-in-time restore, and click View or edit. Approve the User Account Control prompt. Your saved restore points appear under Current restore points. If that entry is missing, press Win+S, type cmd, right-click Command Prompt, select Run as administrator, type vssadmin list shadows, and press Enter to see all system snapshots.
How to View Restore Points in Settings
The simplest way to see your restore points is in the Settings app, under the Recovery section of System settings. This built-in method shows your saved snapshots, so you know your computer can roll back if a recent app or update causes trouble. It works the same on Windows 11 Home and Pro. The Point-in-time restore entry appears only on recent Windows 11 builds. If you don’t see it, update Windows first, or use the Command Prompt method later in this guide.
Steps:
- Press Win+I to open Settings. The Settings window opens with the main categories listed on the left.
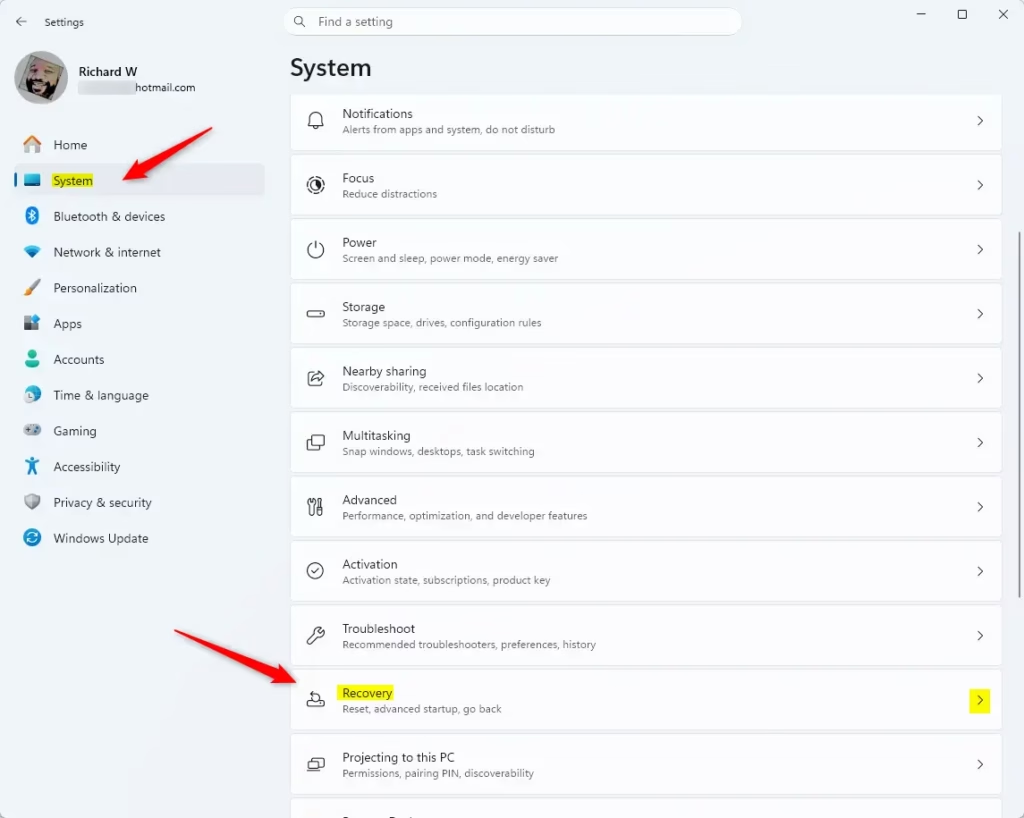
- Click System, then scroll down and click Recovery. The recovery options for your PC now appear on the right.
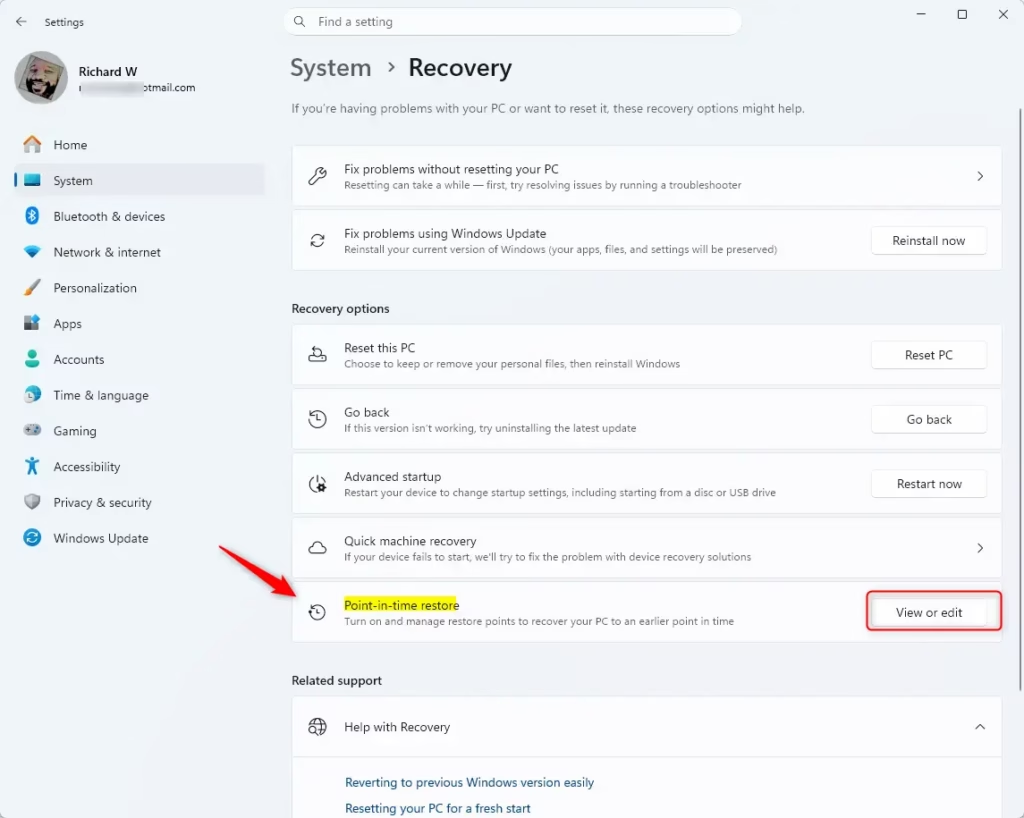
- Find Point-in-time restore and click View or edit.
- [ADMIN REQUIRED] Click Yes on the User Account Control (UAC) prompt. If you are signed in with a standard account, Windows asks for an administrator’s password instead. Enter it to continue.
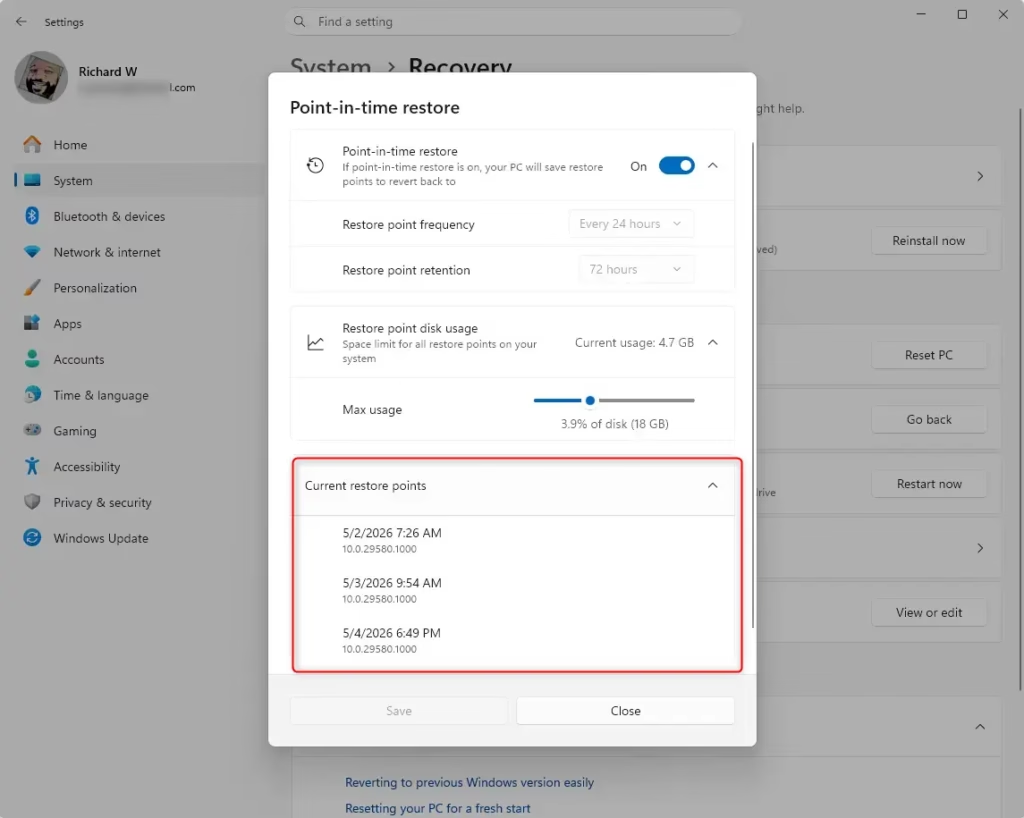
- Look under Current restore points. You will see a list of available snapshots there. If the list is empty, skip to the troubleshooting section below to find out why.
| Criteria | Point-in-time restore | System Restore |
|---|---|---|
| Configuration | System settings | Control panel |
| Restore point trigger | Scheduled frequency (automatic only) | Event-triggered or manual |
| Retention | Max 72 hours per restore point | Indefinite (subject to disk usage/cleanup) |
| Target scope | Full system state | System files and settings; app/user data coverage varies |
| Management | Will support remote management* | No modern management |
| Configuration | Defaults | Options |
|---|---|---|
| Feature On/Off | On | On, Off |
| Restore point frequency | Every 24 hours | 4, 16, 12, 24 hours |
| Restore point retention | 72 hours | 6, 12, 16, 24, 72 hours |
| Maximum usage limit | 2% of disk | Percent of disk (min 2GB, max 50GB equivalent) |
Viewing Restore Points via Command Line
An administrative command line lets you see the raw system snapshots and shadow copies stored on your hard drive. This view is less friendly than Settings, but it works on every edition of Windows 11.
Steps:
- Press Win + S and type cmd. Command Prompt should appear at the top of the search results.
- Right-click Command Prompt and select Run as administrator. Click Yes if the UAC prompt appears. The window title should read Administrator: Command Prompt. If it doesn't, close it and try again, because the command below fails without admin rights.
- [ADMIN REQUIRED] Type the following command and press Enter:Code
vssadmin list shadows
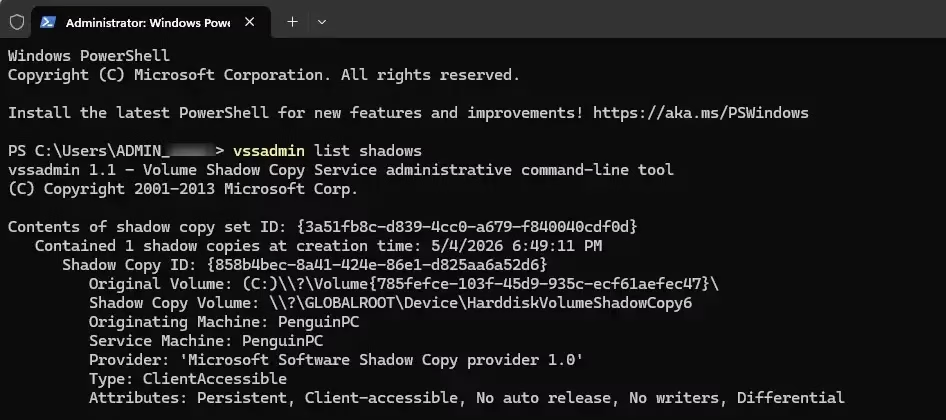
This command lists all shadow copies currently stored on your drive. Each entry shows a creation time, so you can see when the snapshot was taken, along with the volume it belongs to. If the list is empty, no restore points are available. If you get an error about access, you did not open the Command Prompt as administrator.
Keep in mind that shadow copies can also be created by other tools, such as backup software. The list may therefore include entries that are not System Restore points.
Troubleshooting Missing Restore Points
Windows also deletes old snapshots automatically when the drive runs low on free space or when they pass the age limit. Work through the causes below in order.
- System Protection is Off: Go to System Properties System Protection and ensure it is turned On for your drive. You can reach this tab by searching for "Create a restore point" in the Start menu. Select your main drive in the list, click Configure, and choose Turn on system protection. If it was off, Windows has not saved any snapshots while it was disabled, so the list will stay empty until new points are created.
- Disk Space: If your drive is nearly full, Windows may delete old restore points to make room for new files. Free up space by removing files you no longer need, then check the list again. Remember the 2% free space minimum mentioned earlier.
- Age Limit: Restore points are typically kept for a maximum of 72 hours. If your last point is older than that, it may have been deleted automatically. Once a point is gone, it cannot be recovered. Create a new one before you make any big changes to your system.
Summary
You can view restore points in Windows 11 from either the Settings app or the Command Prompt. Settings gives you a clear list, and the Command Prompt works when Settings does not. Remember that these recovery points are temporary. Whether they exist depends on your available disk space and your System Protection settings, so check the list before you install anything risky.
Have a question about this guide?
Answered by AI from this guide. Good questions may be added to this page — please don't include personal details.
Did this guide fix your problem?

About the Author
Richard
Tech Writer, IT Professional
Richard is a writer at Geek Rewind who turns complex IT tasks into clear, step-by-step guides. He draws on years of hands-on experience in system administration and enterprise IT operations, focusing on Windows, Linux and WordPress: the problems people actually run into, and the fixes that work. His server and WordPress guides come from systems he runs himself. Richard builds and maintains the platform behind Geek Rewind, from its Ubuntu servers and Nginx configuration to its custom WordPress plugins. Many new tutorials start with readers' questions, and he's always glad to answer them in the comments.
No comments yet — be the first to share your thoughts!