How to Turn On System Protection in Windows 11


- 2 ways to do it
- Needs administrator rights
System Protection in Windows 11 saves copies of important system files and settings as restore points. If an update, driver or app breaks something, you can roll your PC back to a restore point from a date when everything worked. Windows often leaves this feature off on the C: drive, so you may need to switch it on yourself before a problem shows up.
Turning it on takes less than a minute. It works the same in Windows 11 Home and Pro, and you don’t need to restart afterward. You do need to be signed in with an administrator account, because standard accounts can’t change these settings.
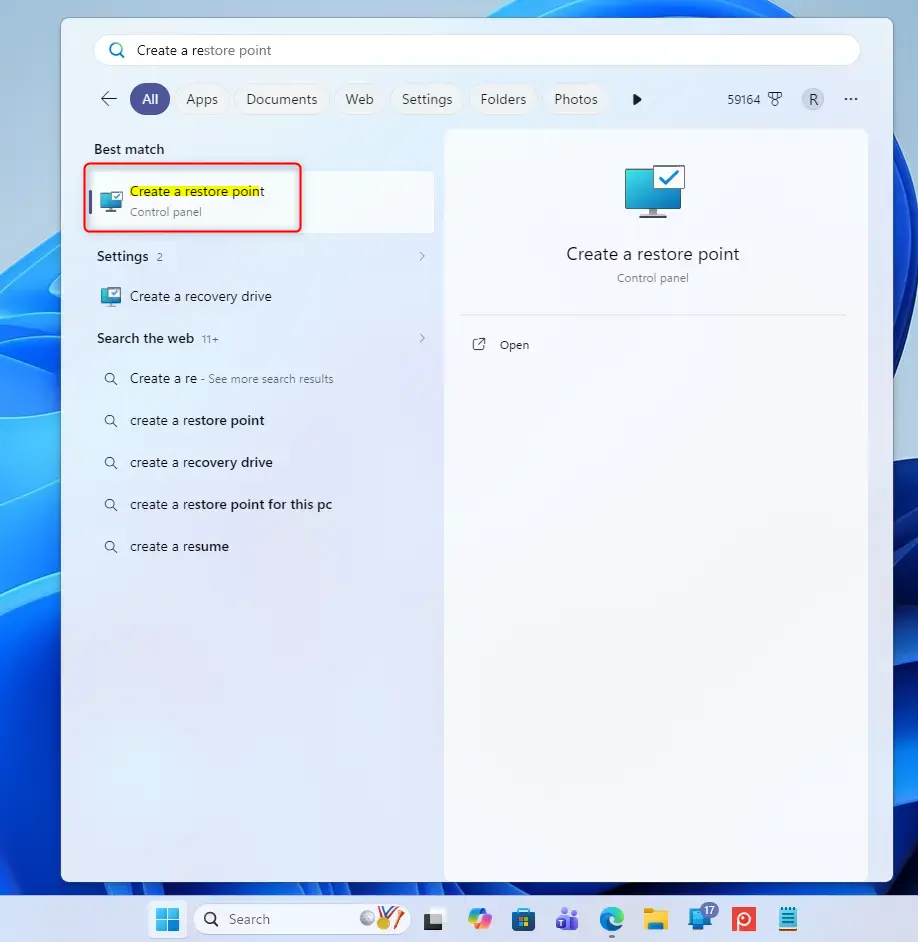
Open System Properties by clicking Start, typing Create a restore point, and clicking the result. Select your C: drive under Protection Settings, click Configure, select Turn on system protection, then click Apply and OK twice. System Protection is now on.
Turning On System Protection: Your First Step
Turning on System Protection is the first step in any PC recovery plan. Until it is on, Windows doesn’t save system snapshots for that drive, and you have nothing to roll back to. This guide covers opening the right window, enabling protection on the C: drive and saving the change.
Here’s how:
Open System Properties
You turn on System Protection from the System Properties window. The quickest way to open it is through Start search, and the Run command works too. Both methods take you to the same panel, where you manage restore points and set up protection for each drive.
Method 1Using the Search Bar
Method 1 uses the search bar:
- Click the Start button, the Windows icon usually found at the bottom of the screen.
- Type Create a restore point in the search box.
- Click the matching result in the list. The System Properties window opens on the System Protection tab.
If you are signed in as a standard user, Windows may ask for administrator credentials at some point. You can’t change the settings without them.
Method 2Using the Run Command
Method 2 uses the Run box. It is handy if search is slow or not working:
- Press the Win and the R key together. A small “Run” window opens.
- Type sysdm.cpl in the box.
- Press Enter. The System Properties window opens. If it doesn’t show the System Protection tab, click that tab in the next step.
Configure System Protection Settings
Next, pick the drive you want to protect. This is where you enable the backup feature and later set how much disk space restore points can use.
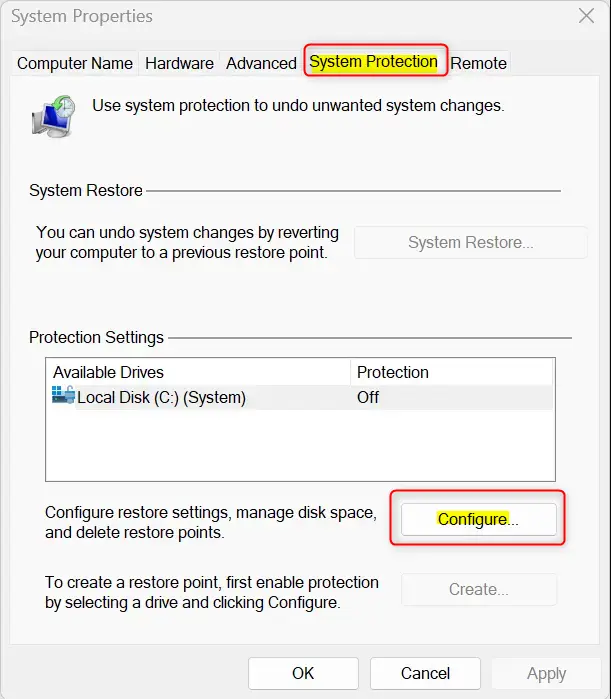
- In the System Properties window, click the System Protection tab if it isn’t already showing.
- Look at the list under Protection Settings. The Protection column shows On or Off next to each drive.
- Select your C: drive, which is normally marked “(System)”.
- Click the Configure button. A “System Protection for Local Disk (C:)” window opens.
If Configure is greyed out, you are most likely not signed in as an administrator. Sign in with an admin account and try again. Also, only drives formatted with NTFS can be protected.
Turn On System Protection
The window that opened lets you switch System Protection on for the selected drive. It also has a disk space slider, so you decide how much room restore points can take up.
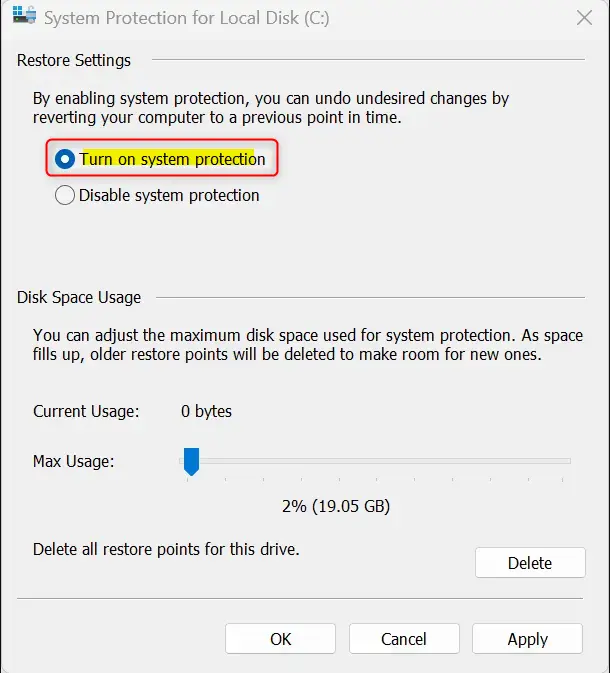
- Under Restore Settings, select the circle next to Turn on system protection. This is the step that actually enables the feature for the drive. The Max Usage slider is now active.
- Optional: drag the Max Usage slider to set how much disk space restore points can use. A larger limit keeps more and older restore points. When the limit is reached, Windows deletes the oldest ones to make room for new ones.
The default limit is fine for most people. Raise it only if you have plenty of free space and want a longer history to go back to.
Apply Your Changes
Apply the settings, then close both windows. Windows starts creating restore points on that drive from this point on.
- Click the Apply button. You might see a quick message that System Protection is turning on.
- Click OK to close the “Configure System” window.
- Click OK again to close the “System Properties” window.
- To check the result, reopen the System Protection tab. The C: drive should now show On in the Protection column.
Windows creates restore points automatically, for example before some updates and driver installs. If you want one right now, for instance before you change something risky, click Create on the System Protection tab, type a short description and click Create again.
Turning protection off deletes the existing restore points for that drive, so only do it if you mean to.
Reference:
https://support.microsoft.com/en-us/windows/system-protection-e9126e6e-fa64-4f5f-874d-9db90e57645a
Summary
System Protection automatically creates restore points, so you can return your PC to an earlier working state if something goes wrong. It is worth turning on because it is often off by default on the C: drive. Switching it on now means the restore points will already exist when you need them.
Have a question about this guide?
Answered by AI from this guide. Good questions may be added to this page — please don't include personal details.
Did this guide fix your problem?

About the Author
Richard
Tech Writer, IT Professional
Richard is a writer at Geek Rewind who turns complex IT tasks into clear, step-by-step guides. He draws on years of hands-on experience in system administration and enterprise IT operations, focusing on Windows, Linux and WordPress: the problems people actually run into, and the fixes that work. His server and WordPress guides come from systems he runs himself. Richard builds and maintains the platform behind Geek Rewind, from its Ubuntu servers and Nginx configuration to its custom WordPress plugins. Many new tutorials start with readers' questions, and he's always glad to answer them in the comments.
… liked this!