What Breaks When You Turn Off Windows 11 System Restore Points

Turning off System Restore in Windows 11 removes your safety net for rolling back bad updates, driver crashes, and broken software without losing personal files. System Restore is a built-in feature that saves snapshots of your system files and registry keys so you can undo major computer problems.
Disabling this feature deletes every saved snapshot currently on that drive and stops Windows from creating new ones. Without these backups, fixing a corrupted operating system often means a repair, a reset, or a full reinstall of Windows. System Restore is the same in Windows 11 Home and Pro, so the points below apply to both.
Turning off Windows 11 System Restore removes your ability to undo bad driver and software installations, eliminates automatic restore points before Windows updates, deletes all existing snapshots on that drive, and removes your safety net for registry editing mistakes. Without restore points, fixing a corrupted system often requires Safe Mode troubleshooting, a Windows reset, or a full reinstall.
What Breaks When You Turn Off 🪟 Windows 11 System Restore Points
Disabling this feature removes several layers of protection. Here are the core functions that break or disappear when you turn off system restore points in Windows 11.
One thing to keep in mind throughout: System Restore protects system files, drivers, installed programs, and registry settings. It does not back up your documents, photos, or other personal files, so it is not a replacement for a real backup.
1The Ability to Undo Bad Software and Driver Installs
Turning off Windows 11 system restore points removes your ability to easily undo faulty software and driver installations. When a new driver or app crashes your computer, you can no longer roll your system settings back to a date before the bad install. You have to fix the problem manually.
Normally, if a new driver ruins your computer, you open your system recovery options, pick a date before the installation, and restore the computer to working order. If you turn off system protection, that option is gone. Your remaining options are slower:
- Boot into Safe Mode and remove the faulty software.
- Roll the driver back through Device Manager. This only works if Windows still has the previous driver version stored.
- Reset your entire operating system, which is the last resort and costs you the most time.
The gap is biggest when the PC will not boot to the desktop. Safe Mode and the recovery environment can still help, but without a restore point you have fewer tools to work with.
2Protection Against Broken Windows Updates
When system protection is active, Windows can create a restore point automatically before certain installs, including some updates and drivers. It does not do this for every update, but it is a useful backstop. Disabling system protection removes that backstop. If a faulty Microsoft update breaks your internet connection or traps your device in a restart loop, you will not have a restore point to fix it quickly.
Without restore points, you depend on two things. One is Microsoft releasing a patch. The other is your ability to uninstall the update yourself. If you can still reach the desktop, go to Settings Windows Update Update history Uninstall updates and remove the update that caused the problem. If you cannot reach the desktop, you will need the Windows recovery environment, which takes longer and is less forgiving.
3Registry Editing Safety Net
Turning off system restore points removes your easiest safety net when editing the Windows Registry. A single mistake in the registry can stop your computer from booting, and without a restore point you lose the quickest way to undo it.
A good habit before editing the registry is to create a manual restore point first. If you delete a critical key by mistake, restoring the snapshot you made five minutes earlier takes only a few clicks. With system protection off, you cannot create that restore point at all, so one wrong keystroke in the Registry Editor can force a repair or reinstall of Windows.
Exporting the keys you plan to change from the Registry Editor gives you a second layer of protection, but it is no substitute for a full restore point.
4Loss of Existing Restore Points
Turning off the feature does not just stop future snapshots. It destroys every snapshot currently stored on that drive. If you have a working restore point from last week that could save you from a problem you have not noticed yet, it is wiped permanently the moment you confirm the change.
Windows asks you to confirm before it deletes anything, and there is no undo. If you only want to free up space, shrink the storage limit instead (see the steps later in this article) rather than turning protection off.
Hidden Consequences: What Else Stops Working?
Beyond the obvious safety nets, turning off system protection has a few side effects that catch everyday users off guard.
Conflict with Third-Party Software Uninstallers
Some third-party uninstallers and system cleaners create a restore point before removing stubborn programs and their leftover files. With system protection off, they cannot do that, so if a deep clean removes something Windows needs, there is nothing to put it back. Check the settings of any cleaner you use. Some will warn you, and some will fail quietly.
Interference with System File Checker Results
System File Checker (SFC) repairs damaged Windows files, but it does not use restore points. It pulls clean copies from the Windows component store on your drive, so turning off system protection does not stop it from working. What you lose is the other option. If SFC and related repair tools cannot fix the damage, you no longer have an earlier snapshot to fall back on.
The Real Cost of Saving Disk Space
Turning off Windows 11 system restore points frees up storage, but the real cost is the time you lose during a crash. The amount you save depends on the maximum usage setting and the size of your drive. It is often around ten gigabytes, and on some systems more. Weighed against hours of troubleshooting a broken computer, keeping the feature on is usually much safer.
If a bad update or driver crashes your computer and you have no restore points, fixing it might mean hours of troubleshooting, downloading recovery media, or reinstalling all your applications. Saving ten gigabytes is rarely worth losing an afternoon when a rollback could have fixed the issue in five minutes. On a small solid-state drive the trade-off is more tempting, but lowering the storage limit is a better answer than turning protection off.
How to Limit Disk Space Instead of Disabling It
Limiting how much disk space Windows uses for restore points lets you save storage without giving up your safety net. Lowering the maximum disk usage slider keeps a few recent snapshots available while capping how much space they can take. When the limit is reached, Windows deletes the oldest restore points to make room for new ones.
- Click the Start button, type Create a restore point, and press Enter. The System Properties window opens.
- Make sure you are on the System Protection tab.
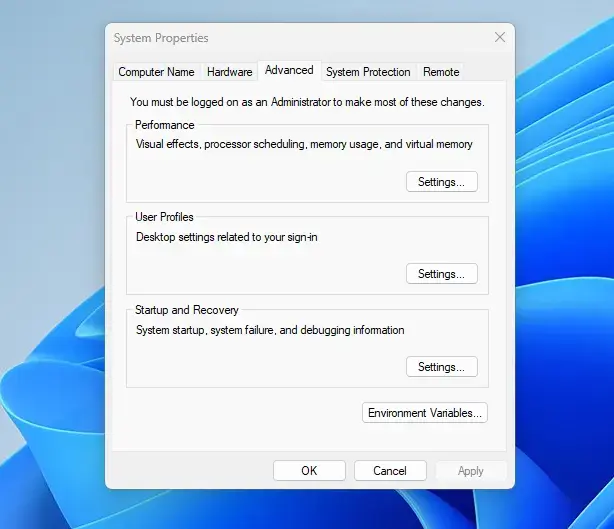
System Properties - Click your main system drive, usually labeled Local Disk (C:), to highlight it.
- Click the Configure button near the bottom. If it is greyed out, check that you are signed in as an administrator. On a work or school PC, a policy may also block the change. The Restore Settings window opens.
- Look for the section labeled Disk Space Usage. It shows the current usage and a Max Usage slider.
- Drag the slider to the left to reduce the maximum space Windows can use for restore points. For example, lower it from 10 percent to 3 or 5 percent.
- Click Apply, and then click OK to save your changes. You return to the System Protection tab.
Lowering the slider keeps the protection you need while reclaiming storage. Don't set it too low. A very small limit may leave room for only one restore point, or none. You do not need to restart the computer for this change to take effect.
How to Check Your System Protection Status
Checking your system protection status takes a few seconds. Open the restore point menu from the Start search box and look at the Protection column next to your drives. It shows whether your computer is currently saving restore points. Some Windows 11 installs ship with protection off for the system drive, so it is worth checking even if you never changed anything.
- Click the Start button, type Create a restore point, and select the matching result. The System Properties window opens on the System Protection tab.
- Look at the list under the Protection column next to your drives.
- If it says On, your safety net is active. If it says Off, your computer is not creating automatic snapshots for that drive.
To turn it back on, select the drive and click the Configure button. Choose Turn on system protection, set the Max Usage slider, and click OK. Protection starts working from that point. Snapshots that were deleted earlier do not come back, so click Create on the System Protection tab to make a fresh restore point right away.
Summary
Disabling system restore points in Windows 11 deletes all your existing safety snapshots and stops your computer from creating new ones automatically. It saves some disk space, but it leaves you without an easy way to undo bad software updates, faulty driver installations, or accidental registry errors. If storage is the concern, lower the maximum usage instead and keep protection on.
Was this guide helpful?

About the Author
Richard
Tech Writer, IT Professional
Richard is a writer at Geek Rewind who turns complex IT tasks into clear, step-by-step guides. He draws on years of hands-on experience in system administration and enterprise IT operations, focusing on Windows, Linux and WordPress: the problems people actually run into, and the fixes that work. His server and WordPress guides come from systems he runs himself. Richard builds and maintains the platform behind Geek Rewind, from its Ubuntu servers and Nginx configuration to its custom WordPress plugins. Many new tutorials start with readers' questions, and he's always glad to answer them in the comments.




No comments yet — be the first to share your thoughts!