Task Manager 📊 showing 100 percent disk usage means your hard drive or solid-state drive (SSD) is running at maximum capacity and slowing down your PC. This bottleneck causes freezing, slow app loading, and sluggish performance across Windows 10 and Windows 11.
Advertisement
A maxed-out disk usually happens when background services, outdated drivers, or system files get stuck in a loop. Turning off specific Windows features like SysMain (a service that preloads apps you use often) and Windows Search often brings that stubborn percentage back down to normal.
⚡ Quick Answer
Task Manager 📊 shows 100 percent disk usage because your storage drive is completely overwhelmed by background tasks or open apps trying to read and write data at the same time. You can fix this common performance bottleneck by restarting your computer or disabling the SysMain service in the Windows Services app.
Advertisement
What Does 100 Percent Disk Usage Mean?
100 percent disk usage means your computer’s main storage drive is working at its absolute maximum capacity and cannot handle any more requests. When Task Manager 📊 shows 100 percent disk usage, it indicates that background programs, system updates, or failing hardware are constantly reading and writing data to your hard drive, which causes your computer to freeze, lag, and run extremely slowly.
Every time your computer needs to open a file, load a webpage, or save a document, your storage drive reads or writes data. The Windows Task Manager 📊 measures how busy your storage drive is at any given moment. When the Task Manager shows 100 percent disk usage, your storage drive is spending all of its processing time trying to handle every single read and write request without any spare capacity left.
If your computer uses an older mechanical hard drive, 100 percent disk usage happens frequently. These older mechanical hard drives have moving parts and physical limits. Modern versions of Windows do a lot of background tasks. These background tasks can easily overwhelm an older mechanical hard drive, locking the disk usage at 100 percent.
How to Check Your Disk Usage in Task Manager
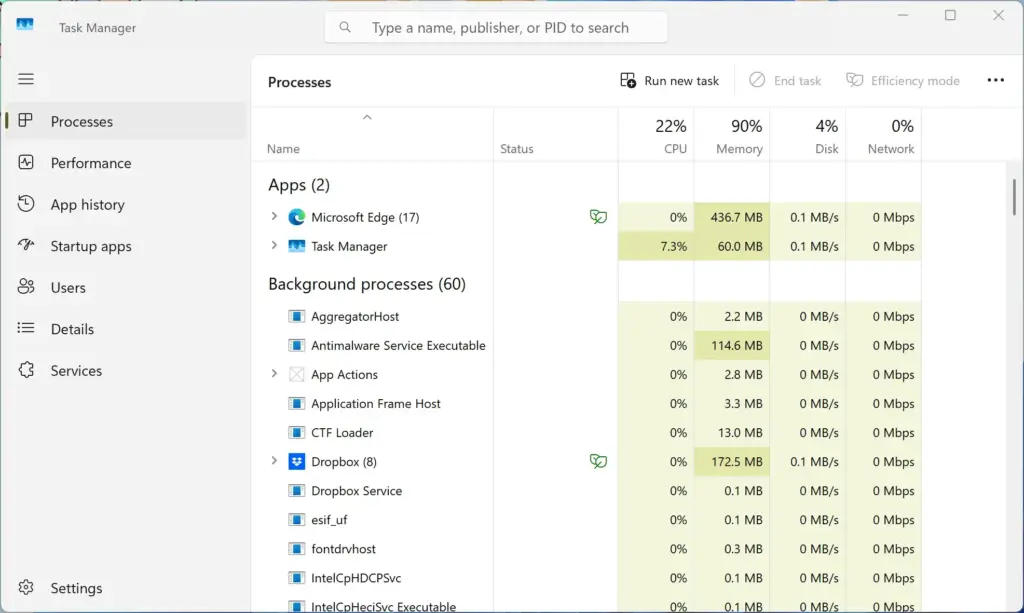
Checking your disk usage in Task Manager 📊 takes just a few seconds and helps you identify which apps are slowing down your computer. You can open Task Manager by pressing the Ctrl, Shift, and Esc keys at the same time, then clicking on the Performance or Processes tab to see your exact drive activity percentage and find the exact programs causing the slowdown.
Advertisement
Here is how to open the Task Manager and check your disk usage:
Task Manager
Press the Ctrl + Shift + Esc keys on your keyboard at the same time. You can also press Ctrl + Alt + Delete and select Task Manager.
If the Task Manager opens in a small window with very few details, click More details at the bottom of the window.
Click on the Processes tab at the top.
Look at the column labeled Disk. Click the word Disk at the top of the column to sort the list. This puts the programs using the most disk space at the very top.
Take note of which apps or background processes are using the highest percentage. This points you directly to the culprit.
Common Causes and Fixes for 100 Percent Disk Usage
Common causes and fixes for 100 percent disk usage include outdated background services, cluttered temporary files, and corrupted system storage drivers. You can fix high disk usage step by step by restarting your computer, disabling unnecessary startup programs in Task Manager, and updating your storage drivers to stop your drive from freezing up.
1Restart Your Computer
Restarting your computer is the easiest way to fix 100 percent disk usage caused by stuck background processes or temporary system glitches. When a background task gets trapped in a continuous loop of reading and writing data, a simple reboot clears your computer's short-term memory, stops all running background tasks, and instantly resets your storage drive activity back to normal.
Advertisement
Restarting clears your computer's short-term memory and stops all running background tasks. Click the Start button, click the Power icon, and select Restart. Check the Task Manager again once your computer boots back up.
2Disable Superfetch or Prefetch Services
Disabling the Superfetch or SysMain service in Windows is one of the most effective ways to fix 100 percent disk usage on traditional hard drives. This Windows feature tries to guess which apps you will open next and preloads them into memory, which frequently overwhelms slower mechanical drives and causes massive system slowdowns until turned off.
While running the Windows Superfetch service (also called SysMain) sounds helpful, the service often causes 100 percent disk usage on computers with traditional hard drives. Turning off the Superfetch service can bring immediate relief to your computer system.
📝NoteThis step requires administrator privileges.
Advertisement
Click the Start button, type Services in the search bar, and click the Services app icon.
Scroll down the long alphabetical list and look for a service named SysMain (or Superfetch on some older versions of Windows).
Right-click on SysMain and select Properties.
In the window that opens, find the option labeled Startup type. Click the drop-down menu next to it and select Disabled.
Click the Stop button right below it to stop the service from running right now.
Click Apply and then click OK.
3Stop Windows Search Indexer
Stopping the Windows Search indexer can immediately fix 100 percent disk usage caused by the system getting stuck scanning corrupted files over and over again. Windows constantly indexes your documents and photos so you can find them quickly in the Start menu, but this background scanning process occasionally malfunctions and hammers your hard drive continuously.
Sometimes, the indexer gets stuck on a corrupted file. It keeps scanning the same file over and over, driving your disk usage up to 100 percent. You can temporarily stop the Windows Search service to see if this is the problem.
📝NoteThis step requires administrator privileges.
Click the Start button, type Services, and open the Services app.
Scroll down and find Windows Search.
Right-click on Windows Search and select Properties.
Change the Startup type to Disabled.
Click the Stop button to stop the service immediately.
Click Apply and then OK.
Check your Task Manager after doing this. If your disk usage drops, you know the search indexer was the root cause.
Advertisement
4Check for Antivirus and Malware Scans
Antivirus and malware scans often cause 100 percent disk usage because checking every single file on your computer demands a massive amount of drive power. If your security software is running a full system scan in the background, your hard drive has to read all your data at once, which temporarily slows down your entire computer.
Antivirus software running a background scan often causes your hard drive usage to spike to 100 percent after you install new security programs or when a scheduled check starts automatically. Open your antivirus program to see if a system scan is running. If an antivirus scan is currently running, you can either let the security check finish or pause the scan until you stop using your computer.
5Reset Virtual Memory
Resetting your virtual memory can fix 100 percent disk usage by clearing out a fragmented or corrupted paging file that is wasting your system resources. When your physical RAM gets full, Windows uses a portion of your hard drive as temporary memory, and resetting this file stops the system from wasting time struggling to read and write to it.
If your virtual memory file—known as the pagefile—becomes scattered across the drive or damaged, your computer wastes valuable time reading and writing data to the storage drive. Resetting this virtual memory file can clear up the high disk usage problem by creating a fresh, clean file for your system to use.
Advertisement
Note: This step requires administrator privileges.
Click the Start button, type Advanced system settings, and click the option that says View advanced system settings.
Under the Advanced tab, find the Performance section and click the Settings button.
In the new window, click the Advanced tab at the top.
Look for the Virtual memory section and click the Change button.
Uncheck the box at the top that says Automatically manage paging file size for all drives.
Select your main drive (usually C:) from the list.
Select the radio button for No paging file and click the Set button. Click Yes on the warning message.
Restart your computer.
Repeat the steps above to return to the virtual memory settings. Check the box to Automatically manage paging file size for all drives again, click Set, and restart your computer one more time.
6Update Your Device Drivers
Updating your storage device drivers can resolve 100 percent disk usage caused by communication conflicts between Windows and your hardware. Outdated drivers, particularly the StorAHCI.sys driver that manages how your storage drive talks to the motherboard, often struggle with modern Windows updates and cause severe performance bottlenecks until you install a fresh version.
You can check and update your storage controller driver through the Device Manager.
Note: This step requires administrator privileges.
Advertisement
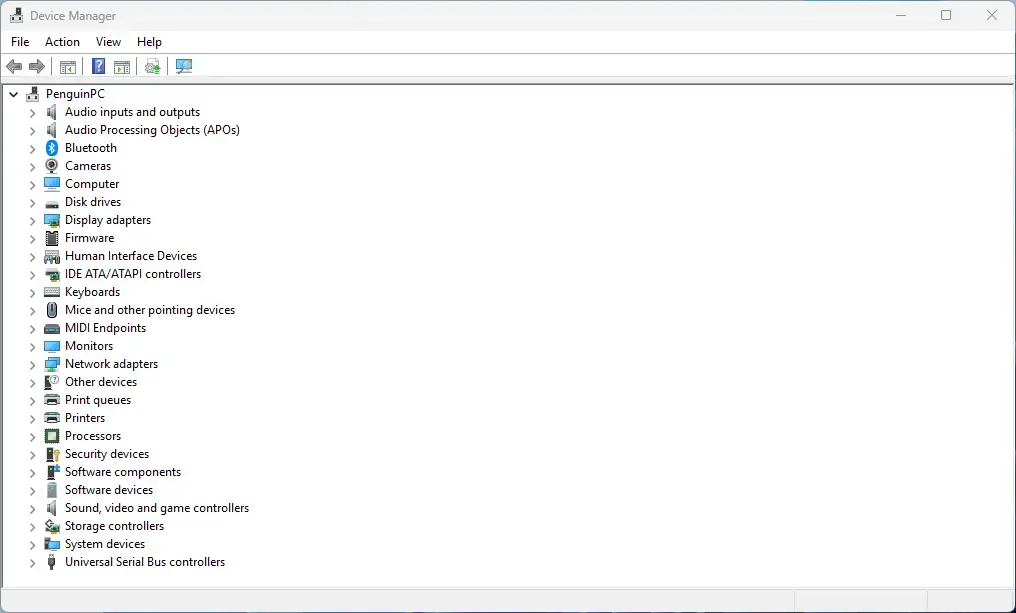
Right-click the Start button and select Device Manager from the menu.
Device Manager
Scroll down and look for a category named IDE ATA/ATAPI controllers. Click the arrow next to it to expand the list.
Right-click on the controller listed (usually called Standard SATA AHCI Controller) and select Properties.
Go to the Driver tab at the top of the properties window and click the Driver Details button.
Look for a file named storahci.sys in the list. If you see it, click OK to close the details window.
Click the Details tab in the main properties window.
Click the drop-down menu under Property and select Device instance path.
Note down the text value shown in the box below.
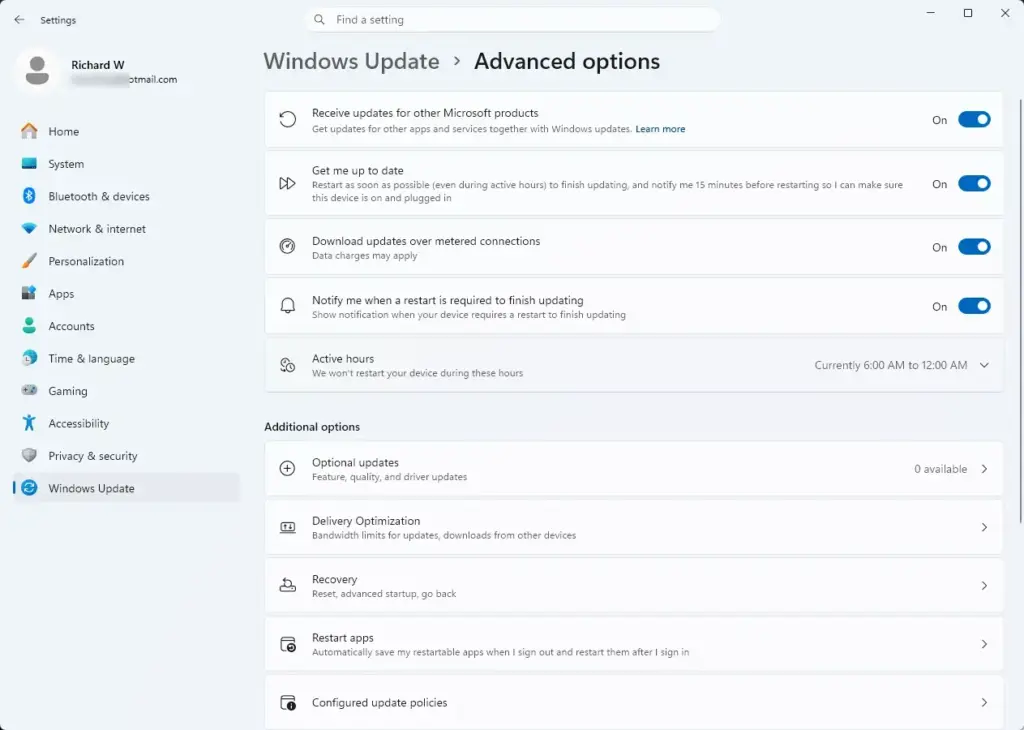
Close the Device Manager and open the main Windows settings. Click the Start button, open Settings, go to Windows Update, and check for optional updates to find manufacturer driver updates safely.
How to stop Manufacturer Apps from Installing Automatically in Windows 11
Checking for optional updates in Windows Update remains the safest route for everyday users.
Settings › Update › Advanced options
7Check Your Hard Drive for Errors
Checking your hard drive for errors using the built-in command prompt tool can find and fix damaged sectors that cause 100 percent disk usage. When a hard drive starts failing or develops corrupted files, Windows struggles repeatedly to read the data, creating a massive processing bottleneck that slows your entire computer down to a crawl.
Note: This step requires administrator privileges.
Click the Start button, type cmd in the search bar.
Right-click on Command Prompt in the search results and select Run as administrator.
Command Prompt
Type the following exact command into the black window:
💻Code
chkdsk.exe /f /r
Press the Enter key on your keyboard.
Windows will ask you if you want to schedule this check the next time your computer restarts. Type the letter Y for yes and press Enter.
Restart your computer. The scan will run before Windows boots up. This can take anywhere from a few minutes to a few hours depending on the size and speed of your drive.
Advanced and Overlooked Fixes
If you tried the basic steps above and your disk usage is still locked at 100 percent, the issue might stem from background cloud services, browser settings, or hardware limitations. Here are two overlooked fixes that often solve stubborn cases.
1Pause or Reconfigure Cloud Sync Services
Pausing cloud sync services like OneDrive, Dropbox, and Google Drive can stop 100 percent disk usage on your computer when background apps upload large batches of files. These cloud sync services constantly watch your folders for changes and work overtime to sync data, which easily saturates traditional hard drives and causes severe performance slowdowns.
When cloud apps sync large amounts of data, they saturate your hard drive. To check if this is your issue:
Look at the bottom right corner of your screen near the clock. Click the upward-facing arrow to see hidden icons.
Find your cloud sync icons (such as the blue or white cloud for OneDrive).
Right-click the icon and choose the option to pause syncing temporarily (usually for 2 hours or until you restart).
Check your Task Manager to see if your disk usage drops. If it does, let the sync finish overnight while you are not using the computer.
2Disable Google Chrome and Web Browser Preloading
Disabling web browser preloading in Google Chrome stops the constant background reading and writing of cache files that causes high disk usage. Browsers try to speed up your web browsing by preloading pages you might visit next, but a bloated browser cache forces your hard drive to work overtime and triggers system lag.
If your browser cache becomes bloated, it can cause high disk usage. You can turn off this feature inside your browser settings.
Open Google Chrome.
Click the three vertical dots in the top right corner and select Settings.
Click on Performance in the left sidebar menu.
Look for the setting related to preloading pages (often called Preload pages for faster browsing and searching).
Toggle this switch to the Off position.
Restart your browser and monitor your system performance.
When to Consider Upgrading to an SSD
Upgrading to a Solid State Drive (SSD) is the ultimate hardware fix when standard software troubleshooting fails to solve 100 percent disk usage. Traditional mechanical hard drives simply cannot keep up with the constant background read and write demands of modern Windows operating systems, making an SSD upgrade necessary for fast and reliable performance.
Traditional mechanical hard drives (HDDs) have a hard time keeping up with modern versions of Windows. Windows 10 and Windows 11 perform many background tasks that require fast read and write speeds. Traditional hard drives top out at around 100 megabytes per second. A basic Solid State Drive (SSD) is often five to ten times faster. A modern NVMe SSD can be dozens of times faster.
Upgrading from an older mechanical hard drive to a Solid State Drive is the single best upgrade you can make to an older computer. It completely eliminates disk bottlenecks, boots your computer in seconds, and makes even an aging laptop feel brand new.
Conclusion
Fixing 100 percent disk usage in Task Manager is entirely possible by systematically addressing resource-heavy background services, updating your storage drivers, and managing your system memory. While seeing your drive pinned at maximum capacity is stressful, following these simple troubleshooting steps will quickly bring your disk usage back down to normal levels and speed up your computer.
Hardware upgrades and physical drive checks help when software tweaks fail to fix high disk usage in Windows Task Manager. You can check your hard drive for physical errors by running the built-in error checking tool, or you can replace an older mechanical hard drive with a modern Solid State Drive. Taking these hardware steps will restore your computer's speed and make your daily computing experience smooth and enjoyable again.
Summary
Troubleshooting 100 percent disk usage in Windows involves identifying overwhelmed storage drives in Task Manager and applying effective fixes like stopping background services, updating drivers, and checking for drive errors. This comprehensive guide walks you through every simple step needed to stop system lag and restore your computer's normal performance.
Was this guide helpful?
100% of readers found this helpful (1 votes)
📬 Get new Windows tips in your inbox
One email when we publish something worth your time. No spam, unsubscribe anytime.
Richard is a writer at Geek Rewind who turns complex IT tasks into clear, step-by-step guides. He draws on years of hands-on experience in system administration and enterprise IT operations, focusing on Windows, Linux and WordPress: the problems people actually run into, and the fixes that work.
His server and WordPress guides come from systems he runs himself. Richard builds and maintains the platform behind Geek Rewind, from its Ubuntu servers and Nginx configuration to its custom WordPress plugins.
Many new tutorials start with readers' questions, and he's always glad to answer them in the comments.
One email when we publish a guide worth your time — new Windows features, the fixes that actually
work, and a heads-up when Microsoft breaks something. Unsubscribe in one click.
📬 Get new Windows tips in your inbox
One email when we publish something worth your time. No spam, unsubscribe anytime.





No comments yet — be the first to share your thoughts!