How to Scan for Malware in Windows 11 with Defender


Scanning for malware with Microsoft Defender, the free security program built into Windows 11, checks your PC for malicious software whenever you ask it to. A manual scan tells you the system is clean right now. It is most useful after you download a file from a site you don’t know, or when the PC starts acting strangely.
You can start a standard scan in a few clicks from the Windows Security app. Defender works quietly in the background most of the time. A manual check is a good second opinion when something feels off. This guide covers four ways to do it: the right-click menu , the Windows Security app, Command Prompt and PowerShell.
To scan for malware in Windows 11, open Windows Security, click Virus & threat protection, then click Scan options under Current threats and choose Quick scan or Full scan. For one file or folder, right-click it in File Explorer , click Show more options, then click Scan with Microsoft Defender. Results appear in Windows Security when the scan finishes.
Why Scan Manually?
A manual scan lets you check a specific file, folder or drive right away, instead of waiting for Defender’s background checks. Run one if you downloaded an unverified file, plugged in a USB drive you don’t recognize, or noticed odd behavior such as slowdowns, pop-ups or settings changing on their own.
In that case Defender may be switched off or running in a limited mode, and you need to scan from the other program. Uninstalling the other antivirus normally lets Defender take over again.
Option 1The Fastest Way – Right-Click Scan
The right-click menu is the fastest way to check one file, folder or drive. You don’t need to open the full security dashboard. It works well for fresh downloads and email attachments you have saved but not yet opened.
- Open File Explorer . Press the Win+E, or open the Desktop if the item is there.
- Browse to the file, folder or drive you want to check.
- Right-click it. The Windows 11 menu is short and does not show every option.
- Click Show more options to open the full classic menu. You can also press Shift+F10 on the selected item. You should now see a longer list.
- Click Scan with Microsoft Defender. Windows Security opens and shows the scan progress.
- Wait for the scan to finish. Small items finish in seconds. Large folders and whole drives take longer.
- Read the result. If Defender finds something suspicious, it says so and offers actions. Click See details to learn more about what it found.
If Scan with Microsoft Defender does not appear in the full menu, another antivirus is likely in charge. Use that program’s own scan option instead.
Good tip: Scan email attachments and downloads before you open them, not after. If a scan flags something, don't open the file.
Option 2Using the Windows Security App
The Windows Security app gives you the most control. From here you can run a quick check, scan the whole computer, scan chosen locations, or run an offline scan to remove stubborn malware. This is also where you adjust your virus protection settings.
- Click the Start button and type Windows Security. Click the app in the results. You can also go to Settings Privacy & security Windows Security and click Open Windows Security.
- Click Virus & threat protection. It is in the menu on the left and also appears on the home screen. The page that opens has a Current threats area.
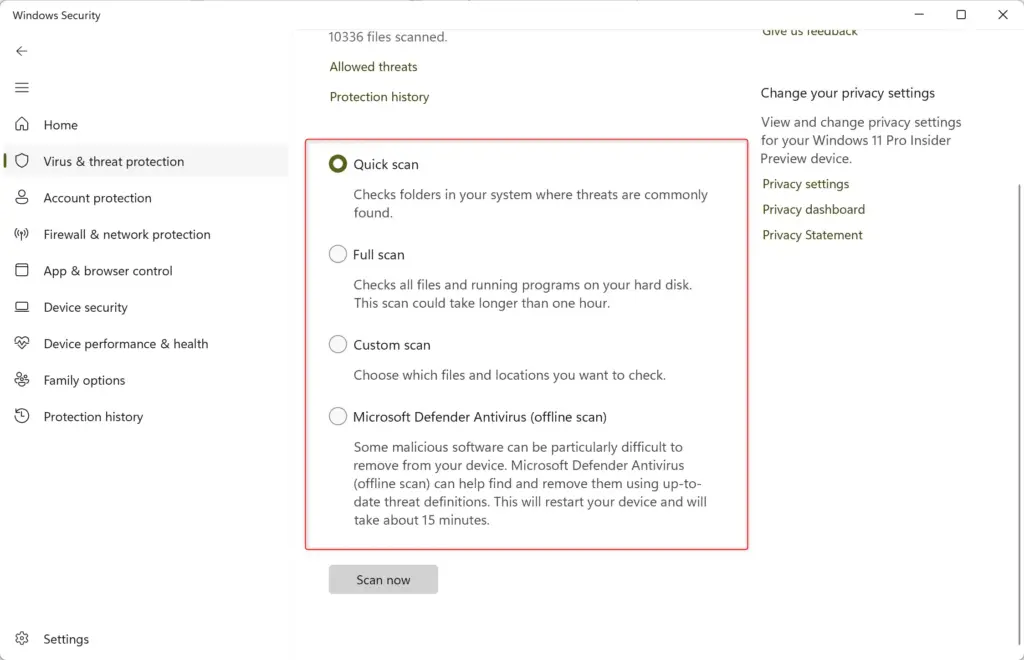
- Under Current threats, click Scan options. You should see a list of scan types with a round button next to each.
- Select the scan type you want:
- Quick scan: checks the places malware most often hides. It is fast and a good first step. The Quick scan button on the main page does the same thing.
- Full scan: checks every file and running program on the computer. It can take a long time, so start it when you don't need the PC.
- Custom scan: lets you pick specific files, folders or drives.
- Microsoft Defender Offline scan: restarts the PC and scans before Windows fully loads. It is good for hidden or persistent threats that can hide from a scan inside Windows. Save your work first, because the PC restarts as soon as you start it.
- Click Scan now. A progress bar shows the scan running. You can keep using the PC, though it may feel slower during a Full scan.

For Custom scans:
- Select Custom scan and click Scan now. A folder picker opens.
- Browse your drives and folders and select what you want Defender to check.
- Click Select Folder. The scan starts right away.
Deal with any problems. As with the right-click method, Defender shows the results when the scan ends. If it reports Threats found, click Start actions to let it quarantine or remove them, or click See details for more information. You can review past results later under Virus & threat protection Protection history
Be careful: A Full scan can run for hours, depending on how much data you have. On a laptop, plug in the charger before you start, and pick a time when you can leave the PC alone.
Option 3Using the Command Prompt (For Those Who Like Typing Commands!)
Command Prompt can run Defender scans through its command-line tool, MpCmdRun.exe. This suits people who prefer the keyboard, and it works in scripts and automated admin tasks.
- Click the Start button and type Windows Terminal.
- Right-click Windows Terminal and choose Run as administrator. Click Yes if the User Account Control prompt appears. Administrator rights are required.
- Make sure you are in a Command Prompt tab. If the tab is PowerShell, click the down arrow next to the plus sign and select Command Prompt.
- Copy one of the commands below, paste it into the window, and press Enter. The tool prints progress messages while it works.
- To update definitions and run a Quick Scan:
Code"%ProgramFiles%\Windows Defender\MpCmdRun.exe" -SignatureUpdate & "%ProgramFiles%\Windows Defender\MpCmdRun.exe" -Scan -ScanType 1 - To run just a Quick Scan:
Code"%ProgramFiles%\Windows Defender\MpCmdRun.exe" -Scan -ScanType 1 - To run a Full Scan:
Code"%ProgramFiles%\Windows Defender\MpCmdRun.exe" -Scan -ScanType 2 - To run a Custom Scan on a specific file or folder, replace
"Full Path"with the actual path to what you want to scan. For example, to scan your Downloads folder, you would type:
Code"%ProgramFiles%\Windows Defender\MpCmdRun.exe" -Scan -ScanType 3 -File "C:\Users\YourUsername\Downloads"
Replace"YourUsername"with your actual Windows username.
Check for notifications. If Defender finds a problem, you will usually get a notification from Windows Security. Click it to see the details and choose an action. You can also check Protection history in the Windows Security app.
Pay attention: Typing commands is easy to get wrong. Copy and paste them exactly as shown, and watch the quotation marks and spaces. One wrong character can stop the command from working.
Option 4Using PowerShell (Another Command-Line Option)
PowerShell has built-in Defender cmdlets, such as Start-MpScan, that start scans from the command line. This option suits administrators who manage several machines, or anyone who prefers PowerShell scripting to the older Command Prompt.
- Click the Start button and type Windows Terminal.
- Right-click it and choose Run as administrator. This avoids permission errors. Click Yes if the User Account Control prompt appears.
- Check that you are in a PowerShell tab. If not, click the down arrow next to the plus sign and select Windows PowerShell.
- Copy one of the commands below, paste it in, and press Enter. The prompt returns when the scan is done.
- To update definitions and run a Quick Scan:
CodeUpdate-MpSignature; Start-MpScan -ScanType QuickScan - To run just a Quick Scan:
CodeStart-MpScan -ScanType QuickScan - To run a Full Scan:
CodeStart-MpScan -ScanType FullScan - To run a Custom Scan, replace
"Full Path"with the exact location you want to scan. For instance, to scan your Documents folder:
CodeStart-MpScan -ScanType CustomScan -ScanPath "C:\Users\YourUsername\Documents"
Replace"YourUsername"with your actual username.
Watch for problems. If Defender finds a threat, you will usually get a Windows Security notification that tells you what to do next.
Spelling, spaces and quotation marks are. If a command fails, compare it character by character with the example, and check that the folder path exists.
Summary
Manual malware scans put you in control when the automatic background checks are not enough. Use the right-click menu for a single file, the Windows Security app for a Quick, Full, Custom or Offline scan, or the command-line tools if you prefer scripts. Whichever you pick, keep Defender's definitions up to date and look at the results when the scan finishes.
Have a question about this guide?
Answered by AI from this guide. Good questions may be added to this page — please don't include personal details.
Did this guide fix your problem?

About the Author
Richard
Tech Writer, IT Professional
Richard is a writer at Geek Rewind who turns complex IT tasks into clear, step-by-step guides. He draws on years of hands-on experience in system administration and enterprise IT operations, focusing on Windows, Linux and WordPress: the problems people actually run into, and the fixes that work. His server and WordPress guides come from systems he runs himself. Richard builds and maintains the platform behind Geek Rewind, from its Ubuntu servers and Nginx configuration to its custom WordPress plugins. Many new tutorials start with readers' questions, and he's always glad to answer them in the comments.
[…] Once you have updated the Microsoft Edge browser, scan your device for viruses and malware to stay safe and protected with Windows Security. […]
[…] How to scan and remove viruses in Windows 11 […]
[…] How to scan and remove viruses in Windows 11 […]