How to Add or Remove Power Button on Windows 11 Start Menu


- 30 steps
- Needs administrator rights
- Includes a restart or sign-out
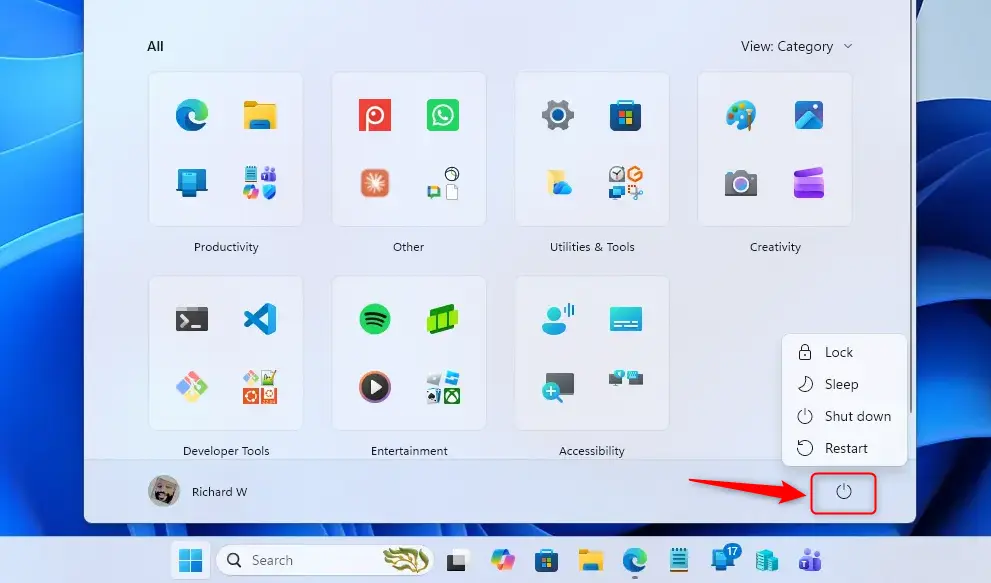
The power button on the Windows 11 Start menu lets you shut down, restart, or put your computer to sleep from the Start menu. Windows 11 Version 23H2 shows this button next to your account profile by default. You can hide it or bring it back, depending on how often you use those options.
Hiding the button gives the Start menu a cleaner look. That suits you if you shut down with a keyboard shortcut or the physical power button on your case. Removing it does not disable any power features, and you can still turn off the PC from the sign-in screen.
Open Registry Editor, go to 🗝️HKEY_LOCAL_MACHINE\
Adding or Removing the Power Button: A Step-by-Step Guide
You add or remove the Windows 11 power button by editing one value in the Registry Editor. The change hides or shows the shutdown and restart options on the Start menu. That is useful when several people use the same PC and you want control over what they see.
The Registry Editor is included in both Windows 11 Home and Pro, so the steps are the same on either edition. You need an administrator account, because the change is made under 🗝️HKEY_LOCAL_MACHINE and applies to the whole PC. Before you start, back up the registry. In Registry Editor, click File Export, choose All as the export range, give the file a name, and save it somewhere you can find it. If anything goes wrong, you can double-click that file to restore your settings.
Step 1Open the Registry Editor
You open the Registry Editor with the Run box. Press the Win and R together, type regedit, and press Enter.
- Press Win+R on your keyboard. The Run box appears in the lower-left corner of the screen.
- In the Run box, type
regeditand then press Enter or click OK. - If a User Account Control (UAC) message asks, “Do you want to allow this app to make changes to your device?”, click Yes. If you are signed in as a standard user, Windows asks for an administrator password instead.
The Registry Editor window now opens. It shows registry keys in a tree on the left and their values on the right. It looks a bit like File Explorer, but these are system settings, not files and folders. Take your time and change only what this tutorial describes.
Step 2Go to the Correct Registry Location
You find the power button setting by expanding the keys on the left side of the Registry Editor window. The path you need is 🗝️HKEY_LOCAL_MACHINE\
- In the Registry Editor, look at the left pane. You will see a tree of keys, with top-level entries such as 🗝️HKEY_LOCAL_MACHINE.
- Go to the following location by expanding the keys in order:
HKEY_LOCAL_MACHINE\SOFTWARE\Microsoft\PolicyManager\default\Start. To save time, you can instead click the address bar just under the menu bar, paste the path there, and press Enter. - Click the last key in the path, Explorer, so it is highlighted. The right pane now shows whatever values are stored in that key. It may be empty or hold only a few items.
If the Explorer key does not exist under Policies, right-click Policies, choose New Key, and name it Explorer. Then continue with the next step.
Step 3Find or Create the ‘HidePowerButton’ Setting
The visibility of the power button is controlled by an entry named HidePowerButton in the Explorer key. If the entry is not there, you create a new DWORD value and name it exactly HidePowerButton.
- With the Explorer key selected on the left, look at the right pane.
- Look through the list of items on the right for something called
HidePowerButton. - If
HidePowerButtonis already there: Double-click it to change its value. Go to Step 4. - If
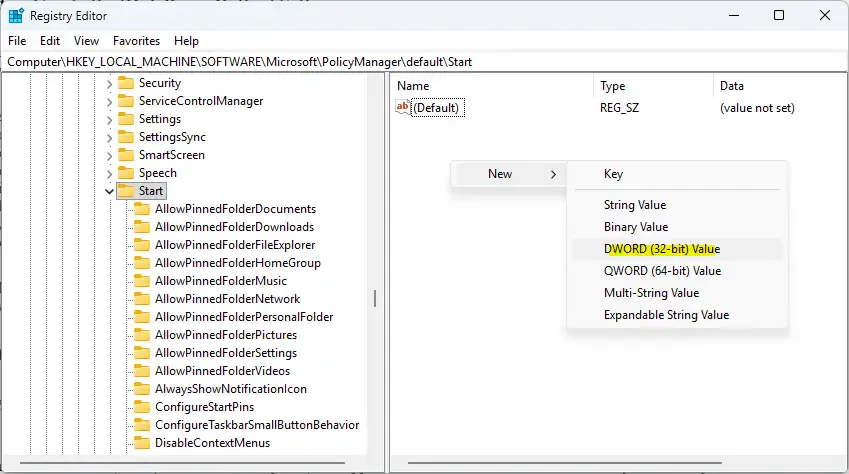
HidePowerButtonis NOT there: You need to create it.- Right-click an empty spot in the right-hand pane.
- Choose New, then select DWORD (32-bit) Value. A new entry appears in the list with its name highlighted for editing.
- Type
HidePowerButtonas the name for the new setting and press Enter. - Double-click the new
HidePowerButtonvalue you just created. Go to Step 4.
HidePowerButton, with the same capitalization and no spaces.If there is a typo, Windows ignores the entry and the setting won’t work. If you made a mistake, right-click the entry, choose Rename, and fix the name.
Step 4Set the Value to Add or Remove the Power Button
You change the state of the power button by editing the Value data of the HidePowerButton entry. Enter 0 to show the power button on the Start menu, or 1 to hide it completely.
- The Edit DWORD (32-bit) Value window opens. This happens whether the
HidePowerButtonentry already existed or you just created it. You will see a box labeled Value data. - To ADD the Power button to your Start menu (make it visible):
- Enter
0in the Value data box. - Make sure Base is set to Hexadecimal. It is the default, and for 0 and 1 the setting makes no difference.
- Click OK. The window closes and the right pane shows the new value next to the entry name.
- Enter
- To REMOVE the Power button from your Start menu (hide it):
- Enter
1in the Value data box. - Make sure Base is set to Hexadecimal.
- Click OK. The window closes and the right pane shows the new value next to the entry name.
- Enter
So a 0 means “don’t hide” (show the button), and a 1 means “hide” (remove the button). It works as a simple on/off switch.
Step 5Apply the Changes
You apply the change by restarting your computer or by signing out and back in to your Windows account. The Start menu does not pick up the new value until the system or your user session is refreshed. Close the Registry Editor first; the value is saved as soon as you click OK.
- Restart your computer: This is the most reliable way to make sure the change is applied everywhere.
- Sign out and sign back in: This refreshes your user session and usually applies the change.
- Restart the Windows Explorer process: This is quicker if you don’t want to restart the whole PC.
- Press Ctrl+Shift+Esc to open Task Manager .
- On the Processes page, find Windows Explorer . If Task Manager opens in its compact view, click More details first.
- Right-click Windows Explorer and choose Restart.
Your taskbar and desktop icons will briefly disappear and then come back. If the Start menu still looks the same afterward, do a full restart.
Step 6Check if It Worked
You verify the change by opening the Start menu and looking at the bottom corner. If you set the value to 0, the power button appears next to your user profile. If you set it to 1, the button is gone.
- Click the Start button (the Windows icon) on your taskbar.
- Look for the Power button. If you set the value to
0, it should be visible. If you set it to1, it should be hidden.
If nothing has changed, check three things. First, confirm you are in the registry path from Step 2. Second, confirm the entry name is spelled and capitalized exactly right. Third, confirm the Value data is what you intended. If all three are correct, do a full restart of the PC, which is sometimes needed for the change to take effect.
Reverting the Changes
You undo the change by going back to the Registry Editor and reversing the number. Open the HidePowerButton entry and change a 0 to a 1 to hide the button, or a 1 back to a 0 to show it again. If you exported a registry backup at the start, you can also restore it instead.
- Follow Steps 1 through 4 again.
- If you added the button (value
0) and want to remove it, change the Value data forHidePowerButtonto1. - If you removed the button (value
1) and want to add it back, change the Value data forHidePowerButtonto0. - Click OK.
- Apply the changes using Step 5 (restart Explorer, sign out and back in, or restart your PC).
You can switch the power button on and off as often as you like by repeating these steps.
Summary
You now know how to add or remove the power button on the Windows 11 Start menu using the Registry Editor. Whether you want easier access to power options or a cleaner Start menu, the change takes a few minutes and is easy to reverse.
Frequently asked questions
What does the power button look like on start menu when PC update is pending restart 🪟 Windows 11?
When an update is waiting for a restart, the power icon on the Start menu shows a small dot on it. Click the power icon and the first option is usually "Update and restart" or "Update and shut down". Choose it to finish installing the update.
Where is power button on window 11?
The power button is in the bottom-right corner of the Start menu, next to your account picture on the left. Click the Start icon on the taskbar to open the menu. On the sign-in screen, the power button is also in the bottom-right corner.
How to disable gemini from power button?
The Windows 11 power button does not open Gemini, so there is no setting to turn off there. If Gemini opens when you press a key or the power button, check your keyboard for a shortcut key. To remove the app, open Settings, go to Apps, then Installed apps, and uninstall Gemini.
Still have a question?
Answered by AI from this guide. Good questions may be added to this page — please don't include personal details.
Did this guide fix your problem?

About the Author
Richard
Tech Writer, IT Professional
Richard is a writer at Geek Rewind who turns complex IT tasks into clear, step-by-step guides. He draws on years of hands-on experience in system administration and enterprise IT operations, focusing on Windows, Linux and WordPress: the problems people actually run into, and the fixes that work. His server and WordPress guides come from systems he runs himself. Richard builds and maintains the platform behind Geek Rewind, from its Ubuntu servers and Nginx configuration to its custom WordPress plugins. Many new tutorials start with readers' questions, and he's always glad to answer them in the comments.
No comments yet — be the first to share your thoughts!