How to Show or Hide Recent Files on Start Menu in Windows 11

The Recommended section sits at the bottom of the Windows 11 Start menu. It lists documents, photos and other files you opened recently so you can reopen them with one click. That is handy on your own PC. On a shared computer, or one other people can see, it also shows what you worked on last. Turning off one setting hides those items and clears your history.
Open Settings Personalization Start and toggle off Show recently opened items in Start, Jump Lists, and File Explorer. The Recommended section disappears from your Start menu immediately and clears your recent file history.
This setting is in the Settings app. It works the same on Windows 11 Home and Pro, needs no restart, and you can switch it back on at any time.
To hide recent files from the Start menu:
- Press the Win+I to open the Settings app. You can also right-click the Start button and choose Settings.
- Go to Settings Personalization The Personalization page opens with theme and background options.
- Scroll down and click Start. You will see a list of switches for the Start menu .
- Find Show recently opened items in Start, Jump Lists, and File Explorer and set the switch to Off. On some newer builds the label is worded a little differently, for example “Show recommended files in Start, recent files in File Explorer , and items in Jump Lists”. It is the same setting.
- Open the Start menu . The recent files should be gone from the Recommended section. If the section still shows recently added apps, those come from a separate switch on the same page.
Because this one switch also controls Jump Lists and File Explorer, the change reaches further than the Start menu. Jump Lists are the recent-item lists you see when you right-click an app on the taskbar. Recent files in File Explorer’s Home page (called Quick access in older builds) are hidden too.
To show recent files again, go back to Settings Personalization Start and set the same switch to On. Windows does not bring back the history it cleared. The list starts empty and fills up again as you open files.
If the Recommended section stays empty after you turn the switch back on, open a few files and check again. The list only fills with files you open after the switch is on.
Option 1Using Settings to Show or Hide Recent Files
Managing windows 11 recent files takes just a few clicks through the main Windows settings menu. You can turn off or turn on the list of recently opened documents and apps directly from the Personalization panel so your Start menu stays clean and private.- Open the Settings app. You can do this by pressing the Win+I on your keyboard.
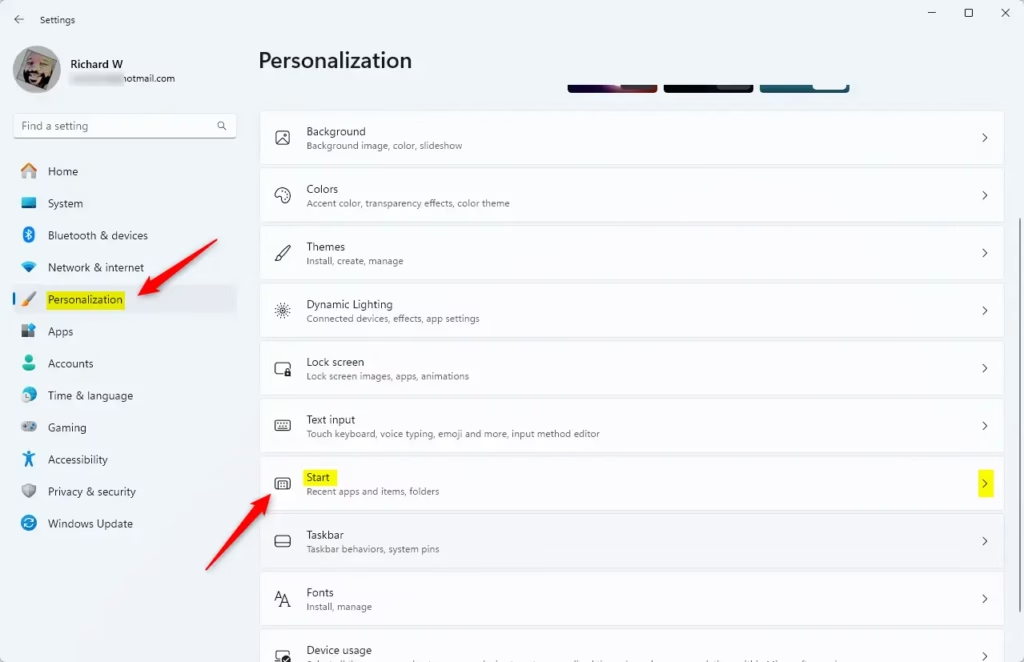
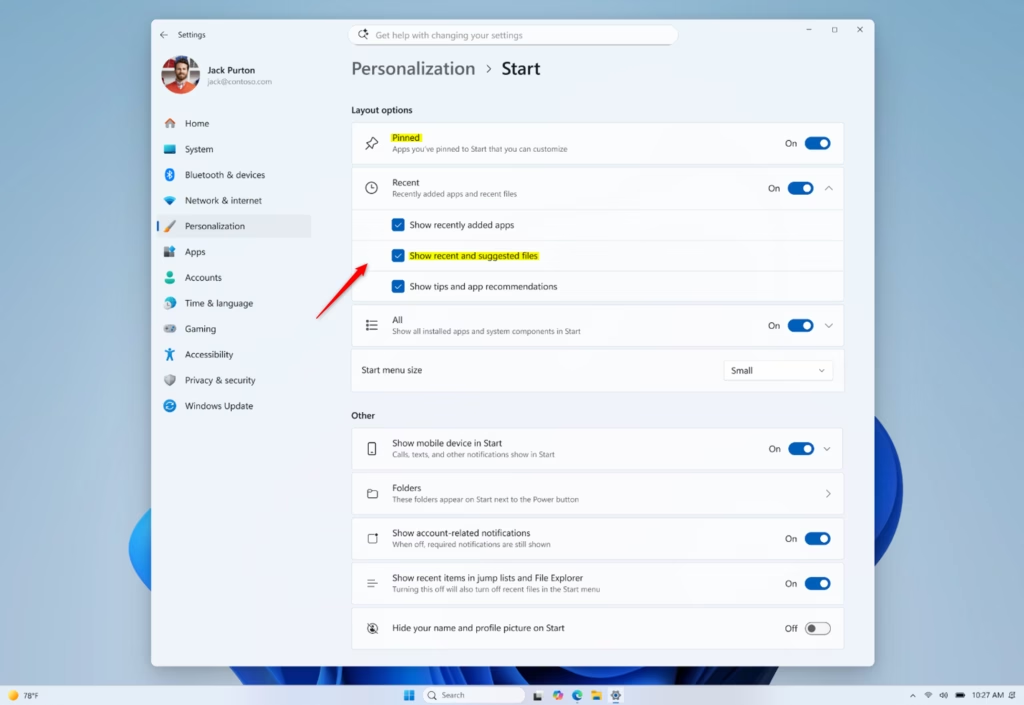
- In the Settings window, click on Personalization in the left-hand menu. Then, on the right side, click on Start.
- Look for the section labeled Layout options. You will see an option called “Show recent and suggested files.”
- To show recent filesMake sure the box next to this option is checked. This is the default setting.
- To hide recent filesUncheck the box next to this option.
- You can now close the Settings app.
Option 2Using the Registry Editor to Show or Hide Recent Files
You can adjust specific registry keys to force the Start menu to hide or display your recently used items.
Open the Run Box
- Press
Windows key + Ron your keyboard at the same time. The “Run” box will appear.
Start the Registry Editor
- In the “Open:” field of the Run box, type
regedit. - Press
Enteror click “OK.”
- The Registry Editor looks a bit like File Explorer . You need to go to a specific section called a “key.”
- Carefully type or copy and paste this path into the address bar at the top of the Registry Editor:
HKEY_CURRENT_USER\Software\Microsoft\Windows\CurrentVersion\Start - Press
Enterafter you paste the path. This will take you to the correct spot.
Find or Create “ShowSuggestedFiles”
- Look at the right side of the Registry Editor window. You are looking for something called
Start_TrackDocs. - It might already be there. If not, don’t worry.
How to create it if it’s missing:
- Right-click on an empty space on the right side.
- A menu will appear. Move your mouse over “New.”
- Click on “DWORD (32-bit) Value.”
- A new item will appear. Type
Start_TrackDocsand press .
Set the Value
To show recent files:
Change the value of a setting called Start_TrackDocs to 1.
To hide recent files:
Change the value of a setting called Start_TrackDocs to 0.
Summary:
For more advanced users, the Registry Editor offers an alternative approach, though caution remains vital.
Have a question about this guide?
Answered by AI from this guide. Good questions may be added to this page — please don't include personal details.
Did this guide fix your problem?

About the Author
Richard
Tech Writer, IT Professional
Richard is a writer at Geek Rewind who turns complex IT tasks into clear, step-by-step guides. He draws on years of hands-on experience in system administration and enterprise IT operations, focusing on Windows, Linux and WordPress: the problems people actually run into, and the fixes that work. His server and WordPress guides come from systems he runs himself. Richard builds and maintains the platform behind Geek Rewind, from its Ubuntu servers and Nginx configuration to its custom WordPress plugins. Many new tutorials start with readers' questions, and he's always glad to answer them in the comments.
No comments yet — be the first to share your thoughts!