How to Change Where On-Screen Indicators Appear in Windows 11

On-screen indicators in Windows 11 are the small pop-ups that show volume, brightness and airplane mode changes. By default they appear at the bottom center of your display. Moving them stops them from covering games, videos or work windows.
You can change their position in the Settings app on Windows 11 version 23H2 or newer. It takes a few clicks and clears the screen space where the pop-ups would otherwise land.
Open Settings , press Win+I, go to System Notifications, scroll to the on-screen indicators section, click the “Position of on-screen indicators” drop-down, and select Bottom center, Top left, or Top center. The change takes effect immediately without restart.
Option 1Changing Indicator Positions Through Windows Settings
Everything for this method is in the Settings app, so you do not need to edit any files. It works the same on Windows 11 Home and Pro. If you cannot find the option described below, your build may not include it. Open Windows Update in Settings, install any pending updates, and look again.
Step-by-Step Guide:
- Open Settings . Press Win+I at the same time. The main Settings window opens.
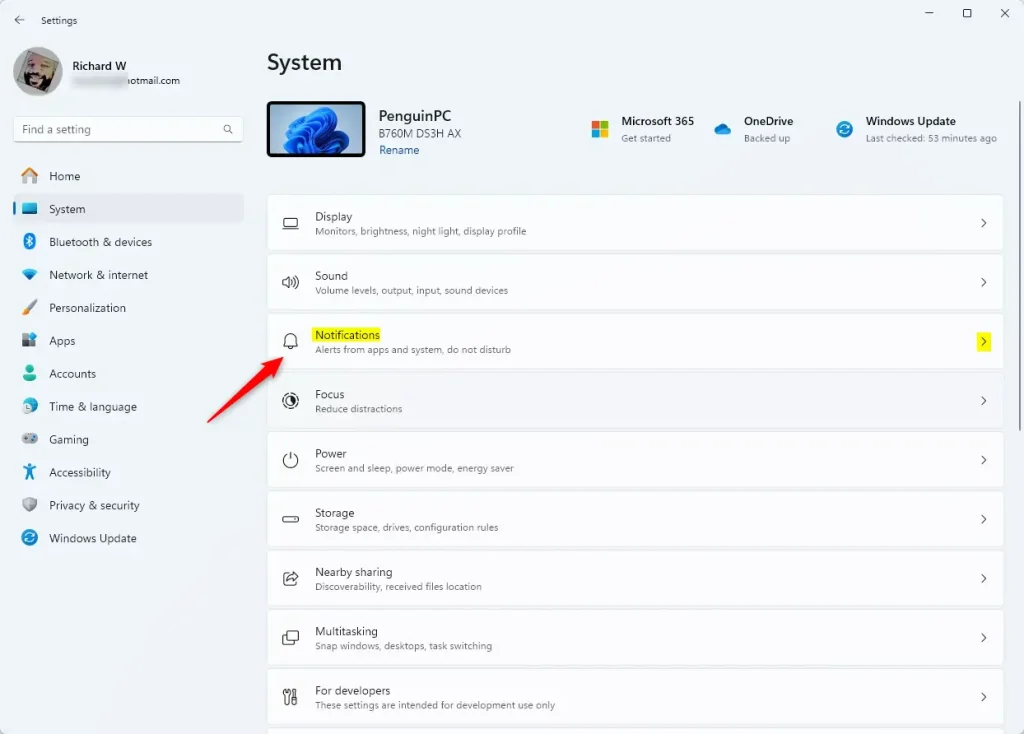
- Go to Notifications. Click System in the left pane. On the right, click Notifications. You should now see the list of notification options for your PC.
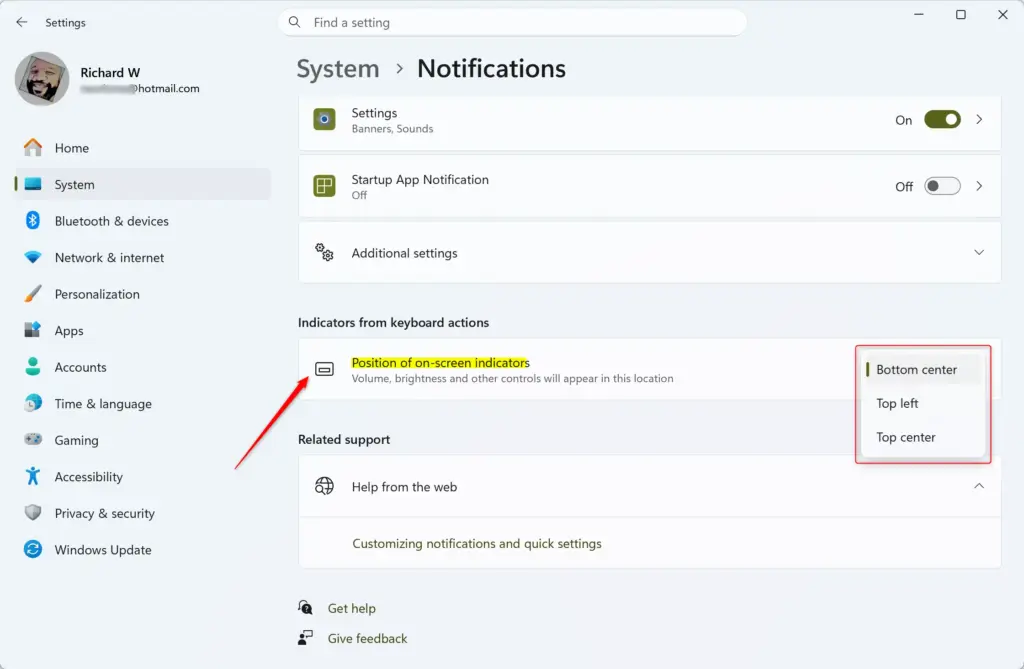
- Choose your indicator position. Scroll down the Notifications page to the on-screen indicators section. Find the drop-down menu labeled “Position of on-screen indicators” or something close to it, and click it. You should see these options:
- Bottom center: The default spot, where the indicators have always appeared.
- Top left: Moves the indicators to the top-left corner of the screen.
- Top center: Places the indicators in the middle of the top edge of the screen.
Click the position you want. If the drop-down is not on the page, the wording may differ on your build, so scroll through the whole Notifications page before giving up.
- Test the change. Press a volume or brightness key on your keyboard. The indicator should appear in the new position.
- Close Settings. Close the window. Your choice is saved automatically, and you do not need to restart. To undo it, come back to the same drop-down and select Bottom center.
Option 2Changing Indicator Positions Using the Registry Editor (For Advanced Users)
It edits Windows’ internal database directly, which gives you finer control over system settings. That power cuts both ways, because a wrong change can cause problems. Use this method only if the Settings option is missing or you prefer to set the value yourself.
In Registry Editor, select the key, then choose File Export and save the .reg file somewhere you can find it. Double-clicking that file later restores the saved values.
Step-by-Step Guide:
- Open Registry Editor. Press Windows key + R to open the Run box. Type
regeditand press Enter or click OK. A User Account Control (UAC) prompt may ask whether to allow the app to make changes. Click Yes. The Registry Editor window opens. - Go to the correct key. Click the address bar at the top of the Registry Editor window. Type or paste this path carefully, then press Enter:Registry
HKEY_CURRENT_USER\Software\Microsoft\Windows\CurrentVersion\SystemSettings\ConfirmatorPositionThe left pane should jump to that key. If the
ConfirmatorPositionkey does not exist, you need to create it. Right-click theSystemSettingskey, select New Key, and name itConfirmatorPosition. - Find or create the position value. Select the
ConfirmatorPositionkey and look at the right-hand pane. You should see a value namedPositionIndex. If it is not there, right-click an empty area of the right pane, select New DWORD (32-bit) Value, and name itPositionIndex. - Set the position number. Double-click the
PositionIndexvalue. An edit window opens with a Value data field. Enter the number for the position you want:- 00000001 (Decimal 1): Bottom center (the default).
- 00000002 (Decimal 2): Top left.
- 00000003 (Decimal 3): Top center.
Make sure Base is set to Hexadecimal, which is the default. Values 1 to 3 are the same in hexadecimal and decimal, so the setting will not change your result here. Click OK when you are done. The new number should now show in the value list.
- Close Registry Editor. Close the window. The change may take effect right away, but it is safest to restart your computer so Windows reads the new value.
- Test the change. After the restart, press a volume or brightness key. The indicator should appear in the position you chose. If nothing moved, reopen the key and check that the value name and number are exactly right. To undo the change, set the value back to 1, or import the .reg backup you exported earlier.
Summary
Changing the indicator position moves the volume and brightness pop-ups out of your way. The quickest route is the Settings app, under System and then Notifications. If that option is missing, Registry Editor is the advanced fallback. Back up the key first, and restart afterward to be sure the change applies.
Have a question about this guide?
Answered by AI from this guide. Good questions may be added to this page — please don't include personal details.
Did this guide fix your problem?

About the Author
Richard
Tech Writer, IT Professional
Richard is a writer at Geek Rewind who turns complex IT tasks into clear, step-by-step guides. He draws on years of hands-on experience in system administration and enterprise IT operations, focusing on Windows, Linux and WordPress: the problems people actually run into, and the fixes that work. His server and WordPress guides come from systems he runs himself. Richard builds and maintains the platform behind Geek Rewind, from its Ubuntu servers and Nginx configuration to its custom WordPress plugins. Many new tutorials start with readers' questions, and he's always glad to answer them in the comments.
No comments yet — be the first to share your thoughts!