How to Enable or Disable Touch Indicator in Windows 11


The touch indicator in Windows 11 puts a small grey circle on the screen each time you tap or swipe on a touch-enabled laptop or tablet. It shows exactly where your finger lands. That helps when you record your screen for a tutorial or demo, present on a projector, or check whether a touch screen registers taps accurately.
You can switch the circle on or off in under a minute from the Settings app. Go to Accessibility, open the mouse pointer and touch page, and flip the Touch indicator switch. The Control Panel and the Registry Editor offer two other ways to do the same thing. All three work on Windows 11 Home and Pro.
Open Settings , go to Accessibility, click Mouse pointer and touch, then toggle the Touch indicator switch on or off. The setting takes effect immediately without restarting, and a grey circle appears when you tap the screen.
Option 1Turn On or Off Touch Indicator Using Settings
How do you enable the touch indicator in Windows 11?Settings applies the change immediately, so you do not need to restart.
- Press
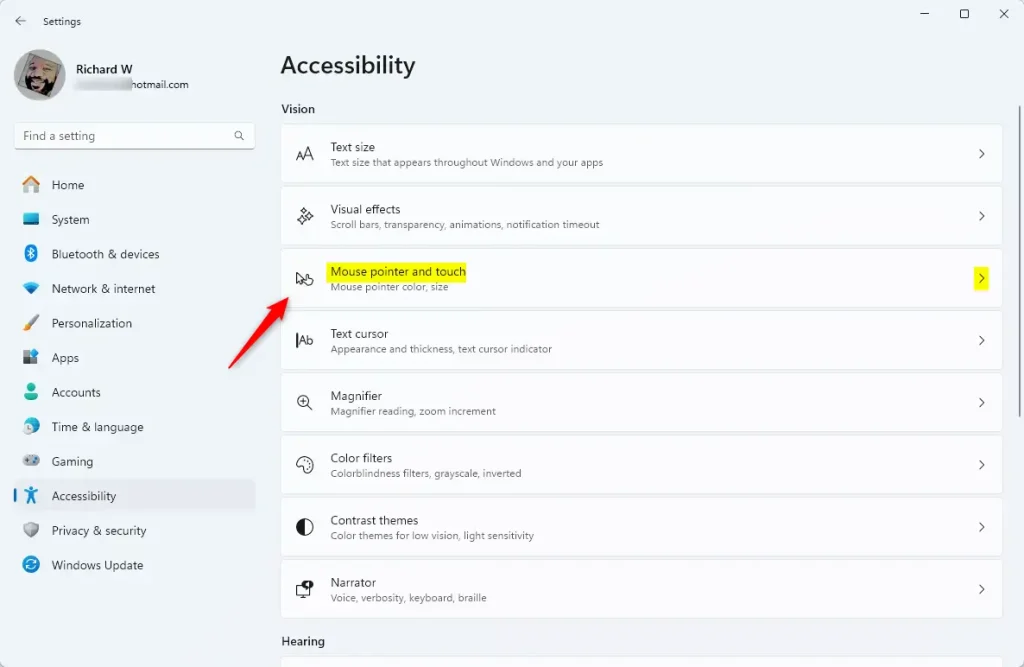
Windows key + Ion your keyboard. The Settings app opens. - On the left side, click Accessibility.
- On the right side, scroll down if needed and click Mouse pointer and touch.
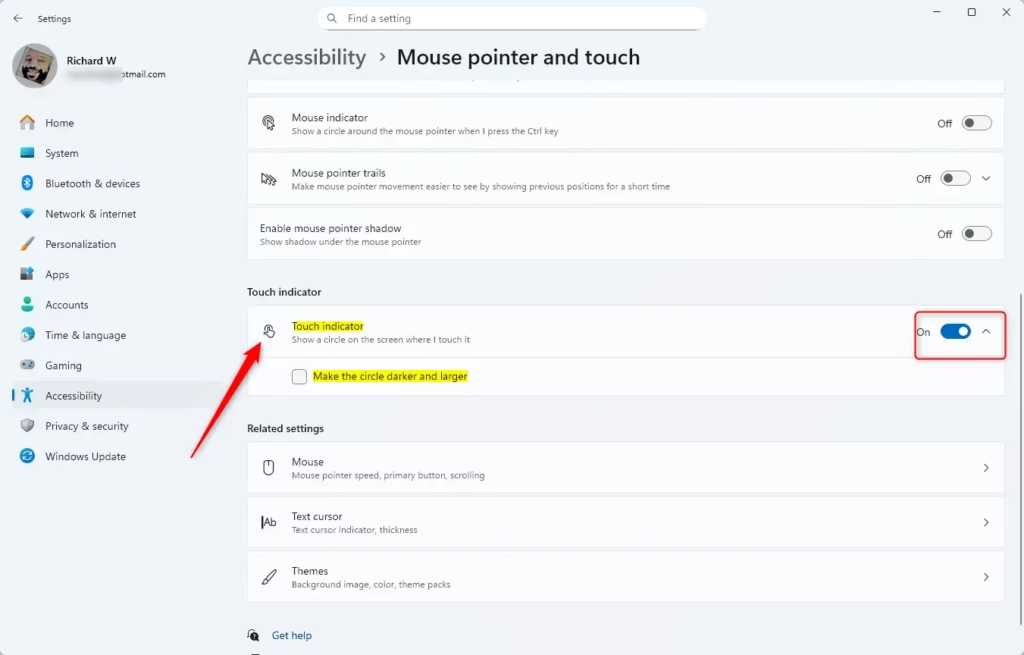
- Find the Touch indicator option and set the switch to On or Off. The switch should change straight away.
- If you turned it on, check the box for Make the circle darker and larger. The circle is easier to see on bright backgrounds, in screen recordings and on a projector. Clear the box to go back to the default circle.
- Close the Settings window. There is no Save button because the change has already been applied.
To test it, tap anywhere on the screen. A circle should appear under your finger. If nothing shows, check that the switch is really on. Keep in mind that the circle only reacts to touch input, so clicking with a mouse or touchpad will not show it. If your PC has no touch screen, you will see no circle at all, even with the setting on.
To undo the change, return to the same page and flip the switch back.
Option 2Turn On or Off Touch Indicator Using Control Panel
How to manage touch indicator via Control PanelThe older Control Panel offers the same option. It is useful if you already work in Control Panel or if the Settings page is blocked on a managed PC. The Pen and Touch item usually appears only on devices with a touch screen or pen hardware. If you cannot find it, use the Settings method above.
- Open the Control Panel. Type
Control Panelin the search box and press Enter. The Control Panel window opens. - Set the View by option at the top right to Small icons or Large icons. Category view hides this item. You should now see a flat list of icons.
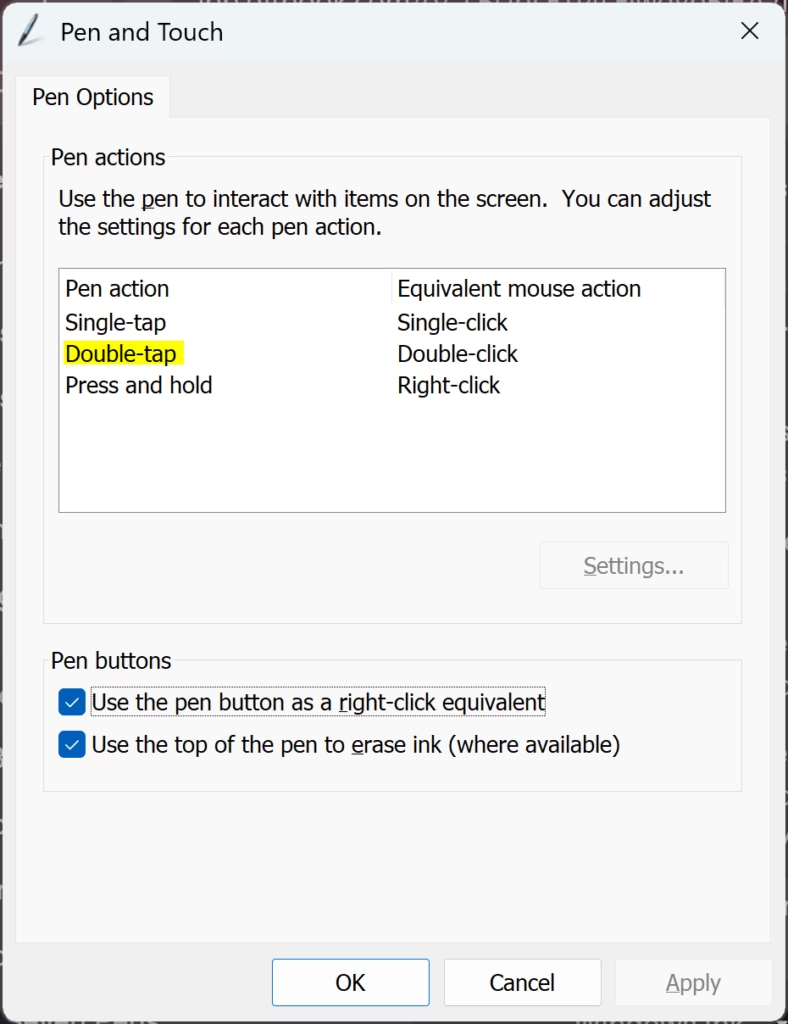
- Click Pen and Touch. A small properties window opens.
- Click the Touch tab.
- Check or uncheck Show visual feedback when touching the screen to turn the touch indicator on or off.
- If you turned it on, you can also check Optimize visual feedback for projection to an external monitor. This makes the circle darker and bigger. It matches the Make the circle darker and larger option in Settings.
- Click OK to apply the change and close the window.
The two methods control the same feature, so a change made here should also show up in Settings. To undo it, reopen the window and reverse the checkboxes.
Option 3Turn On or Off Touch Indicator Using Registry (For Advanced Users)
Configure touch indicator using Registry EditorThe Windows Registry gives you a third way to change the touch indicator. It is meant for experienced users, or for cases where you need to apply the setting by script or to several PCs. Most people should stick with Settings.
In Registry Editor, click File, then Export, choose All as the export range, and save the file somewhere safe. If something goes wrong, double-click that file to restore it. A wrong edit can cause problems, so enter the values exactly as shown in the code blocks below.
⚠️ This step requires admin privileges.
Turn On Touch Indicator (default)
Enable touch indicator with contact visualizationreg add "HKEY_CURRENT_USER\Control Panel\Cursors" /v ContactVisualization /t REG_DWORD /d 1 /f
reg add "HKEY_CURRENT_USER\Control Panel\Cursors" /v ContactVisualization /t REG_DWORD /d 2 /f
Turn On Touch Indicator with Darker and Larger Circle
Enable touch indicator without contact visualizationreg add "HKEY_CURRENT_USER\Control Panel\Cursors" /v ContactVisualization /t REG_DWORD /d 2 /f
reg add "HKEY_CURRENT_USER\Control Panel\Cursors" /v ContactVisualization /t REG_DWORD /d 2 /f
Turn Off Touch Indicator
Disable touch indicatorreg add "HKEY_CURRENT_USER\Control Panel\Cursors" /v ContactVisualization /t REG_DWORD /d 0 /f
reg add "HKEY_CURRENT_USER\Control Panel\Cursors" /v ContactVisualization /t REG_DWORD /d 0 /f
Summary
Summary of touch feedback optionsAfter a registry change, sign out and back in, or restart the PC, so Windows reads the new values. Then check the result on the Mouse pointer and touch page in Settings.
In short, the touch indicator draws a circle where you touch the screen, so you can see exactly where your input registers. You can turn it on or off from Settings, Control Panel or the Registry Editor, whichever suits you.
- The circle appears only for touch input. It does not appear for a mouse, touchpad or pen cursor.
- Settings is the easiest route: go to Accessibility, then Mouse pointer and touch, then Touch indicator. The change applies immediately.
- Control Panel works too, through Pen and Touch, but that item may be missing on a PC without touch hardware.
- The Registry Editor is the last resort. Back up the registry first and restart or sign out afterwards.
- For recordings and projectors, turn on the darker, larger circle. It is much easier to see.
- Close any windows you opened once you are done.
Have a question about this guide?
Answered by AI from this guide. Good questions may be added to this page — please don't include personal details.
Did this guide fix your problem?

About the Author
Richard
Tech Writer, IT Professional
Richard is a writer at Geek Rewind who turns complex IT tasks into clear, step-by-step guides. He draws on years of hands-on experience in system administration and enterprise IT operations, focusing on Windows, Linux and WordPress: the problems people actually run into, and the fixes that work. His server and WordPress guides come from systems he runs himself. Richard builds and maintains the platform behind Geek Rewind, from its Ubuntu servers and Nginx configuration to its custom WordPress plugins. Many new tutorials start with readers' questions, and he's always glad to answer them in the comments.
No comments yet — be the first to share your thoughts!