How to Turn Mouse Pointer Trails on or off in Windows 11

Mouse pointer trails in Windows 11 create a visual shadow that follows your cursor, making it easier to track its movement on screen.
This setting acts as a visual aid, which can be especially helpful if you find yourself losing track of the mouse on busy backgrounds or if you have vision difficulties.
You can find and change this option within the Mouse pointer and touch settings. Simply toggle the ‘Mouse pointer trails’ switch to turn them on or off.
Navigate to Settings > Accessibility > Mouse pointer and touch, then toggle “Mouse pointer trails” on or off. This feature adds a shadow behind your cursor to improve visibility.
How to Turn On Mouse Pointer Trails
Step 1Open Windows Settings
Opening the Windows Settings app is the first step to changing your mouse pointer trails in Windows 11. You can quickly open Settings by pressing the Windows key and the letter I on your keyboard simultaneously, or by clicking the Start button and then selecting the Settings icon.
- Using the Keyboard: Press the Windows key + I on your keyboard at the same time. This is a quick shortcut to open Settings.
- Using the Start Menu: Click the Start button (the Windows logo) on your taskbar. Then, click the Settings gear icon. If you don’t see it, type “Settings” in the search bar and click on the result.
Step 2Go to Mouse Settings
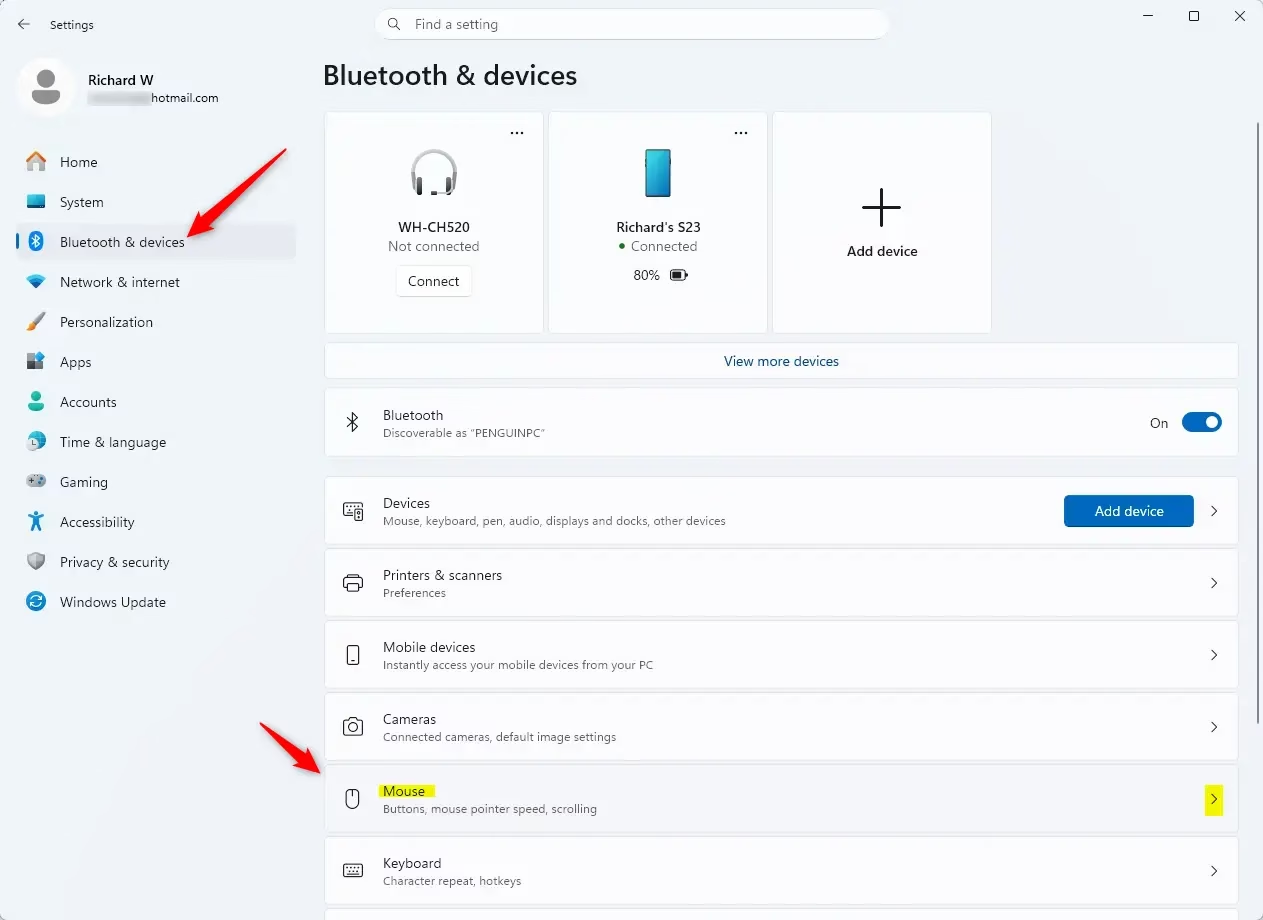
Once the Settings app is open, look at the list on the left side. Click on ‘ Bluetooth & devices’.
Within the “ Bluetooth & devices” section, scroll down until you find and click on Mouse.
Step 3Find More Mouse Options
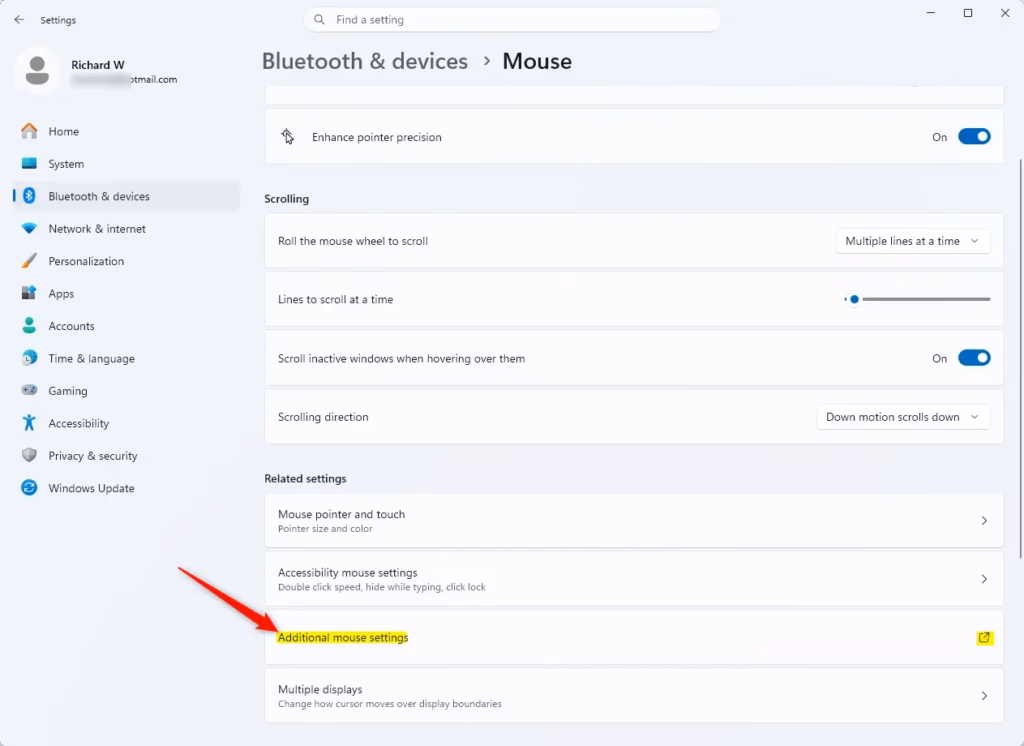
After opening the main mouse settings in Windows 11, you need to find the ‘Additional mouse settings’ link to access more options for your pointer. This link is typically located near the bottom of the settings page and is where you can control mouse pointer trails.
Mouse pointer trails are a feature that helps users see the mouse cursor better on screens. To access this setting, click the “Additional mouse options” link near the bottom of the mouse settings page. This opens the “Mouse Properties” window, which contains legacy Windows settings for controlling pointer behavior, including trails. Through these advanced options, you can adjust how your mouse pointer appears on screen.
The “Mouse Properties” window displays legacy Windows settings. These older options manage various mouse behaviors, including pointer trails. Users can adjust how the mouse pointer appears on the screen by accessing these settings.
Step 4Turn On Pointer Trails
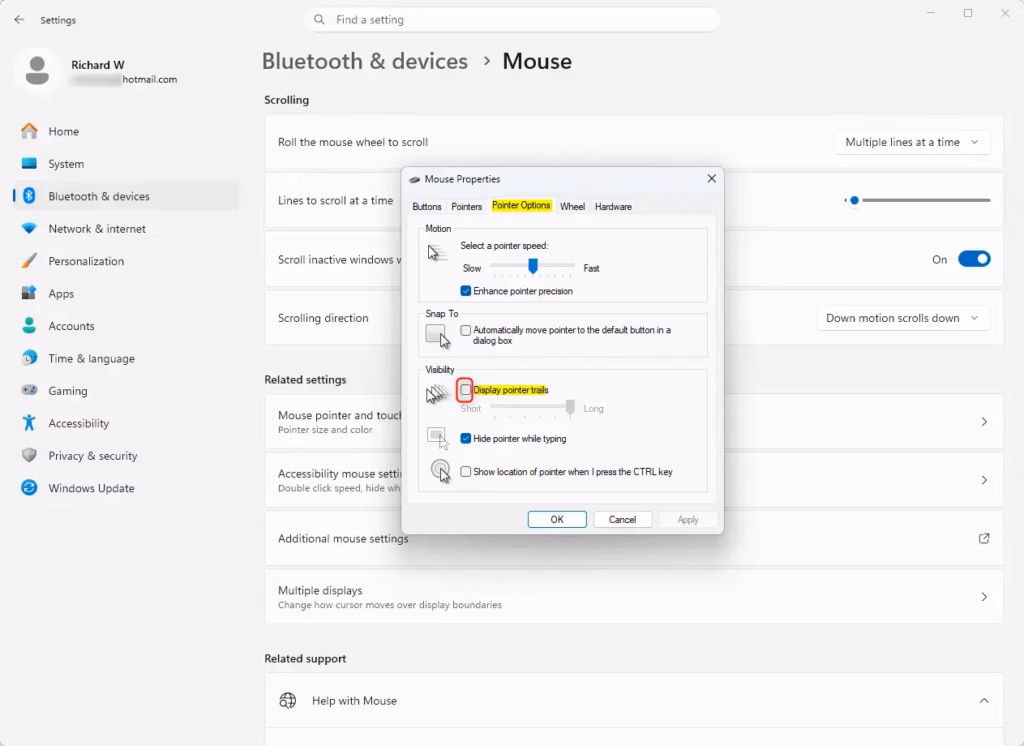
To enable mouse pointer trails in Windows 11, open the ‘Mouse Properties’ window and navigate to the ‘Pointer Options’ tab. Check the box next to ‘Display pointer trails’ to make them appear. You’ll then see a visual trail follow your mouse.
Mouse pointer trails in Windows 11 appear once you click the “Display pointer trails” checkbox. This action adds a checkmark, activating the feature. The activated mouse pointer trails leave a visible path on the screen, aiding users in tracking the pointer’s movement, especially on screens with fewer pixels.
The ‘Enhance pointer precision’ setting in Windows 11 controls mouse pointer speed. Some gamers utilize the ‘Enhance pointer precision’ setting for faster pointer movements. Other users find precise control difficult when the ‘Enhance pointer precision’ setting is enabled. This guide focuses on managing mouse pointer trails in Windows 11.
Step 5Save Your Changes
Once you’ve enabled mouse pointer trails in Windows 11, remember to save your changes to see them in effect. Click the ‘Apply’ button within the ‘Mouse Properties’ window, then click ‘OK’ to finalize saving your settings and activate the pointer trails.
Moving the mouse around the Windows 11 desktop will now reveal a visual trail behind the pointer. This pointer trail helps users easily track the mouse’s movement on the screen.
Reference:
Summary
To turn on mouse pointer trails in Windows 11, navigate to Settings > Bluetooth & devices > Mouse > Additional mouse settings and check ‘Display pointer trails’. This setting helps improve cursor visibility and navigation.
How do I enable mouse trails in 🪟 Windows 11?
To enable mouse trails in Windows 11, open Settings, navigate to Accessibility, then select Mouse pointer and touch. Locate the ‘Mouse pointer trails’ option and toggle it on. This feature adds a shadow behind your cursor to help track its movement.
Why does my mouse cursor have a trail?
Your mouse cursor has a trail because the ‘Mouse pointer trails’ feature is enabled in Windows 11 Accessibility settings. This visual aid creates a shadow behind the cursor as you move it, making it easier to track its location on busy screens or for users with visual impairments.
How to get rid of mouse trails?
To get rid of mouse trails in Windows 11, open Settings and go to Accessibility > Mouse pointer and touch. Find the ‘Mouse pointer trails’ option and toggle it off. This will remove the shadow that follows your mouse cursor.
How do I turn on cursor trails?
To turn on cursor trails in Windows 11, open the Settings app. Navigate to Accessibility, then click on Mouse pointer and touch. You’ll find the ‘Mouse pointer trails’ toggle switch. Click it to turn the feature on and enable the trail effect.
Was this guide helpful?

About the Author
Richard
Tech Writer, IT Professional
Richard, a writer for Geek Rewind, is a tech enthusiast who loves breaking down complex IT topics into simple, easy-to-understand ideas. With years of hands-on experience in system administration and enterprise IT operations, he’s developed a knack for offering practical tips and solutions. Richard aims to make technology more accessible and actionable. He's deeply committed to the Geek Rewind community, always ready to answer questions and engage in discussions.

No comments yet — be the first to share your thoughts!