Windows 11 Taskbar: What Is the Search Feature


The Windows 11 taskbar search box lets you find apps, files, settings, and web results right from your desktop without digging through folders. Clicking it opens a query panel that searches your PC and the web at the same time.
Windows 11 taskbar search finds apps, files, settings, and web results from your desktop. Click the magnifying glass icon or search box next to the Start button , type what you need, and Windows displays matching results. You can also press Win+S to open search without clicking the taskbar .
Microsoft puts search on the default Windows 11 taskbar to speed up launching programs and finding documents. Type the first few letters of a file or app name and the best match usually appears at the top, so you can open it with one click or by pressing Enter.
Depending on your Windows 11 version and settings, search appears on the taskbar as a magnifying glass icon, an icon with a label, or a full box. You can open it in any of these ways:
- Click the search icon or box on the taskbar . The search panel opens with a text field and recent or suggested items below it.
- Press the Win to open Start , then start typing. Start passes what you type to search, so you get the same results.
- Press Win+S to open the search panel directly, without going through Start.
- Type a few letters of the app, file, or setting you want. Results update as you type.
- Click a result, or press Enter to open the top one.
If you would rather have a different look, right-click the taskbar and choose Taskbar settings. The search entry there lets you hide it or switch between the icon and the box. The options you see depend on your Windows 11 build. Changing this only affects how search looks on the taskbar . Search itself still works through the Win and Win+S.
Finding What You Need with Windows Search
Windows Search is a built-in utility that finds files, applications, settings, and web results without opening a browser. It works the same on Windows 11 Home and Pro.
This is why results appear almost instantly. It also explains why a file you just copied onto the PC, or one in an unusual folder, may not show up right away. Give the index a little time to catch up, then search again.
Results are grouped so you can scan them quickly. Apps and settings tend to appear first, followed by documents and other files, and then web suggestions. Web results come from Bing, so a search for something that is not on your PC will offer to look it up online. This is why a single search box can replace browsing through the Start menu, Settings, and File Explorer.

| 1. Widgets | 2. Start | 3. Search | 4. Task view | 5. Applications | 6. System tray |
Using the Search Box on Your Taskbar
You can find apps, files, and settings on your computer by using the windows taskbar search feature located right next to the Start button. Click inside the search box or on the magnifying glass icon and start typing what you need. Windows will instantly display matching results from your apps, documents, and the web so you can open them quickly.- Look for the Search Box: You'll usually see a search box right on your taskbar, often next to the Start button. If you don't see a box, you might see a magnifying glass icon.
- Start Typing: Just click in the search box (or on the icon) and start typing what you're looking for. As you type, Windows will show you a list of suggestions. These can be apps, documents, settings, or even web results pulled from Microsoft Bing.
- Select Your Result: Click on the item you want from the list, and Windows will either open the app, file, or setting, or take you to the web search result.
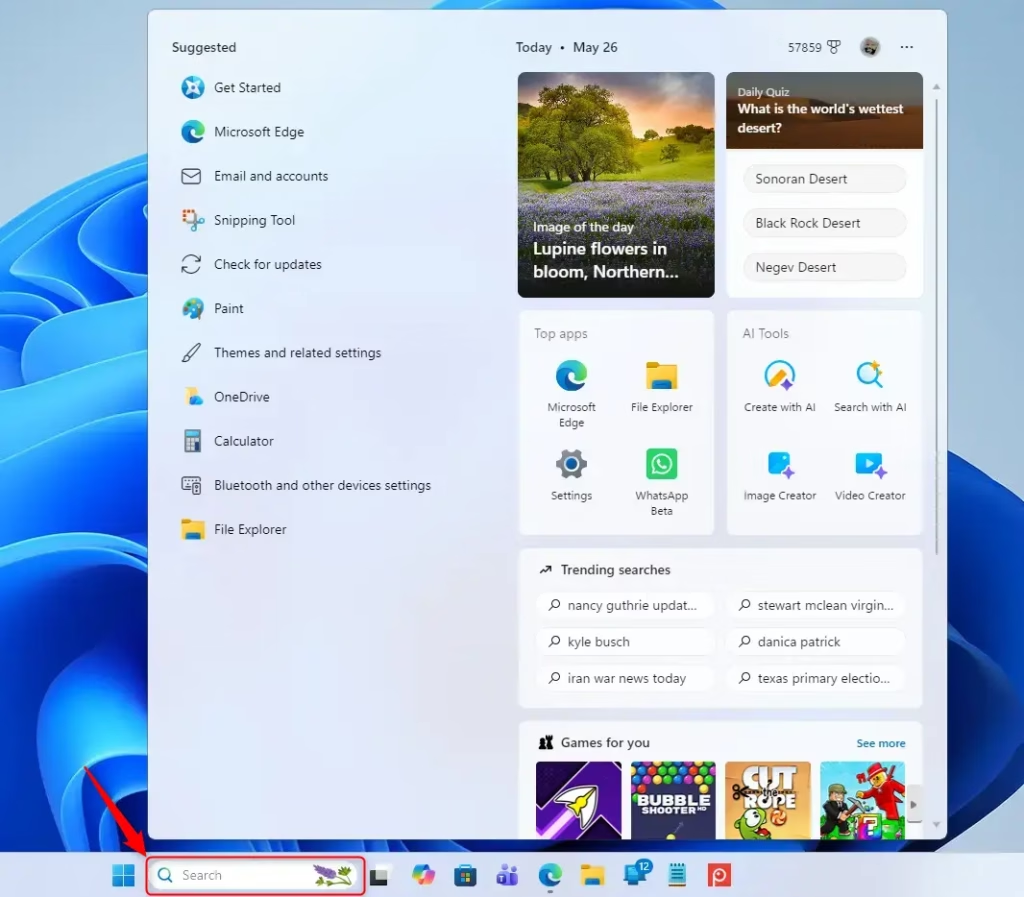
Using the Keyboard Shortcut
You can open the windows taskbar search instantly without touching your mouse by pressing a simple keyboard shortcut. Press the Windows key + S on your keyboard at the same time to bring up the search box. This shortcut works from anywhere on your desktop, letting you type your search query right away.
- Press the Keys: Press the Windows key + S on your keyboard at the same time.
- Type and Select: This will bring up the same search box you see on the taskbar. Type your query and select your result just like you would from the taskbar itself.
Searching from the Start Menu
You can perform a windows taskbar search directly from the Start menu without needing to use the taskbar box. Click the Start button or press the Windows key on your keyboard and start typing immediately. The Start menu window will automatically show matching apps, settings, and files for you to choose from.
- Open Start: Click the Start button or press the Windows key on your keyboard.
- Start Typing: As soon as the Start menu opens, you can begin typing your search query. Results will appear in the Start menu window.
- Choose Your Item: Click on the result you want to open.
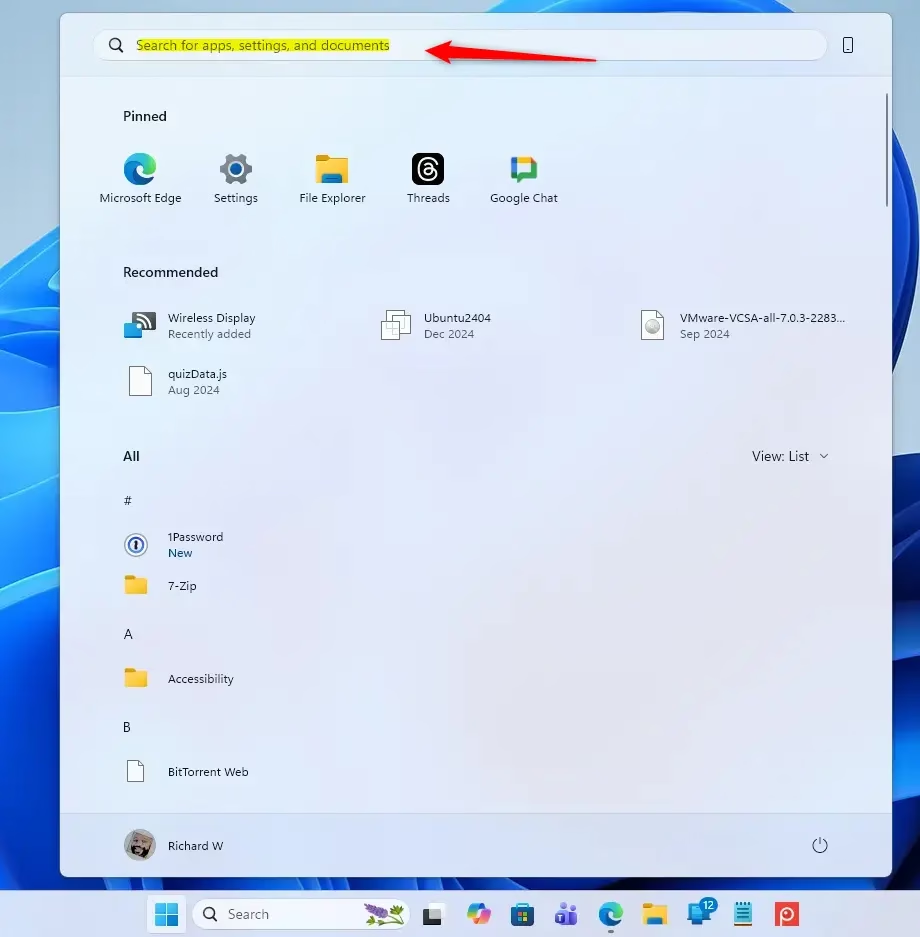
Customizing How Search Appears
You can change how the windows taskbar search looks to save screen space or match your preferences. Right-click an empty spot on your taskbar, open Taskbar settings, and look for the search options to switch between a full search box, a small icon, or hiding it completely.
- Right-Click the Taskbar: Find an empty spot on your taskbar and right-click on it.
- Select Taskbar Settings: A menu will pop up. Choose "Taskbar settings."
- Find Taskbar Items: In the Taskbar settings window, look for a section called "Taskbar items."
- Configure Search: You'll see an option for "Search." Click the dropdown menu next to it. You have a few choices:
- Search box: This shows the full text box where you can type.
- Search icon and label: This displays a small magnifying glass icon with the word "Search" next to it.
- Search icon only: This shows just the magnifying glass icon.
- Hide: This will completely remove the search feature from your taskbar.
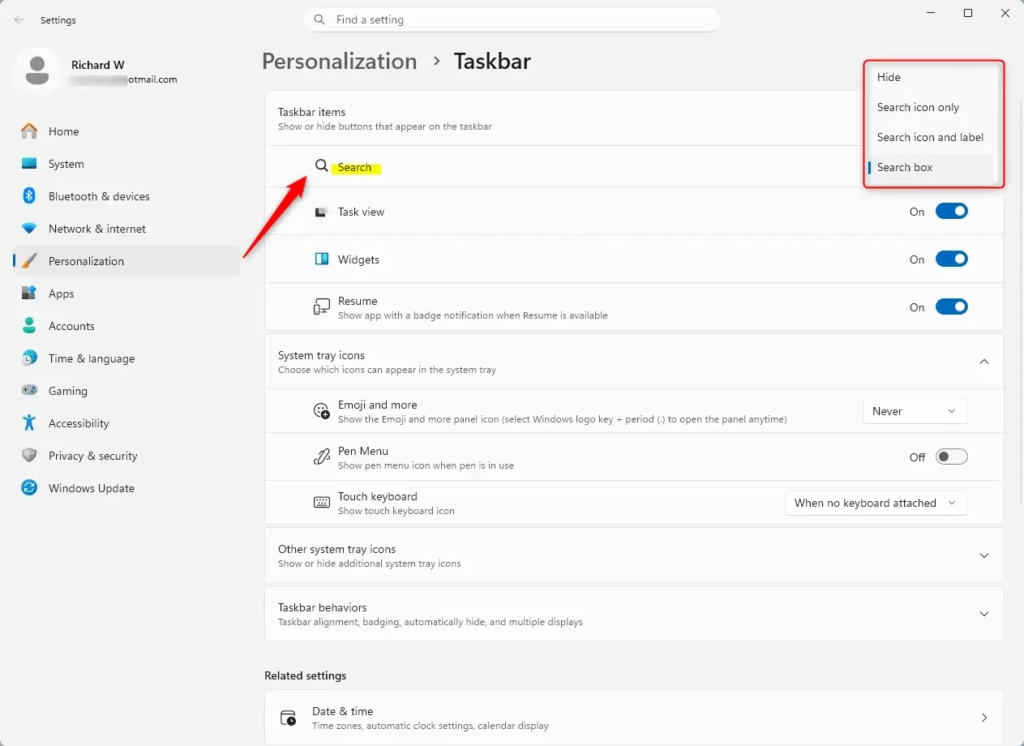
Practical Tip: Keeping the "Search box" visible maintains the fastest access route for frequent searches. Selecting "Search icon only" or "Hide" saves screen space if you use the keyboard shortcut (Windows key + S).
Confirm familiarity with those alternative methods before removing the taskbar element.
Conclusion
Mastering the search function reduces time spent hunting for files and applications. Experimenting with different display layouts reveals the configuration best suited for daily computer use.
Frequently asked questions
How to get search icon on taskbar 🪟 Windows 11?
Open Settings and go to Personalization Taskbar. Scroll down to Taskbar items and toggle on Search. Choose whether you want just the icon or a search box. If search doesn't appear, restart Windows.
Should you turn off Windows search?
Most people benefit from keeping Windows Search on—it indexes your files and speeds up finding apps and documents. Turn it off only if you have an older PC with very limited storage or RAM, or if you use third-party search software instead.
Why can't I search in my taskbar?
Check Settings Personalization Taskbar and confirm Search is toggled on. If the toggle is already on, restart Windows. If search still doesn't appear, press Windows + S to open search directly, which bypasses the taskbar icon.
Why isn't my 🪟 Windows 11 search bar finding anything?
Open Settings System Storage and run Storage Sense to rebuild search indexing. Check Permissions Search permissions and make sure your user account has search access. Restart Windows. If indexing is paused, Settings Privacy & security General shows the status.
Still have a question?
Answered by AI from this guide. Good questions may be added to this page — please don't include personal details.
Did this guide fix your problem?

About the Author
Richard
Tech Writer, IT Professional
Richard is a writer at Geek Rewind who turns complex IT tasks into clear, step-by-step guides. He draws on years of hands-on experience in system administration and enterprise IT operations, focusing on Windows, Linux and WordPress: the problems people actually run into, and the fixes that work. His server and WordPress guides come from systems he runs himself. Richard builds and maintains the platform behind Geek Rewind, from its Ubuntu servers and Nginx configuration to its custom WordPress plugins. Many new tutorials start with readers' questions, and he's always glad to answer them in the comments.
No comments yet — be the first to share your thoughts!