How to Change Which Taskbar Shows Apps on Multiple Screens in Windows 11


Windows 11 lets you decide which taskbars show your open app icons when you use more than one monitor. You can show icons on every screen, only on the screen where an app is running, or keep everything on your main monitor.
Setting this up properly keeps extra screens from filling with icons you don’t need. It also makes open programs easier to find. This tutorial covers the Settings method and the batch file method, and how to undo either one.
Open Settings Personalization Taskbar, expand Taskbar behaviors, and use the dropdown next to When using multiple displays, show my taskbar apps on to choose All taskbars, Main taskbar and taskbar where window is open, or Taskbar where window is open. Changes apply immediately without restart.
Multiple Displays and Taskbars
The multiple monitors taskbar settings control how Windows 11 spreads your open programs across screens. Showing a taskbar on every display makes it easier to keep track of the windows you are working in. The two kinds of display behave differently:
- Main display: This is the screen that carries the clock and the system tray (the icons in the corner of the taskbar ).
- Other displays: These can show their own taskbars, but they are simplified. They usually don’t have the clock or corner icons, though newer Windows 11 builds may add the clock to them.
Before you pick a layout, check which screen is set as your main display. The options below depend on that screen. You can check it in Settings under System Display.
How to Choose Where Your Taskbar Shows Apps
Windows 11 gives you three choices for where running programs appear. You can show all open apps on every screen, limit them to the main monitor plus the screen where the app is open, or show them only on the taskbar where the window sits.
- All taskbars: Apps you pinned or opened appear on every taskbar on all screens. This is the default and the simplest to understand.
- Main taskbar and taskbar where the app is open: Pinned apps only show on the main taskbar. Open apps show on the main taskbar and also on the screen where the app is open.
- Taskbar where the app is open: Pinned apps only show on the main taskbar. Open apps only show on the screen where the app is open. This gives the cleanest second screen, but you can’t see on the main taskbar what is open elsewhere.
If you are not sure which to pick, try the second option first. It keeps one complete list of open apps on your main screen and still shows each window’s icon on the screen where it lives.
Option 1Change Taskbar App Display Using Windows Settings
- Press Windows key + I to open Settings.
- Click Personalization in the left menu.
- Select Taskbar on the right. You should now see the taskbar options, such as taskbar items and corner icons.
- Scroll down and click Taskbar behaviors to expand it.
- Make sure the option to show your taskbar on all displays is turned on. If it is off, the dropdown in the next step stays greyed out.
- Find the dropdown next to When using multiple displays, show my taskbar apps on and click it.
- Choose one of the three options described above: All taskbars, Main taskbar and taskbar where window is open, or Taskbar where window is open. The icons on your taskbars should change right away.
- Close Settings when you are done.
You don't need to restart. To undo the change, open the same dropdown and pick your previous option.
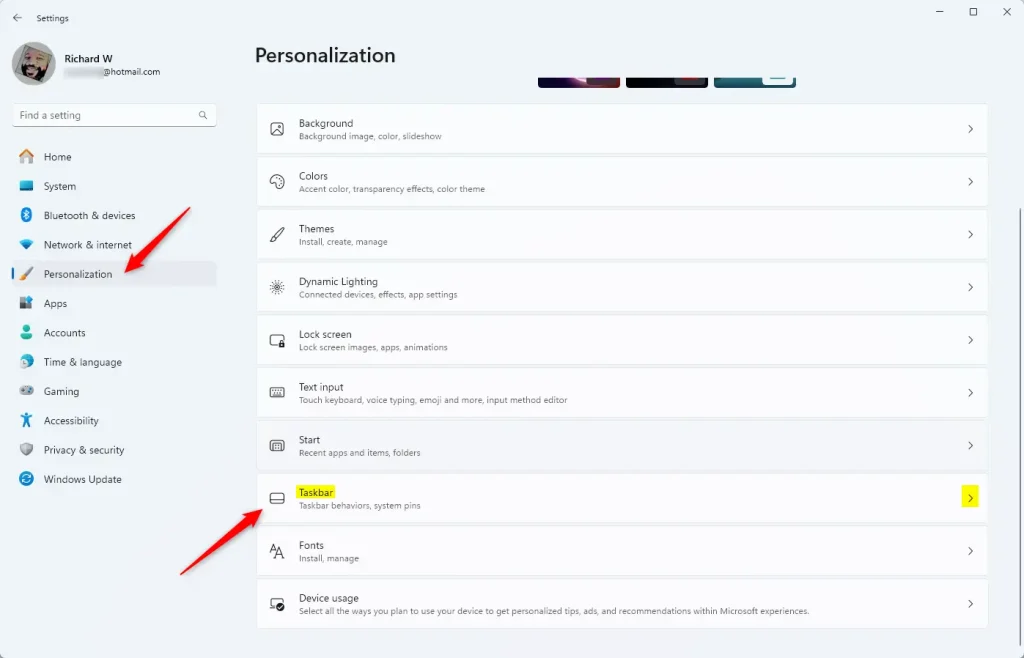
This method works through the normal Settings app. You open Personalization, expand Taskbar behaviors, and switch between all three display choices. It needs no scripts, and it works on both Windows 11 Home and Pro. Use it if you only change this setting now and then, or if you would rather not run any scripts.

The app display options only apply once taskbars are enabled on your other screens. If you only have one monitor connected, the multiple-display options may not appear at all.
Option 2Change Taskbar App Display Using a Batch File
A batch file is a plain text file that runs a set of commands automatically. It lets you skip the menu clicks. The three scripts below each set one of the three taskbar app display methods.
If the taskbar doesn't update right away afterwards, sign out and back in. You can always go back to the Settings method above and reset the dropdown.
Show apps on All taskbars:
REG ADD "HKCU\Software\Microsoft\Windows\CurrentVersion\Explorer\Advanced" /V MMTaskbarEnabled /T REG_DWORD /D 1 /F
REG ADD "HKCU\Software\Microsoft\Windows\CurrentVersion\Explorer\Advanced" /V MMTaskbarMode /T REG_DWORD /D 0 /F

taskkill /f /im explorer.exe
start explorer.exe
Show pinned apps on main taskbar, open apps on main and open window taskbar:
REG ADD "HKCU\Software\Microsoft\Windows\CurrentVersion\Explorer\Advanced" /V MMTaskbarEnabled /T REG_DWORD /D 1 /F
REG ADD "HKCU\Software\Microsoft\Windows\CurrentVersion\Explorer\Advanced" /V MMTaskbarMode /T REG_DWORD /D 1 /F

taskkill /f /im explorer.exe
start explorer.exe
Show pinned apps on main taskbar, open apps only on taskbar where window is open:
Taskbar batch script multiple monitors automation lets you change your app display preferences instantly. You can set pinned apps to stay on your main screen while active programs show only on their respective displays by running a simple .bat file. This saves you from digging through the standard Settings app every time you want a different layout.
Summary
- Multiple Display Options: You can pick how and where taskbar apps show when you use more than one screen.
- Easy Settings: You can change this at any time in Windows Settings under Personalization Taskbar.
- Quick Changes with Scripts: Batch files let you switch settings fast if you prefer.
- Better Workflow: Adjusting taskbar behavior keeps your workspace organized and easy to use.
- Consistent Look: You can make your taskbars look and act the way you want on all screens.
You can set taskbars to appear on every screen, change the behavior through the Personalization menu, or use batch scripts for quick adjustments. A tidy multi-monitor setup keeps your open programs organised and makes working across several screens much easier. If a change doesn't suit you, switch the dropdown back and carry on.
Have a question about this guide?
Answered by AI from this guide. Good questions may be added to this page — please don't include personal details.
Did this guide fix your problem?

About the Author
Richard
Tech Writer, IT Professional
Richard is a writer at Geek Rewind who turns complex IT tasks into clear, step-by-step guides. He draws on years of hands-on experience in system administration and enterprise IT operations, focusing on Windows, Linux and WordPress: the problems people actually run into, and the fixes that work. His server and WordPress guides come from systems he runs himself. Richard builds and maintains the platform behind Geek Rewind, from its Ubuntu servers and Nginx configuration to its custom WordPress plugins. Many new tutorials start with readers' questions, and he's always glad to answer them in the comments.
No comments yet — be the first to share your thoughts!