How to Set Up and Use Multiple Monitors with Windows 11

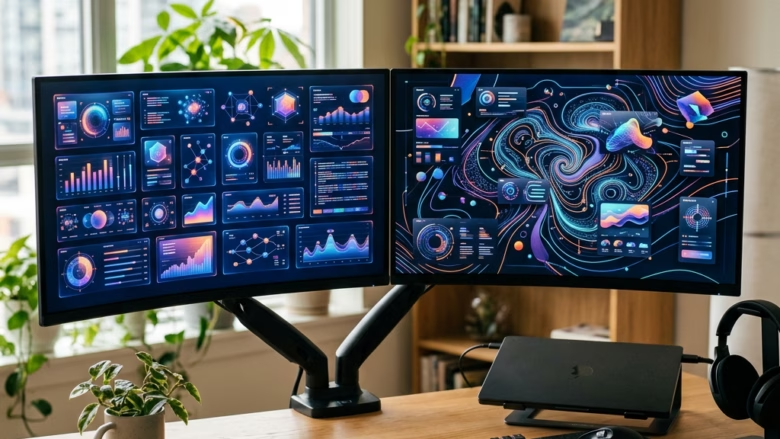
Multiple monitors in Windows 11 let you spread your desktop across up to 10 screens, depending on your graphics hardware. You can run several apps side by side without switching tabs. Most people start with two screens, and the steps here work the same for three or more.
Plug in the extra screen, press Win+P, and pick how you want the displays to work together. The menu offers PC screen only, Duplicate, Extend and Second screen only. The rest of this guide covers connecting the hardware, arranging the screens and tuning each one.
Connect your monitors to your PC using the appropriate video cables. Then, right-click the desktop, select “Display settings,” and arrange your screens by dragging the monitor icons.
Getting Started: Connecting Your Monitors
Start with the physical setup. Each monitor needs its own connection straight to the computer, so the video ports on your PC and monitors decide what you can do. Look at the back of the PC (or the sides of a laptop) and at the back of each monitor before you buy any cables.
Understanding Your Ports
Three cable types cover most setups:
HDMI is the most common and carries both audio and video. DisplayPort is the better choice for high resolutions and fast refresh rates. USB-C with DisplayPort Alternate Mode lets a laptop drive a monitor over a single cable. Not every USB-C port supports video, so check for a DisplayPort or display symbol next to the port, or look in the manual.
- HDMI: Very common on most laptops and desktops, also found on TVs. It sends video and audio.
- DisplayPort (DP): Often better for computer monitors, especially for high resolutions and fast refresh rates. It sends video and audio.
- USB-C (with DisplayPort Alternate Mode): A versatile connector that can send video, data, and power. Many new laptops use this. You might need an adapter or a USB-C to DisplayPort/HDMI cable.
- DVI: An older standard, mainly for video. Less common on new devices.
- VGA: The oldest standard, analog. Usually found on very old computers and monitors. The quality is generally lower.
What You’ll Need
Before you start, check that you have three things: enough video output ports on the computer, a matching input port on each monitor, and the right cable for each pair. If a port type doesn’t match, an adapter is usually cheaper than a new monitor. Look at both devices first so you don’t find a mismatch halfway through.
- Your Computer: Make sure it has the right video output ports.
- Your Monitor(s): Make sure they have matching input ports.
- Video Cables: You'll need the correct cables (HDMI, DisplayPort, USB-C, etc.) to connect your computer to each monitor. Check the ports on both devices to know which cables you need. You might need different cables if your monitors have different input types.
- Power Cords: For each monitor.
Step-by-Step Connection Process
Connecting is quick. Power off nothing: Windows 11 handles monitors being plugged in while it runs. Make sure each monitor is on and set to the correct input (HDMI 1, DisplayPort and so on) using its on-screen menu.
- Power Down: It's a good idea to turn off your computer and unplug it before connecting new hardware. Turn off your monitors too.
- Connect the First Monitor:
- Find a video output port on your computer (like HDMI or DisplayPort).
- Find a matching video input port on your first monitor.
- Use the right video cable to connect the computer to the monitor.
- Plug in the monitor's power cord and turn it on.
- Connect Additional Monitors:
Connecting a second monitor to your Windows 11 PC involves powering down your equipment, plugging the correct video cable into matching ports on both your computer and the monitor, and turning the hardware back on to establish the physical link.
- Power Up Your Computer: Once all monitors are connected and turned on, turn on your computer.
Windows 11 detects new monitors automatically. You should see the desktop appear on the new screen, or the main display may briefly flicker or show a notice about a newly found screen. If the new monitor stays black, check the cable and the monitor's input setting before changing anything in Windows.
Configuring Your Displays in 🪟 Windows 11
Once your monitors are plugged in, open Display settings to set up how they work together. Every option in this guide lives there, and no restart is needed for any of the changes below.
Accessing Display Settings
There are two quick ways to open Display settings. You can right-click an empty space on the desktop and select Display settings. Or you can open Start, then go to Settings System Display
- Right-Click Method: Right-click on an empty spot on your desktop. In the menu that appears, select Display settings.
- Settings App Method: Click the Start button, then click Settings (the gear icon). In the Settings app, click System in the left menu, then click Display.
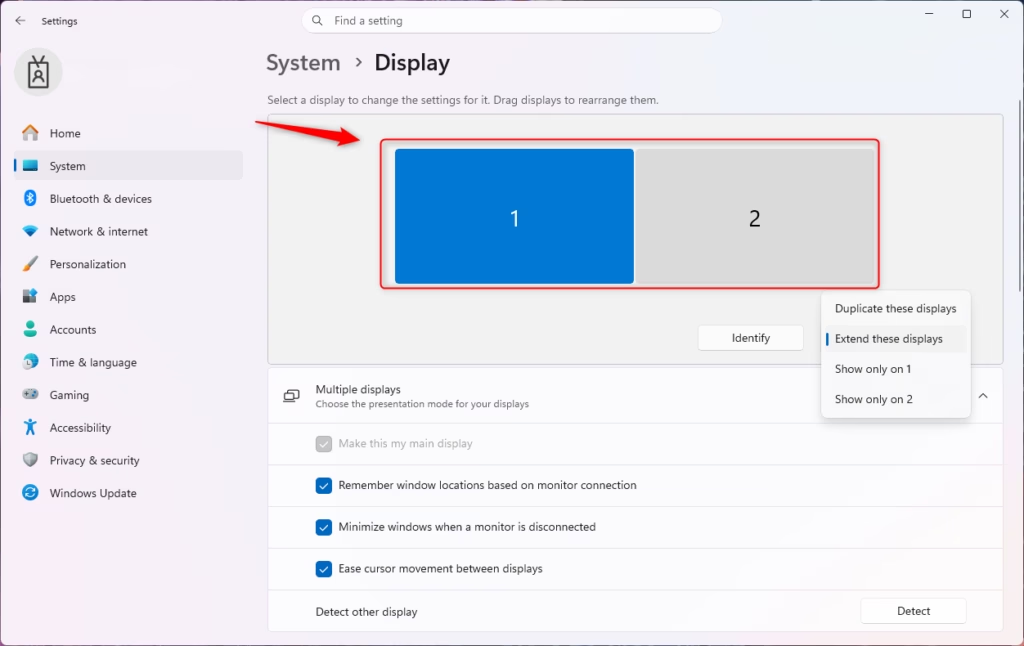
The Display settings window opens. Near the top, Windows shows a numbered diagram with one box for each connected monitor. Each box is a screen, and the numbers are how Windows refers to them in every setting below.
Identifying Your Displays
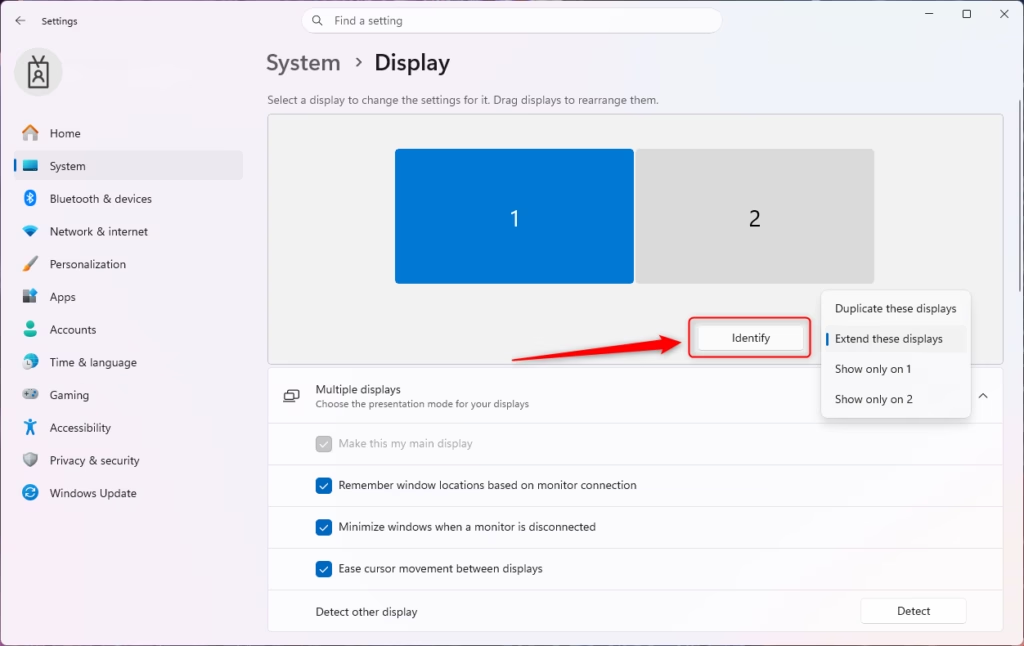
If you are not sure which number matches which physical screen, Windows has a built-in tool to help. Scroll to the Multiple displays area or the diagram and use the identify button.
- In the Display settings, click the Identify button.
A large number appears briefly on each physical monitor, matching the numbers in the diagram. Do this before changing resolution or scaling so you don't adjust the wrong screen.
Detecting New Displays
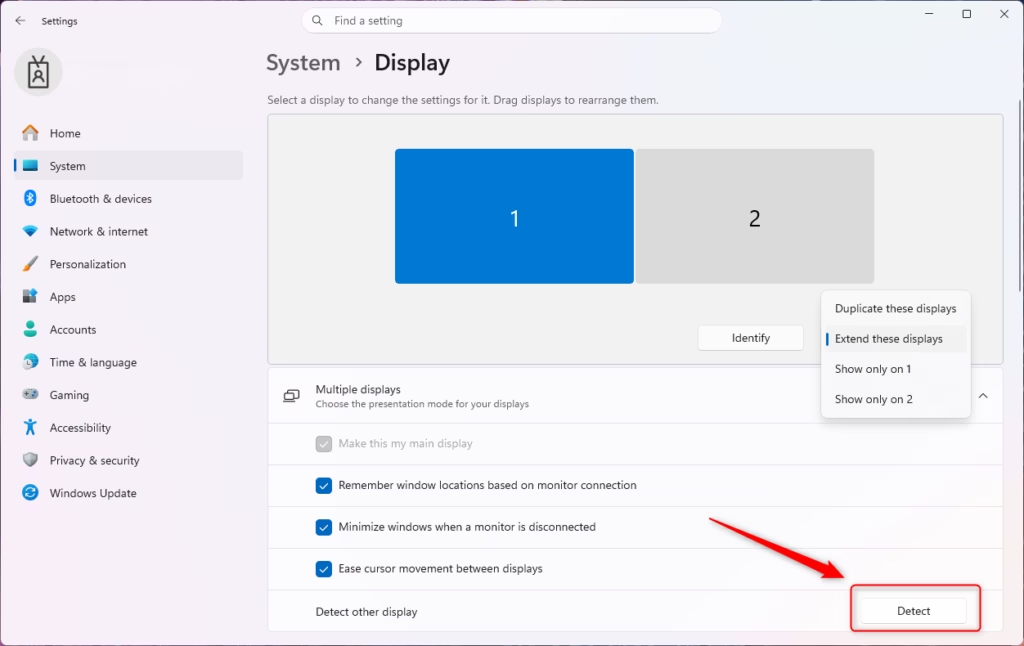
Sometimes Windows doesn't detect a newly attached monitor on its own. This is more common with older monitors, docking stations and long cables. Try the steps below in order.
- Scroll down in the Display settings to the "Multiple displays" section.
- Click the Detect button. Windows will look for any connected displays it might have missed.
If the screen is still not found, reseat both ends of the cable, try another port on the PC or monitor, and try a different cable. A faulty cable is a common cause.
Arranging Your Displays
Arranging the displays makes the on-screen layout match your desk, so the mouse cursor moves naturally from one screen to the next. If your second monitor sits on the left of the first, the box for it should sit on the left in the diagram too. In Display settings, click and drag the numbered boxes until their positions match your real hardware.
- In the Display settings, click and drag the numbered monitor icons (1, 2, 3, etc.). Place them to match how they are physically on your desk. For example, if your second monitor is to the right of your main monitor, drag the icon for monitor 2 to the right of monitor 1.
- Once you have them arranged correctly, click the Apply button at the bottom of the window.
Click Apply if the button appears, then test the layout. Move the cursor off the edge of one screen and see if it lands on the right monitor at the right height. If it jumps to the wrong place, go back to Display settings and nudge the boxes until it feels right. You can also offset the boxes vertically if your monitors sit at different heights.
Choosing a Display Mode (Extend, Duplicate, etc.)
Display modes decide how your screens work together. Duplicate shows the same image on every screen, which suits presentations. Extend spreads your desktop across the monitors to give you one large workspace. Two other options, PC screen only and Second screen only, turn one display off. You can switch modes at any time from Windows key + P or from the Multiple displays dropdown in Display settings.
- Duplicate these displays: Shows the exact same image on all selected monitors. This is useful for presentations or if you want a backup display.
- Extend these displays: This is the most common and useful option. It spreads your desktop across all monitors, creating a bigger workspace.
- Show only on 1 / Show only on 2: Turns off all displays except the one you choose.
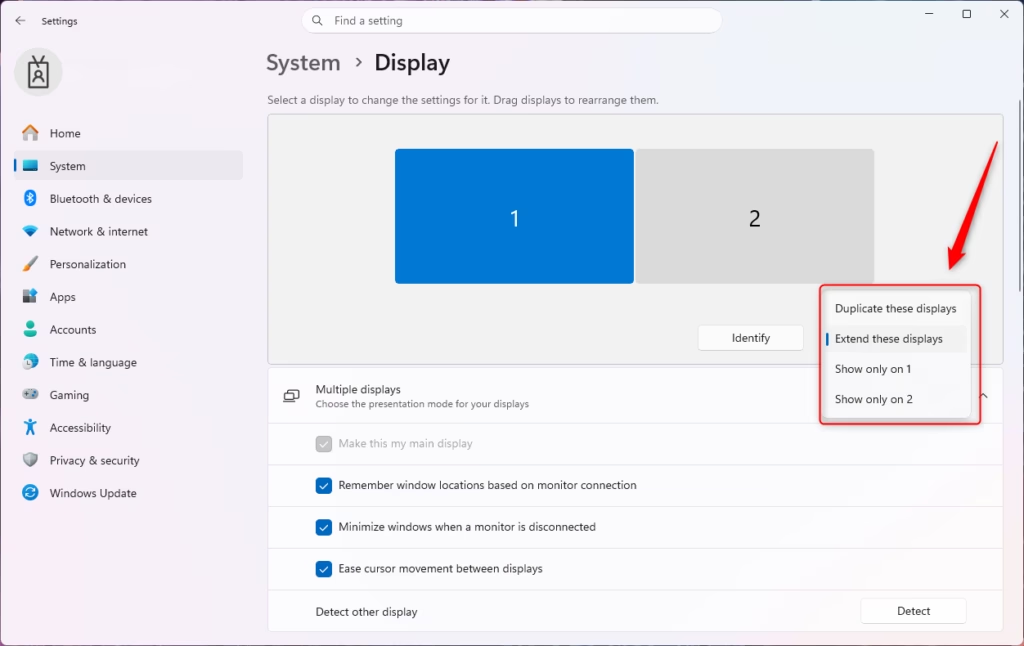
For a real multi-monitor setup, choose Extend these displays. Duplicate only mirrors what is already on your main screen, so you gain no extra space.
Setting Your Main Display
Your main display is where the Start menu, taskbar and newly opened apps appear by default. To change it, open Display settings and click the monitor you want in the diagram. Scroll down to the Multiple displays section, expand it if needed, and check Make this my main display. If the box is greyed out, the monitor you picked is already the main one.
- In the Display settings, click on the numbered icon of the monitor you want to be your main display.
- Scroll down to the "Multiple displays" section.
- Check the box that says Make this my main display.
- Click Apply.
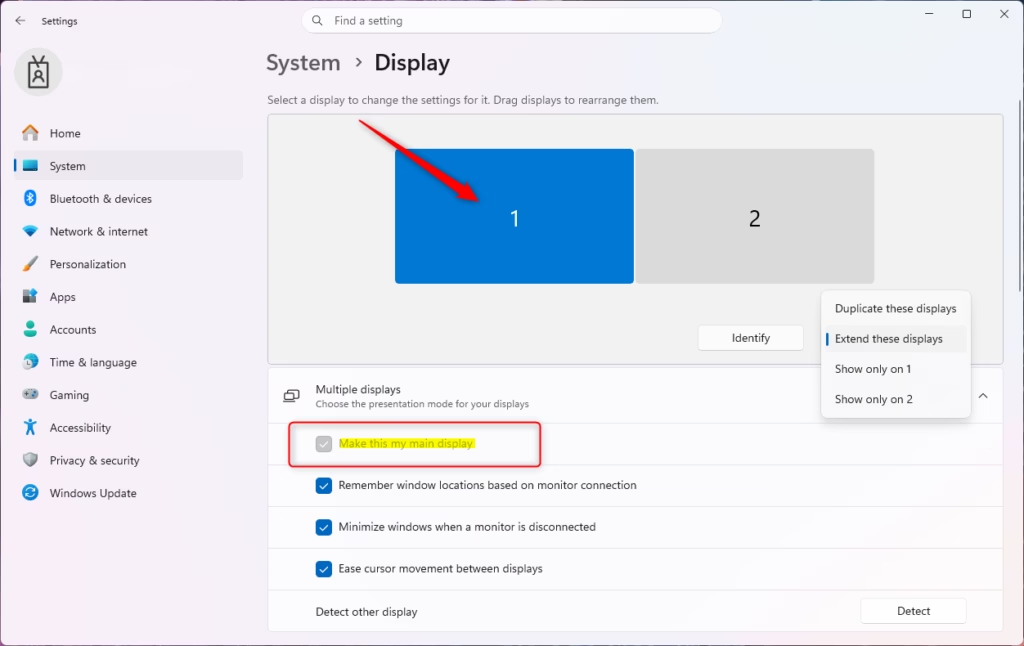
The taskbar and Start button move to the display you chose. To go back, select the other monitor and tick the same box.
Customizing Your Display Settings
With the monitors configured, you can fine-tune how each one looks and behaves. Each of these settings applies to the single monitor you have selected in the diagram, so pick the right one first.
Changing Display Resolution
Display resolution is the number of pixels on your screen. More pixels give sharper images and more room for windows. Open Display settings, click the monitor you want to change, scroll to Display resolution and pick a setting from the dropdown. Choose the one marked Recommended unless you have a reason not to. That is the monitor's native resolution, and anything else tends to look blurry.
- In Display settings, click on the monitor you want to change.
- Scroll down to "Display resolution."
- Click the dropdown menu and choose your desired resolution. The "(Recommended)" option is usually the best for your monitor's built-in resolution.
- Click Keep changes if asked.
Windows shows a preview and asks you to confirm. If the screen goes black or looks wrong, wait about 15 seconds and Windows will revert to the previous setting on its own.
Adjusting Scale and Layout
Scale & layout resizes text, apps and other items so they are readable at different monitor sizes and resolutions. A 4K monitor at 100% scaling makes everything tiny, while a small laptop screen may need 125% or more. Open Display settings, select your monitor, find Scale under Scale & layout and choose a percentage from the dropdown.
- In Display settings, click on the monitor you want to adjust.
- Under "Scale & layout," you'll see "Change the size of text, apps, and other items."
- Click the dropdown menu and choose a percentage (like 100%, 125%, 150%). 100% means no scaling, while higher percentages make things bigger.
Scaling changes apply right away, but some apps keep their old size until you close and reopen them. Changing the scale on the main monitor may also need a sign-out for a few older apps to redraw correctly. Windows can use different scaling on each monitor, which helps when you mix a laptop screen with a large external one.
Changing Display Orientation
Display orientation rotates a screen between landscape and portrait. Portrait works well for long documents, web pages and code. Go to Display settings, select the monitor, choose the orientation you want from the Display orientation dropdown and click Keep changes. Physically rotate the monitor on its stand first if it supports that, then match the setting in Windows. Then check the arrangement diagram, because a rotated monitor changes the shape of its box and may need repositioning.
- In Display settings, click on the monitor you want to rotate.
- Scroll down to "Display orientation."
- Click the dropdown menu and choose Landscape (normal), Portrait (rotated 90 degrees clockwise), Landscape (flipped), or Portrait (flipped).
- Click Keep changes if asked.
Adjusting Refresh Rate
Refresh rate is how many times per second the monitor updates its image, measured in Hertz (Hz). A higher rate makes motion in games and scrolling feel smoother. Many monitors default to 60 Hz even when they can do more. Open Display settings, select the monitor, scroll to Advanced display and choose the highest rate your monitor supports from the Choose a refresh rate menu.
- In Display settings, click on the monitor you want to adjust.
- Scroll down to "Advanced display."
- Under "Choose a refresh rate," select the highest rate your monitor supports from the dropdown menu.
- Click Keep changes if asked.
If a higher rate is missing from the list, the cable or port may be the limit. Older HDMI cables often cap out at lower rates at high resolutions, so try a DisplayPort cable or a newer HDMI one.
Advanced Setup and Tips
With the basics in place, the settings below help you get more from a multi-monitor workflow.
Dealing with Multiple Graphics Ports and Adapters
Sometimes your computer doesn't have enough video outputs, or the ports don't match your monitors. In that case you need other hardware: a docking station, a USB display adapter or an extra graphics card. Check your computer's manual and the back of the PC to list every available video output. Remember that laptops often limit how many external screens they can drive. Then pick the adapters that fit.
- Multiple Graphics Cards: Some desktop PCs have more than one graphics card or multiple ports on one graphics card. Check your computer's manual or look at the back of your tower for all available video outputs.
- Docking Stations: For laptops, a docking station is often the best solution. It connects to your laptop (usually with USB-C or Thunderbolt) and provides multiple video outputs (HDMI, DisplayPort), USB ports, and sometimes even Ethernet.
- USB to Video Adapters: You can buy adapters that plug into a regular USB-A or USB-C port and give you a video output (like HDMI). These are great for adding one or two extra monitors, but performance might be limited for demanding tasks like gaming.
- DisplayPort Daisy-Chaining: Some monitors support DisplayPort Multi-Stream Transport (MST). This lets you connect one monitor to your computer, and then connect a second monitor to the first monitor using a DisplayPort cable. Check your monitor's specifications to see if it supports this.
Configuring the Taskbar for Multiple Monitors
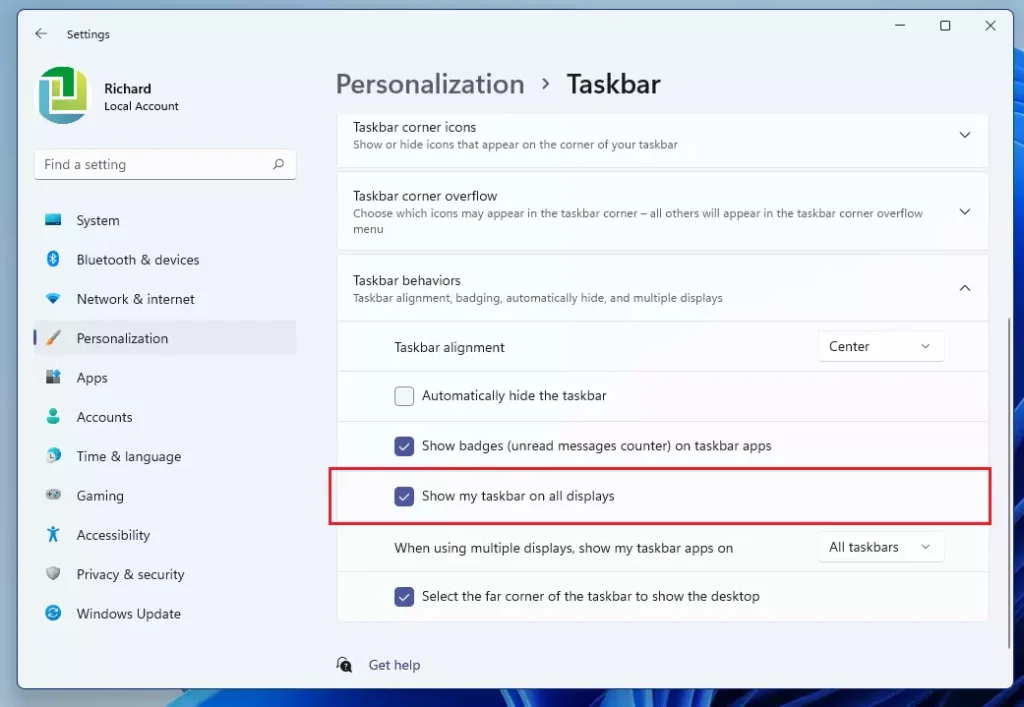
Taskbar settings control whether the taskbar appears on every screen or only on the main one. Open Settings Personalization Taskbar and expand Taskbar behaviors. Then switch the option for showing the taskbar on all displays on or off. A related dropdown lets you choose which taskbar shows the buttons for open apps. This is useful if you want each screen to list only its own windows.
- Go to Settings Personalization Taskbar
- Expand the Taskbar behaviors section.
- Look for the option "Taskbar on all displays." You can choose to show the taskbar on all displays, or only on the display where your mouse cursor is. You can also choose where taskbar buttons show up (like only on the taskbar where the window is open, or across all taskbars).
Using Windows Snap Layouts and Snap Groups
Snap Layouts and Snap Groups help you organise windows across your monitors without dragging and resizing by hand. Hover over a window's maximize button to see a grid of predefined layouts, then click a zone to place the window there.
- Hover your mouse over the maximize button of any window. A grid of layouts appears.
- Click the zone where you want that window. It snaps into place.
- Pick the other windows you want in the remaining zones from the thumbnails Windows offers.
If the grid doesn't appear, open Settings System Multitasking and make sure Snap windows is turned on. Snap Layouts work on each monitor separately, so repeat the process on the other screens.
Snap Groups preserve a set of apps you snapped together. If you minimize the group, hover over one of its apps on the taskbar and pick the group, or click any single app icon in it, to bring all of them back at once.
Setting Different Backgrounds for Each Monitor
Windows 11 fully supports a different wallpaper on each monitor. Right-click the desktop and select Personalize, then go to Background and choose a picture. Right-click the image you want and assign it to a specific monitor.
- Right-click on your desktop and select Personalize.
- Click on Background.
- Choose a picture.
- Below the image selection, you'll see an option like "Choose a photo to show on all displays." If you select a picture here, it applies to all.
- To set different backgrounds: Right-click on the image you want to use for a specific monitor, and then choose Set for monitor 1, Set for monitor 2, etc.
A few things worth knowing about wallpapers:
- Monitor Not Detected: Make sure cables are plugged in securely at both ends. Try a different cable or a different port. Restart your computer. Use the "Detect" button in Display settings.
- Incorrect Resolution or Scaling: Make sure you are using the monitor's native resolution and the right scaling percentage. Update your graphics drivers.
- Flickering or Display Issues: Check your cables. Make sure your graphics drivers are up to date. Try lowering the refresh rate. Some older adapters or cables might not support high resolutions or refresh rates.
- Mouse Cursor Jumps Between Screens Incorrectly: Rearrange your displays in Display settings to match their physical positions correctly.
Troubleshooting Common Issues
Most multiple monitor problems in Windows 11 come down to a few causes. Check the physical cable connections first, then test a different port or cable. Update your graphics drivers, and confirm each display uses its native resolution and a sensible scaling percentage. Work through them in that order, since the cheap checks fix most issues.
When to Consider Upgrading Your Graphics Card
Upgrading the graphics card becomes necessary when the computer handles heavy workloads: gaming across several monitors, high-resolution 4K displays, professional video editing or graphic design. Basic integrated graphics cope with routine tasks such as email, browsing and office work. Heavy multi-monitor setups need dedicated hardware.
- Game on multiple monitors or at very high resolutions (like 4K).
- Do professional video editing or graphic design.
- Run multiple high-resolution monitors (e.g., three 4K displays).
Heavy workloads need a capable graphics card (GPU). Before you buy one, read its specifications to confirm how many displays it supports and at what resolutions and refresh rates. Also check that your power supply and case can take it.
- Can I use monitors with different resolutions or sizes? Yes, Windows 11 handles monitors of different resolutions and sizes well. You can adjust scaling and resolution separately for each monitor to make sure everything looks clear and the right size. Just make sure to arrange them correctly in Display settings.
- Do I need a special graphics card for multiple monitors? For basic use, most modern computers have enough graphics power for two or three monitors. However, for gaming, high-resolution displays, or many monitors, a dedicated graphics card with enough VRAM and multiple output ports is recommended.
- How do I make sure my mouse moves smoothly between screens? The key is to arrange the monitor icons in Windows 11 Display settings to match exactly how they are placed physically on your desk. If your mouse moves up when you expect it to go right, adjust the arrangement until it feels natural.
- What is the difference between "Duplicate" and "Extend"? "Duplicate" shows the same content on multiple screens, which is good for presentations. "Extend" spreads your desktop across all screens, creating a bigger workspace where you can open different apps on each monitor at the same time.
- Can I connect wireless monitors?
Was this guide helpful?
100% of readers found this helpful (1 votes)

About the Author
Richard
Tech Writer, IT Professional
Richard is a writer at Geek Rewind who turns complex IT tasks into clear, step-by-step guides. He draws on years of hands-on experience in system administration and enterprise IT operations, focusing on Windows, Linux and WordPress: the problems people actually run into, and the fixes that work. His server and WordPress guides come from systems he runs himself. Richard builds and maintains the platform behind Geek Rewind, from its Ubuntu servers and Nginx configuration to its custom WordPress plugins. Many new tutorials start with readers' questions, and he's always glad to answer them in the comments.



No comments yet — be the first to share your thoughts!