How to Change Screen Timeout to Turn Off Display After in Windows 11

Screen timeout in Windows 11 is the built-in power feature that turns off your display after your PC sits idle for a set time. You can pick any interval from 1 minute up to 5 hours, or turn the timeout off so the screen stays on.
Adjusting this timer saves electricity, helps laptop battery life, and protects older screens from image burn-in. The quickest way to change it is the Settings app . The other methods below are the classic Control Panel , advanced power plan settings and the command line.
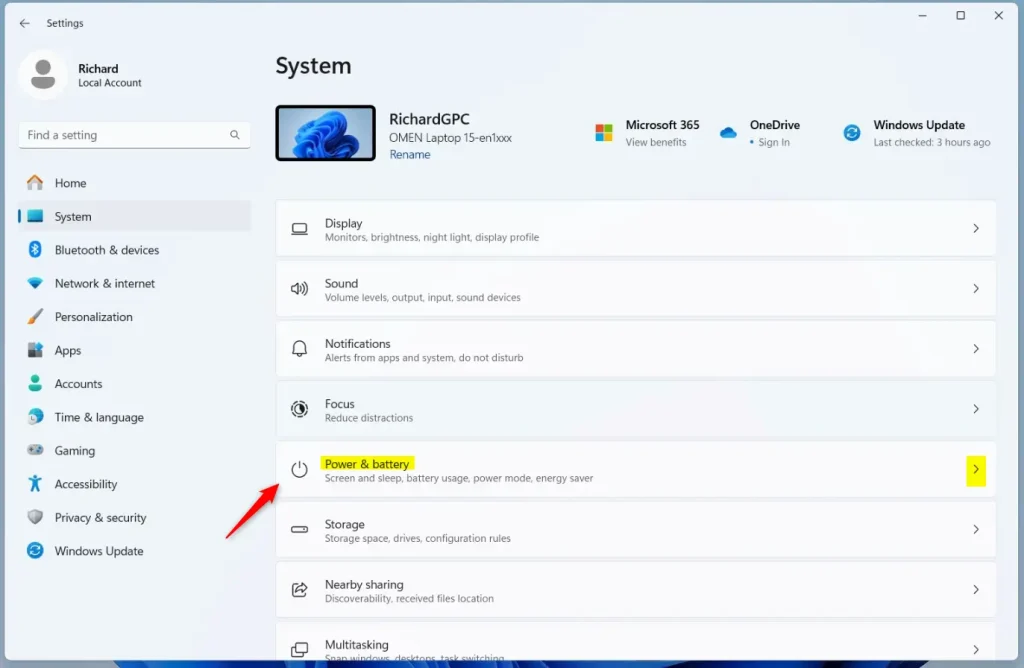
Open Settings , go to System Power & battery Screen and sleep, then choose your desired timeout from the drop-down menus for On battery power and When plugged in. Select Never to keep the display on indefinitely. Changes take effect immediately without restarting.
Why does this matter?
The display is one of the biggest power drains on a PC, especially a laptop. Turning it off after a period of inactivity saves electricity and extends battery life. A short timeout, such as 5 minutes, stops the screen from burning power while you are away from the desk.
A timeout that is too short is annoying if you read long documents or watch videos without touching the mouse. Pick a value that matches how you actually work.
What happens when you do this?
The screen timeout setting controls how long your display stays on before it goes dark. By default, Windows 11 turns off your screen after 5 minutes on battery power and 15 minutes when plugged in. Raise these times if the screen goes dark while you are still working. Lower them if you want to save battery.
It does not put the PC to sleep. Sleep and hibernate have their own timers on the same settings page.
Starting with Windows 11 build 29550.1000 (Canary), power setting changes made in the Settings app (display, sleep or hibernate timeouts) apply to all power plans. This ensures your chosen configuration persists reliably. On earlier builds, the Settings app changes only the plan that is currently active.
Reference:
Power settings in Windows 11 - Microsoft Support
Screen and sleep settings help conserve energy and maximize battery longevity.
Devices with a presence sensor let you toggle Automatically turn off my screen when I leave alongside Automatically wake up my device when I approach. Presence detection settings vary by device brand and model, so you will not see them on every PC.
Option One
The Settings app is the fastest way to change the timeout. It lets you pick an exact time limit or keep the display on indefinitely. It works the same on Windows 11 Home and Pro, and no restart is needed. The new value takes effect as soon as you choose it.
- Press
Win+Ito open Settings. - Click
Systemon the left side. - Click
Power & batteryon the right side. The name depends on whether your PC has a battery. - Click
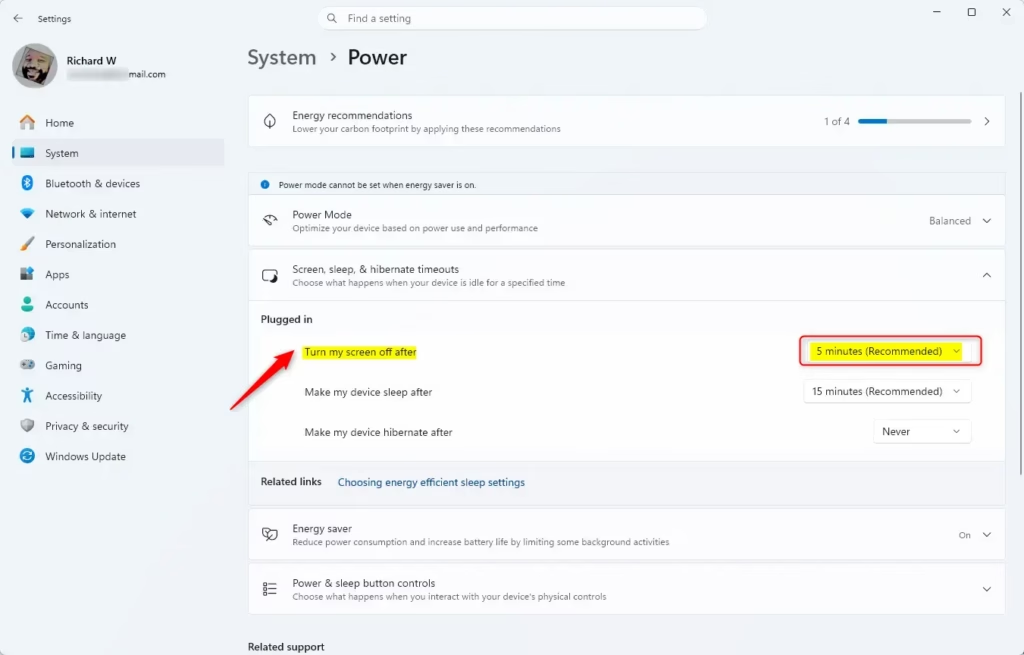
Screen and sleepon the right side to expand it. You should now see the timeout drop-down menus. - Open the drop-down menu for On battery power, turn off my screen after and choose a time. Desktop PCs without a battery do not show this option.
- Open the drop-down menu for When plugged in, turn off my screen after and choose a time.
- Select
Neverin either menu if you want the screen to stay on all the time. - Close Settings.
Only your administrator can change it. To undo your change, return to the same page and select your previous values, or 5 minutes and 15 minutes for the defaults.
Change Screen Timeout in Settings
Option Two Open Power & battery settings
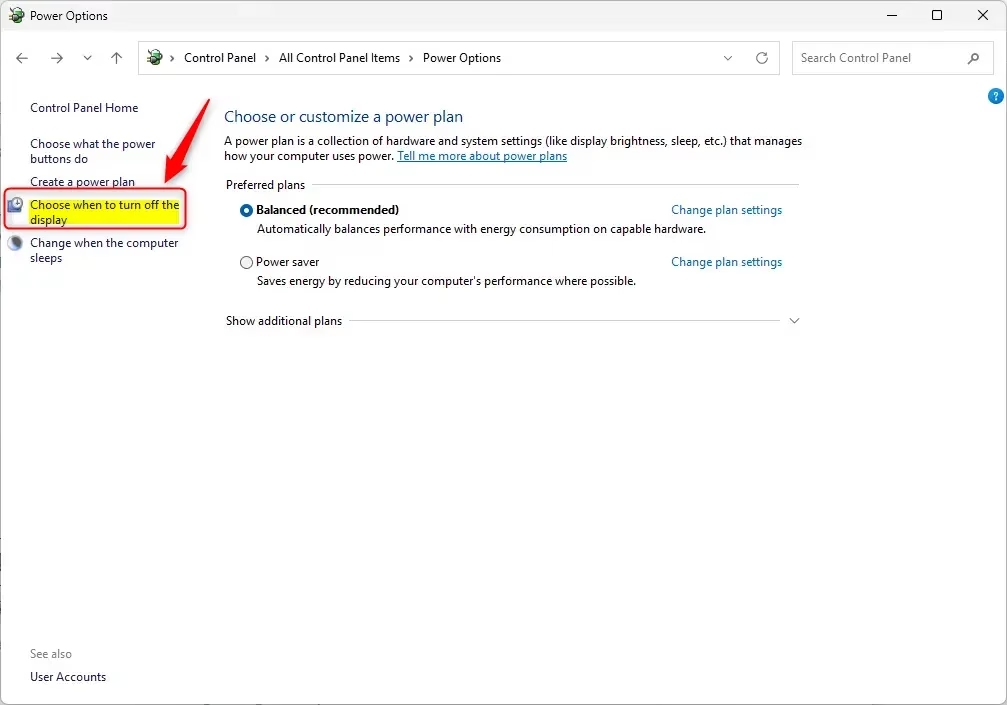
The classic Control Panel is useful if you prefer the traditional menus. It leads to the power management settings that have been part of Windows for years. This method changes the plan that is currently active.
- Open Control Panel in icons view. If you see categories instead, change View by in the top-right corner to large or small icons.
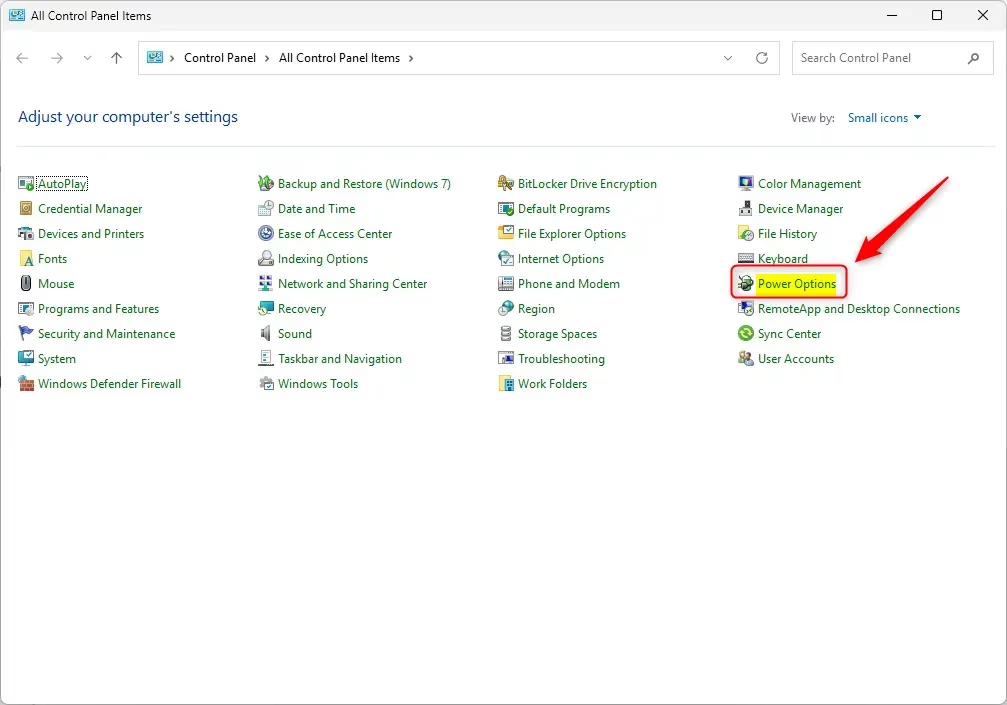
- Click the
Power Optionsicon. - Click
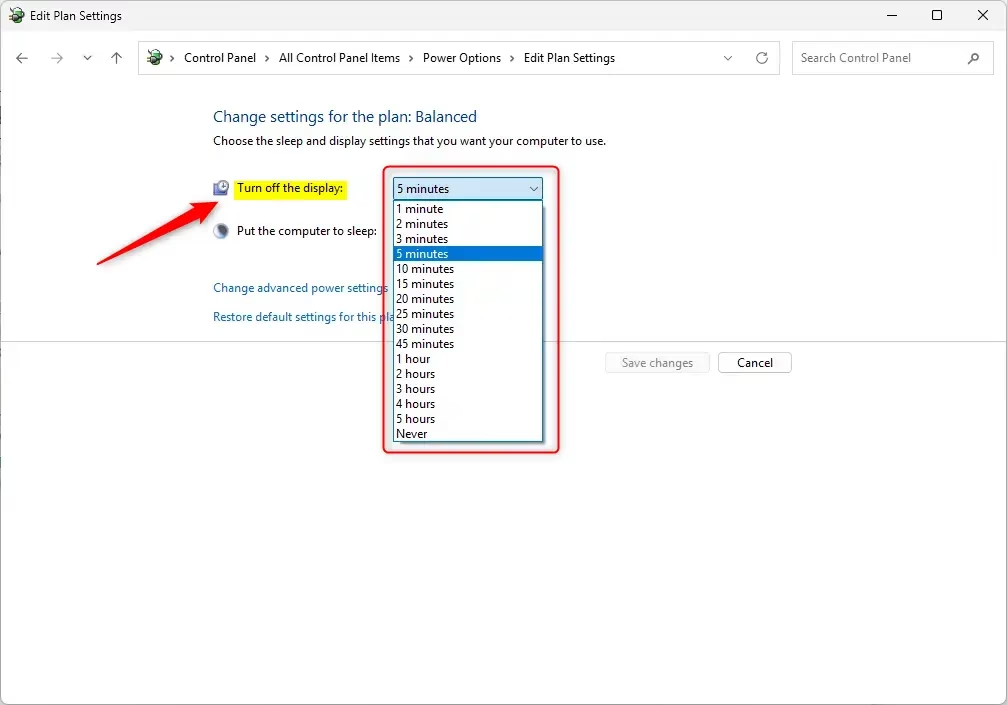
Choose when to turn off the displayon the left side. The power plan page opens with the timeout options. - Open the drop-down menu for On battery and choose a time. Desktop PCs show only the plugged-in column.
- Open the drop-down menu for Plugged in and choose a time.
- Select
Neverin either menu if you want the screen to stay on all the time. - Click
Save changesto apply the change. If you skip this, the old values stay. - Close Control Panel.
No restart is needed. To undo the change, open the same page and choose your earlier times.
Change Screen Timeout in Power Plan Settings
Option Three
Advanced power plan settings give you deeper control than the standard menus. You can set exact display shutdown times for plugged-in and battery states on a specific plan. This is the right place when you use more than one power plan and want to edit a plan other than the active one.
- Open Control Panel in icons view.
- Click the
Power Optionsicon. - Click
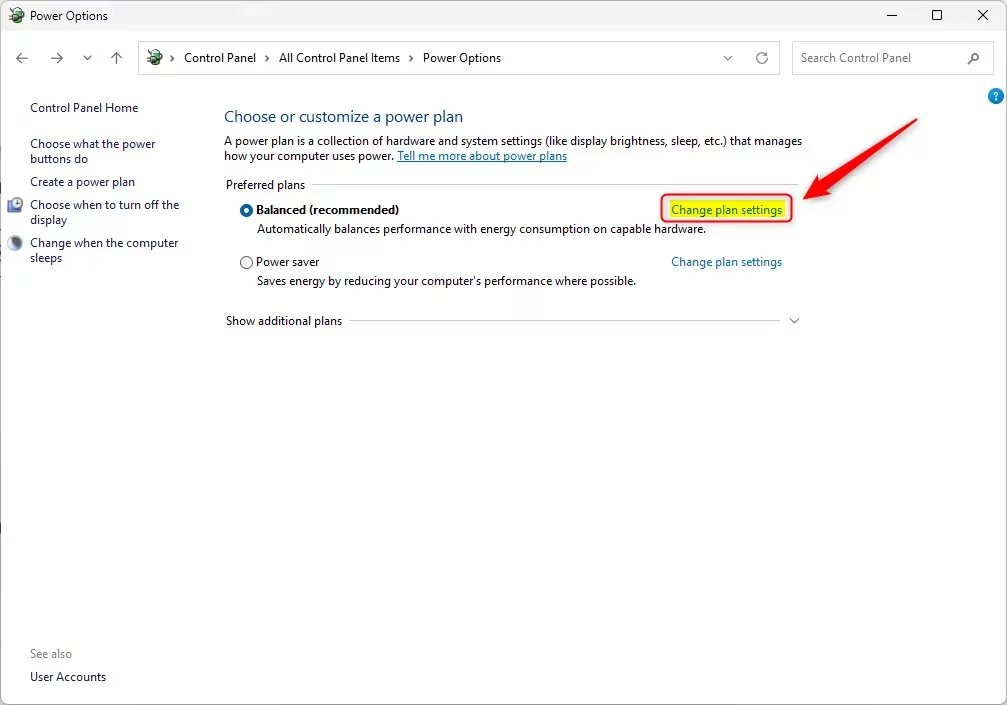
Change plan settingsnext to the plan you want to edit, for example "Ultimate Performance". The plan's settings page opens. - Click
Change advanced power settings. A small Power Options dialog opens with a list of settings. - Scroll down and expand
Display, then expandTurn off display after. - Set the value for On battery and/or Plugged in. Choose a number of minutes or hours, or select
Neverto keep the screen on. - Click
OKto save the change. - Close Control Panel.
Each plan keeps its own values. If the plan you edited is not the active one, the change takes effect only when you switch to that plan. To undo it, reopen the dialog and enter the old values.
Change Screen Timeout in Advanced Power Plan Settings
Option Four
The command line changes the timeout with a single text command. The powercfg tool in Windows Terminal lets you skip the graphical menus entirely. This is handy if you prefer typing or want to script power changes across several PCs. It works on both Home and Pro editions and needs administrator rights.
- Open Windows Terminal as administrator and select
Command PromptorWindows PowerShell. A prompt appears in the tab. - Type one of the commands below and press Enter. If the command works, it returns to the prompt without an error message.
For battery power:
powercfg -change -monitor-timeout-dc <minutes>OR
powercfg /SETDCVALUEINDEX SCHEME_CURRENT 7516b95f-f776-4464-8c53-06167f40cc99 3c0bc021-c8a8-4e07-a973-6b14cbcb2b7e <seconds>For plugged in:
powercfg -change -monitor-timeout-ac <minutes>OR
powercfg /SETACVALUEINDEX SCHEME_CURRENT 7516b95f-f776-4464-8c53-06167f40cc99 3c0bc021-c8a8-4e07-a973-6b14cbcb2b7e <seconds>Important:
- Replace
<minutes>with how many minutes you want before the display turns off. - Replace
<seconds>with how many seconds you want before the display turns off. - Using
0(zero) minutes or seconds works the same as choosing "Never." - Each pair offers two commands, so use whichever fits. The difference is the unit: one takes minutes and the other seconds.
- Close Windows Terminal.
To check the result, open Settings System Power & battery (or Power) and look at the screen timeout drop-down menus. To undo the change, run the same command again with your old value.
Summary
You have four ways to change the screen timeout. All of them control how long your display stays active before it turns off, so choose the one that suits you.
- Option One: Use the Settings app for a quick and easy change.
- Option Two: Use Power Options in Control Panel to adjust when your display turns off.
- Option Three: Use Advanced Power Plan Settings for more detailed control, including plans that are not currently active.
- Option Four: Use command-line tools if you prefer typing commands (requires admin privileges).
The best method depends on personal preference. Whichever you use, a sensible timeout saves power and extends battery life.
Was this guide helpful?

About the Author
Richard
Tech Writer, IT Professional
Richard is a writer at Geek Rewind who turns complex IT tasks into clear, step-by-step guides. He draws on years of hands-on experience in system administration and enterprise IT operations, focusing on Windows, Linux and WordPress: the problems people actually run into, and the fixes that work. His server and WordPress guides come from systems he runs himself. Richard builds and maintains the platform behind Geek Rewind, from its Ubuntu servers and Nginx configuration to its custom WordPress plugins. Many new tutorials start with readers' questions, and he's always glad to answer them in the comments.
No comments yet — be the first to share your thoughts!