How to Configure Multiple Monitors Correctly in Windows 11 Display Settings

Multiple monitors in Windows 11 let you spread your work across two or more screens so you can see more apps at once. Windows detects most extra screens automatically as soon as you plug in a compatible HDMI, DisplayPort, USB-C, or Thunderbolt cable.
Before you connect a new screen, check the physical video ports on both your computer and the monitor to pick the right cable. If you use USB-C, confirm that the port supports video output (DisplayPort Alt Mode or Thunderbolt). Some USB-C ports only carry data or power. Once you plug everything in, Windows sets up a mirrored or extended desktop so you can start working right away.
Open Settings (Win+I), go to System Display, and click Detect next to “Detect another display” under Multiple displays if Windows has not found your second monitor. Once it appears as a numbered box, Windows sets it up as an extended desktop, and you can arrange the layout by dragging the boxes to match your desk.
Detecting Your Second Monitor Manually
If Windows does not recognise your new screen automatically, you can force a scan from the Settings app. This fixes most “missing display” cases caused by a monitor that was powered on after Windows had already finished checking the ports.
- Press the Win+I to open Settings.

Windows 11 Start menu with Settings gear icon highlighted. - Select System from the left-hand navigation menu.
- Click Display to open your monitor management options. You should see a numbered box for each screen Windows currently knows about.
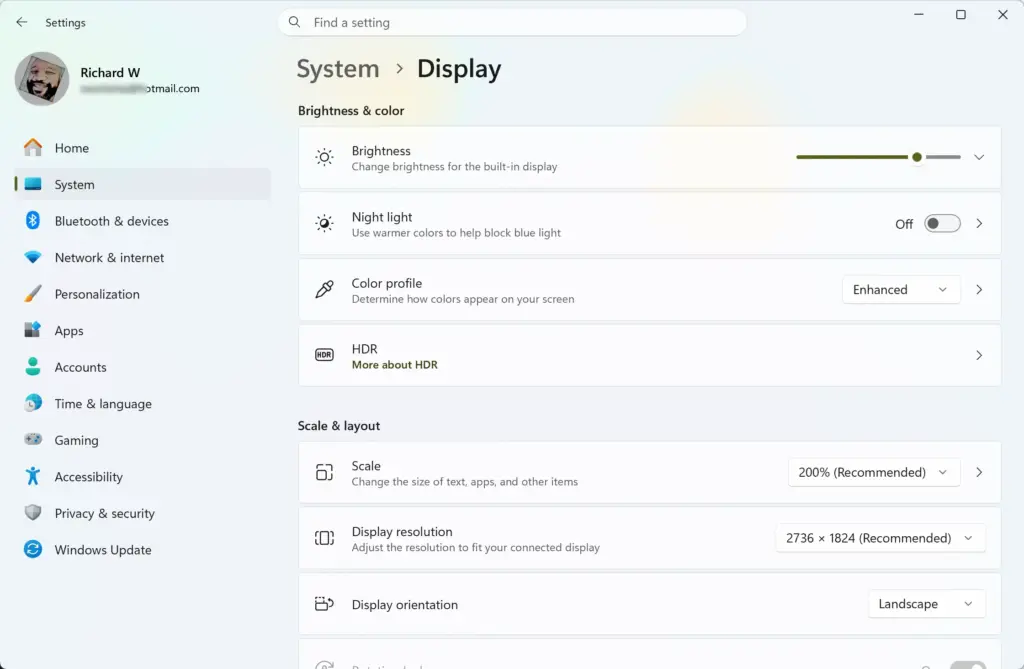
Settings › System › Display - Scroll down to the Multiple displays section and click the arrow next to it to expand it. It is collapsed by default.
- Click the Detect button next to the “Detect another display” option to force Windows to search for connected hardware. The exact wording of this label can differ slightly between Windows 11 builds.
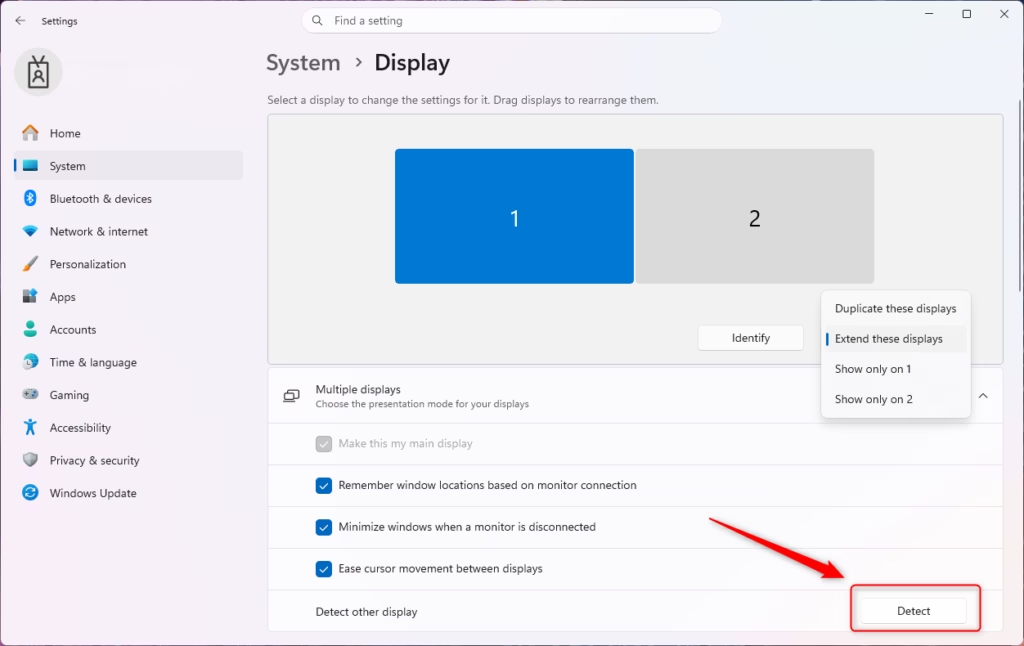
Windows 11 multiple displays detect new monitors prompt. - Wait a few seconds. If Windows finds the monitor, a new numbered box appears at the top of the Display page and the screen lights up.
If nothing changes, the problem is usually the cable, the monitor input or the graphics driver. See the troubleshooting section below.
Arranging Display Layouts and Ordering Screens
Matching the on-screen layout to your physical desk setup lets the mouse cursor move naturally from one display to the next. If the layout is wrong, the cursor gets stuck at invisible edges, or it leaves the left screen when you expect it on the right.
- Open Settings and go to System Display
- At the top of the Display page, look at the numbered boxes. Each box represents one connected monitor.
- Click Identify. A large number flashes on each physical screen so you know which number belongs to which monitor.
- Click and drag the numbered rectangles to match your desk. For example, if monitor 2 sits to the left of monitor 1, drag box 2 to the left side of box 1. If your monitors are different heights, line up the boxes so they roughly match how the screens sit.
Windows 11 multiple displays set main display option highlighted. - Click Apply to save the new layout. This button only appears if Windows needs you to confirm the change after you move the boxes.
To choose your primary display, which hosts the main taskbar and opens new app windows, do this:
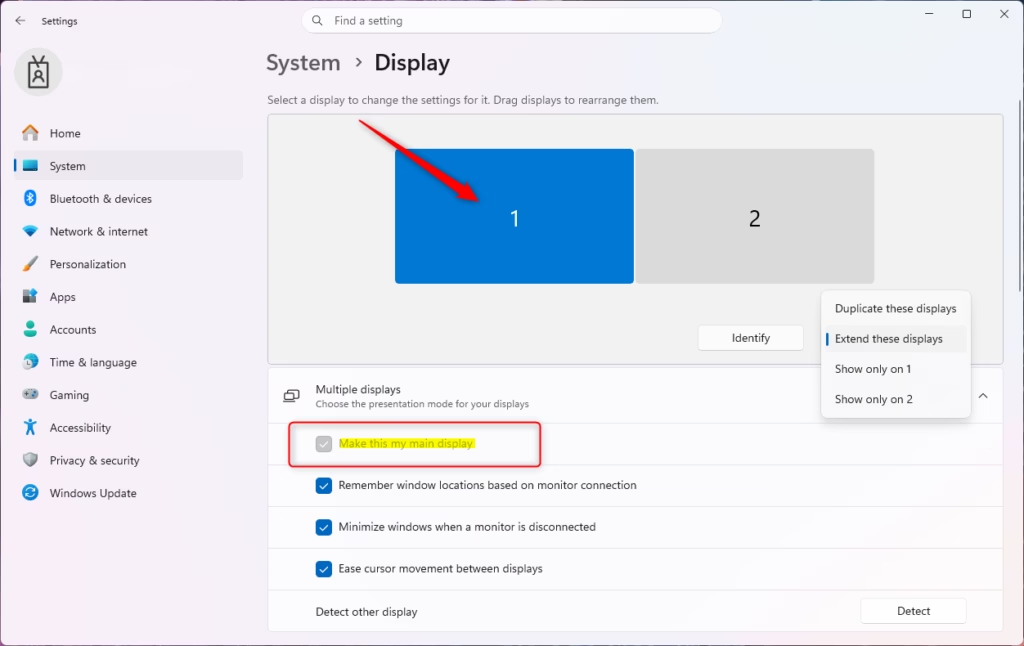
- On the Display page, click the box for the monitor you want as your main screen.
- Expand Multiple displays if it is collapsed.
- Select the Make this my main display checkbox. If the box is already ticked and greyed out, that monitor is already the main one.
The same Multiple displays section has two more checkboxes in current versions of Windows 11. They control what happens when you plug in or unplug a screen:
- Remember window locations based on monitor connection makes Windows put your windows back where they were when you reconnect a monitor, such as a laptop returning to its dock.
- Minimize windows when a monitor is disconnected minimizes the windows that were on the removed screen instead of moving them to the remaining display. Windows can then restore them when the monitor returns.
If you do not see these options, your Windows 11 version may be older. Run Windows Update and check again.
After you arrange the monitors, set the resolution, scale, orientation and refresh rate for each one. Mismatched settings are the most common cause of blurry text, oversized windows and a cursor that jumps oddly between screens. Do this for every display, one at a time:
- On the same Display page, click the numbered box for the monitor you want to adjust. The settings below apply only to the selected monitor.
- Under Scale & layout, open the Scale dropdown and pick a percentage. A small high-resolution screen often needs 125% or 150%, while a large 1080p monitor is usually fine at 100%.
- Open the Display resolution dropdown and choose the option marked Recommended. This is the monitor's native resolution and gives the sharpest text. Windows may ask you to confirm the change. Click Keep changes, or wait for the timer to run out and it reverts.
- Open the Display orientation dropdown if you need to change it. Choose Landscape for a normal screen or Portrait for a monitor that is rotated on its stand. Rotate the physical monitor first, then set this to match.
- Scroll to Related settings and click Advanced display. Select the monitor if there is a display picker at the top, then use Choose a refresh rate to set the highest rate the monitor supports, such as 60 Hz, 144 Hz or more. The list only shows rates that the monitor, cable and graphics card can all handle.
If the highest refresh rate is missing, try a different cable or port. Older HDMI cables and ports often cap the rate below what the monitor can do. If one screen still looks soft, check that its resolution is on Recommended before you change anything else.
Configuring Display Modes: Extend, Duplicate, or Show Only on One
You can extend the desktop for a bigger workspace, duplicate it for a presentation, or use a single screen. The Project menu changes this instantly without opening Settings.
- Press the Windows key + P to open the Project flyout on the right side of the screen.
- Select PC screen only to turn off all secondary displays and show output only on your primary monitor.
- Select Duplicate to copy the exact image of your main screen onto every connected secondary display. This is useful for projectors and meetings.
- Select Extend to stretch your desktop across all connected monitors into one large continuous workspace. This is the mode you want for the layout you set up earlier.
- Select Second screen only to shut off your main screen and send video only to the external monitor.
If you pick Second screen only and the external screen stays black, press the Windows key + P again and choose PC screen only to get your main display back. Extended mode is also the one that makes the layout boxes in Settings meaningful. In Duplicate mode, the screens show the same image and there is nothing to arrange.
Resolving Undetected Monitors and Hardware Connection Issues
When Windows cannot see a monitor, start with the physical connection and then check the graphics driver. A faulty cable or loose plug often blocks the signal that tells Windows a second screen is attached.
Confirm that the monitor is powered on and set to the correct input source using the buttons on the monitor itself. If the input is set to HDMI 1 while your cable is plugged into HDMI 2, the screen stays black. Swap cables, try another port on the PC or monitor, and test the monitor on a different computer to rule out faulty hardware. If you use an adapter or dock, remove it temporarily and connect the cable directly to see whether the adapter is the problem.
Outdated or corrupted graphics drivers can also stop Windows 11 from talking to multiple displays. To update the driver:
- Right-click the Start button and select Device Manager.
- Expand Display adapters. You should see your graphics card listed, such as NVIDIA, AMD or Intel. Some PCs list two, for example integrated and dedicated graphics.
- Right-click your graphics card and select Update driver.
- Choose Search automatically for drivers and let Windows install what it finds.
- Restart the PC if the installer asks you to, then go back to Settings System Display and try Detect again.
If Windows says the best driver is already installed, download the latest driver from the graphics card maker or your PC manufacturer. For a quick refresh without a restart, you can press the Windows key + Ctrl + Shift + B. The screen flickers briefly and may beep as the graphics driver restarts.
Managing Multiple Touch Screens in 🪟 Windows 11
Requirement: this mapping only works with monitors that have touch or pen digitizer hardware. A normal monitor cannot be turned into a touch screen with software. You may also need to be signed in with an administrator account, or enter administrator credentials when prompted. If Tablet PC Settings does not list a touch option, or the Setup button is greyed out, Windows is not detecting a touch or pen device on that system.
When you have more than one screen, Windows can send touch input to the wrong monitor. Use the Control Panel to map each touch panel to the display it belongs to.
- Type "Control Panel" into the Windows search bar on your taskbar and press Enter.
- Click Hardware and Sound.
- Click Tablet PC Settings to open the hardware mapping utility.
- On the Display tab, click the Setup button next to "Configure pen and touch displays for pen or touch input".
- Wait for the screen to turn white with text telling you to tap the screen to identify it as a touch screen. Tap the screen that the prompt appears on.
- If the prompt appears on a non-touch monitor, press the Enter key to move it to the next screen. Repeat until it reaches your touch display, then tap it.
After you finish, test by tapping an icon on each touch monitor and check that the response happens on the screen you touched. If the input is still on the wrong display, run Setup again.
What to do next
With your multiple monitors connected and configured, you can customize your desktop background for each screen or set up taskbar behaviors for your extended workspace.
To show the taskbar on every screen, open Settings Personalization Taskbar, expand Taskbar behaviors, and select the Show my taskbar on all displays checkbox. After you turn it on, a dropdown labelled When using multiple displays, show my taskbar apps on lets you choose whether each taskbar shows all apps or only the windows open on that screen. To go back to a single taskbar, clear the checkbox.
Have a question about this guide?
Answered by AI from this guide. Good questions may be added to this page — please don't include personal details.
Did this guide fix your problem?

About the Author
Richard
Tech Writer, IT Professional
Richard is a writer at Geek Rewind who turns complex IT tasks into clear, step-by-step guides. He draws on years of hands-on experience in system administration and enterprise IT operations, focusing on Windows, Linux and WordPress: the problems people actually run into, and the fixes that work. His server and WordPress guides come from systems he runs himself. Richard builds and maintains the platform behind Geek Rewind, from its Ubuntu servers and Nginx configuration to its custom WordPress plugins. Many new tutorials start with readers' questions, and he's always glad to answer them in the comments.
No comments yet — be the first to share your thoughts!