How to Manage Primary and Secondary Display Arrangements in Windows 11

- 42 steps
- Needs administrator rights
- Includes a restart or sign-out
Display arrangement settings in Windows 11 control which screen holds your main desktop, taskbar, and notification area. This tutorial shows how to set the primary display, position your monitors, and tune scaling, refresh rate, and HDR.
Windows can misidentify your monitors after a system update or a docking station disconnect. Icons scatter, and apps open on the wrong screen.
Most fixes start in Settings System Display. Setting the correct monitor as your main display stops apps from opening out of view. It also keeps your mouse moving smoothly between screens.
Open Settings System Display, select the monitor you want, scroll to Multiple displays, and tick Make this my main display. The taskbar and notification area move to that screen immediately, with no restart needed. If the box is greyed out, that monitor is already your main display.
Checking Display Settings and Multi-Monitor Layout
The Display page is where you arrange your monitors and choose your main screen. Drag the monitor boxes to match your physical desk layout, label each screen with a number, and make Windows look for a display it missed. None of this needs administrator rights, and no restart is required.
The boxes at the top of the page represent your monitors. If the layout does not match how your screens sit on the desk, the mouse pointer crosses from one screen to the next at the wrong place. Dragging the boxes into the right positions fixes that.
- Press the Win and I together to open Settings.
- Select System from the sidebar, then click Display. A row of numbered boxes, one per monitor, appears at the top of the page.
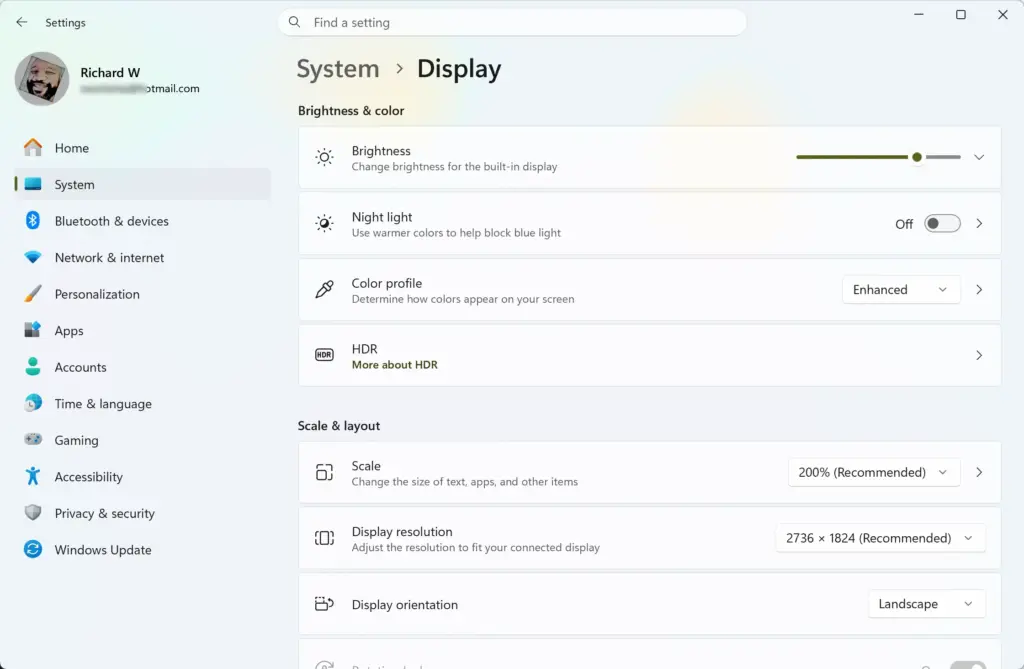
- Click the Identify button. A large number appears on each connected screen, so you can match each physical monitor to its box.
- Click the Detect button if Windows fails to recognize a secondary monitor. If it is still missing, check that the cable is seated and that the monitor is switched to the right input.
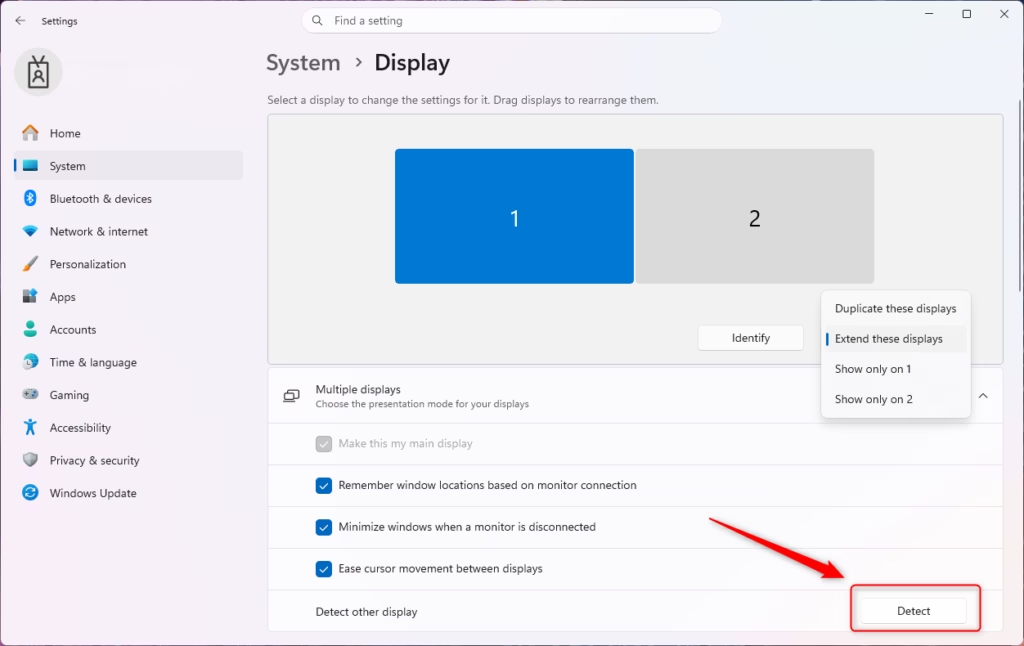
Detect only shows up when Windows cannot find every display, so you may not see it on a working setup.
It offers PC screen only, Duplicate, Extend, and Second screen only. A monitor that shows nothing, or that mirrors your main screen when it should not, often comes back after you pick Extend.
- Select the box for the monitor you want to modify. The selected box is highlighted, and the settings below the layout now apply to that monitor only.
- Drag the boxes until they match your desk layout. Then, if needed, scroll down and expand the Multiple displays section.
- Check the box that says Make this my main display. The taskbar and notification area move to that screen. If the box is greyed out, you have selected the monitor that is already the primary screen. Select the other monitor’s box instead.
To undo the change, select the original monitor and tick Make this my main display on it. On some Windows 11 builds the Multiple displays section only appears when more than one monitor is connected.
The same section has two options that help if apps scatter after you dock or undock a laptop. Remember window locations based on monitor connection lets Windows put windows back where they were when a monitor reconnects. Minimize windows when a monitor is disconnected minimizes the windows on a removed screen instead of leaving them out of reach. Tick either box to turn it on, and clear it to turn it off.
Adjusting Screen Resolution and Scaling
Blurry or tiny text on your main screen usually comes down to the scale and resolution values. Scale is the percentage that enlarges text and apps. Resolution is the number of pixels the screen displays. Both are set on the same Display page.
Always pick the monitor first. Scale and resolution are set per monitor, so changing them on the wrong box affects the wrong screen.
- Open Settings, go to System, and click Display.
- Select your primary monitor from the visual layout box at the top of the page.
- Under Scale & layout, open the Scale dropdown menu and choose a percentage marked (Recommended), such as 100%, 125%, or 150%. Windows picks the recommended value from your screen size and resolution. Text and apps resize right away.
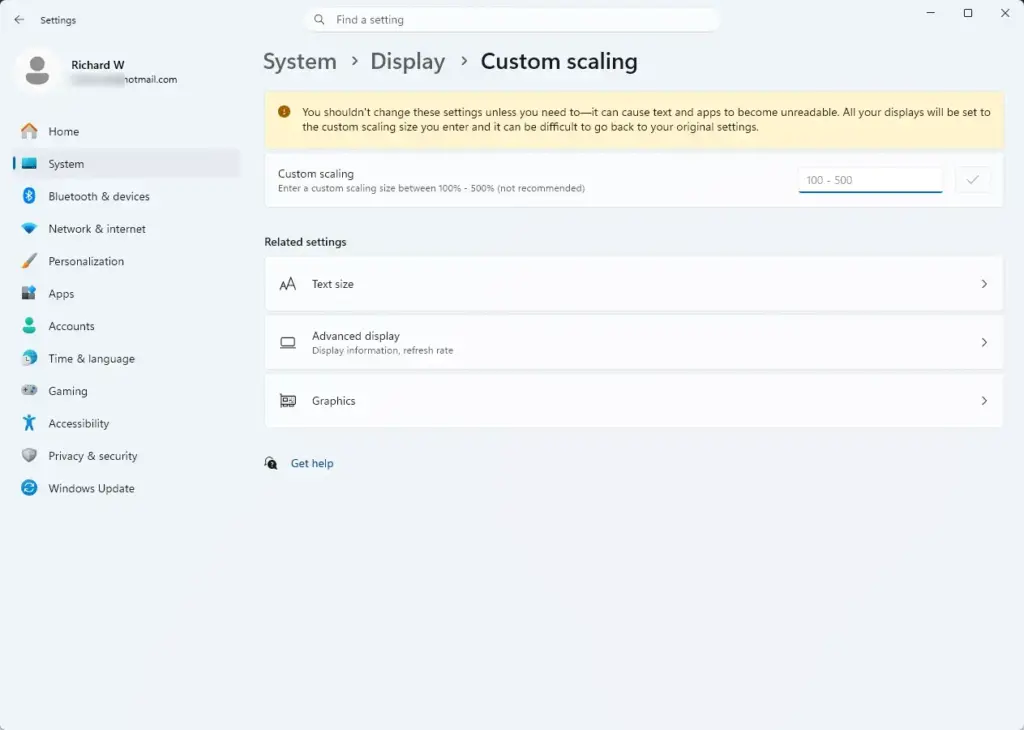
- Find the Display resolution dropdown menu directly beneath scaling.
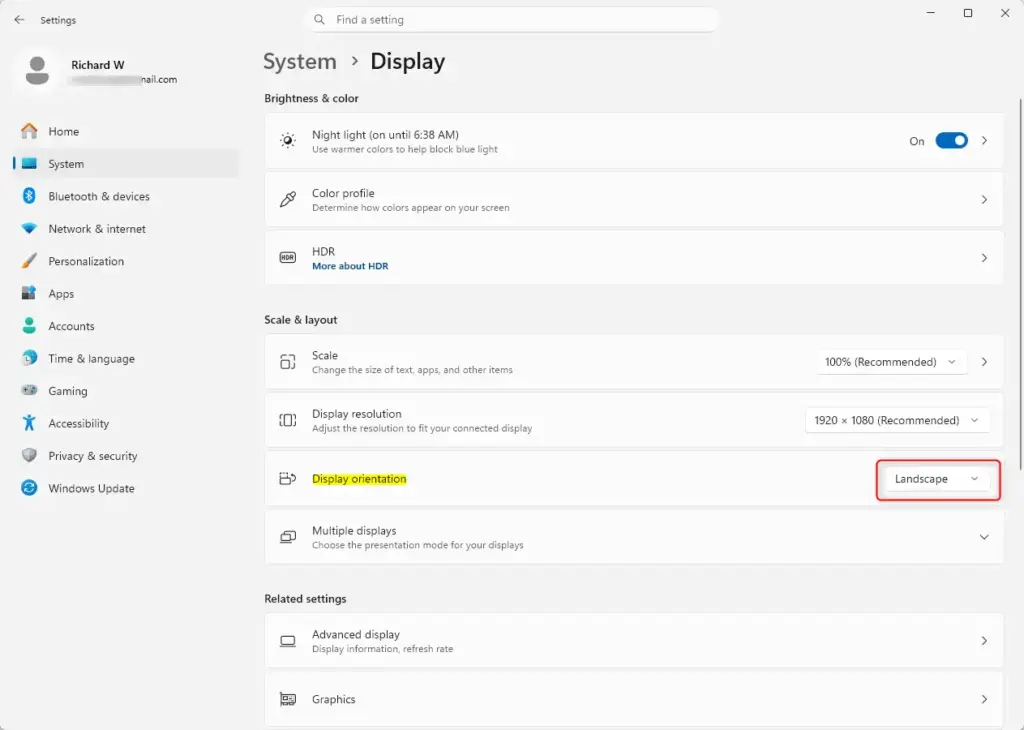
- Select the resolution marked (Recommended). This matches the native pixel dimensions of your monitor panel. Any other resolution makes the image look soft.
- Click Keep changes on the prompt that appears on screen. You have fifteen seconds. If you do nothing, or the screen goes black, Windows reverts to the previous setting on its own.
If the (Recommended) resolution is missing or the list is very short, Windows is probably using a basic display driver. See the driver section further down.
Changing Refresh Rate and Color Depth
Matching the refresh rate to your monitor’s highest supported value makes motion smoother. The refresh rate is how many times per second the screen redraws, measured in Hertz (Hz). A low rate causes choppy animations and screen tearing, which is most noticeable when you drag windows, scroll, or play games. The setting is on the Advanced display page.
- Open Settings, go to System, and click Display.
- Scroll down to the Related settings section near the bottom of the page and click Advanced display.
- If you have more than one monitor, pick the right one from the dropdown at the top of the page.
- Look at the information next to Choose a refresh rate to see your current Hertz setting.
- Click the dropdown menu under Choose a refresh rate and select the highest frequency listed for your monitor. The screen may flicker or go dark for a moment.
- Click Keep changes on the verification window. If you do not confirm, Windows switches back to the old rate.
- If your monitor supports HDR, open your graphics control panel , such as NVIDIA Control Panel or AMD Software: Adrenalin Edition. Check that the color depth matches 10-bit or 8-bit output standards.
The list only offers rates that both the monitor and the graphics driver support. If a higher rate you expect is missing, check that you are using a cable and port that can carry it. Older HDMI cables are a common cause. An outdated driver can also limit the options.
Some laptops also support Dynamic Refresh Rate (DRR). With DRR, Windows switches between a lower and a higher rate on its own, using the higher rate for scrolling and inking and the lower one to save battery. If your hardware and driver support it, a dynamic option appears in the same Choose a refresh rate list. Pick a fixed rate instead if you prefer a constant one.
Fixing Scaling Issues for Older Desktop Apps
Some older programs look blurry on a high-resolution screen because Windows stretches their window to fit the scaling level. You can override this for a single app in its properties, so the application handles DPI (dots per inch, the screen’s pixel density) itself instead of Windows. Changing settings for programs in protected folders, such as Program Files, may require administrator privileges.
- Right-click the executable file or desktop shortcut of the blurry application and select Properties. On Windows 11 you may need to click Show more options first if you right-click a file in File Explorer , depending on the app.
- Click the Compatibility tab at the top of the properties window.
- Click the Change high DPI settings button near the bottom. A second window opens.
- Under Program DPI, check the box labeled Use this setting to fix scaling problems for this program instead of the setting in Settings.
- Under High DPI scaling override, check the box labeled Override high DPI scaling behavior. The section is also described as Scaling performed by.
- Select Application from the dropdown menu below the override checkbox, then click OK, and click Apply.
Close the program and reopen it to see the result. If the text now looks too small, or the app looks worse, go back and try System or System (Enhanced) in the same dropdown. To undo the change, uncheck the boxes again.
Managing HDR and Color Profiles
Turning on High Dynamic Range (HDR) improves contrast and color on a monitor that supports it. If the HDR switch is missing or greyed out, your monitor, cable, or graphics driver probably does not support HDR. On a laptop, plugging in the charger can also matter. The display calibration tool can fix washed-out colors afterward.
- Open Settings, go to System, and click Display.
- Click HDR under the Brightness & color section.
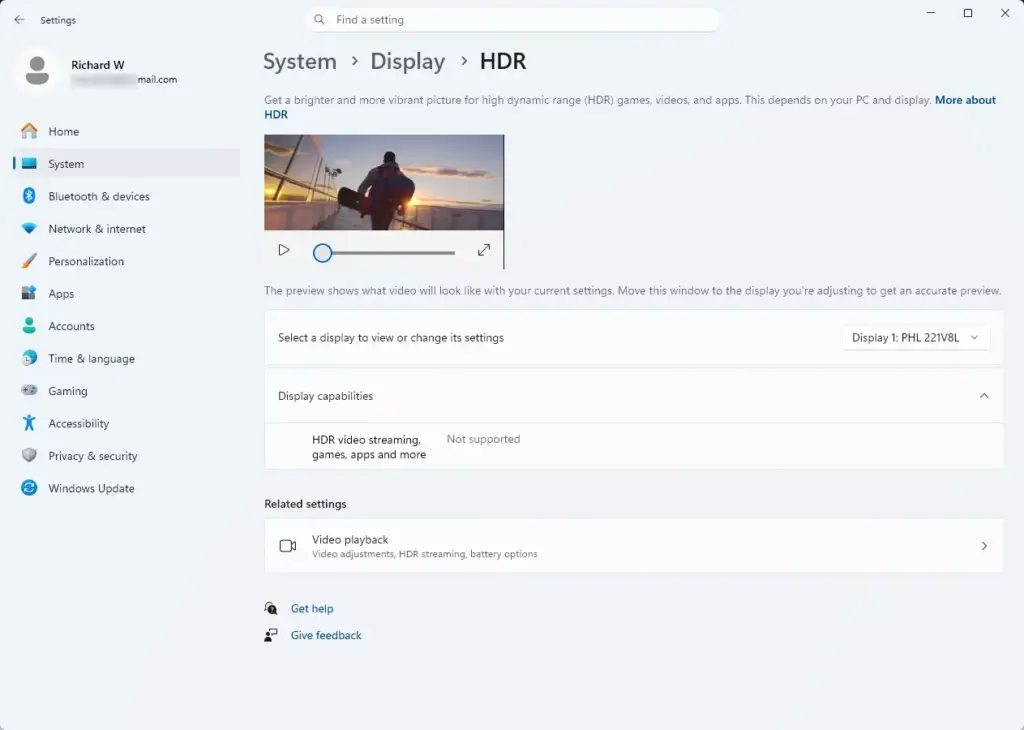
- Turn the Use HDR switch to On if your monitor supports HDR content. The screen may flash briefly, and the desktop can look a bit different afterward.
- Click the Display calibration link on the HDR settings page to launch the Windows HDR Calibration app. It maps your monitor’s peak brightness. If the app is not installed, Windows may send you to the Microsoft Store to get it.
- Type Color Management into the taskbar search box and open it. Use it to assign custom ICC color profiles supplied by your monitor manufacturer. Setting profiles for all users requires administrator privileges.
The HDR settings page may also list Auto HDR. When your display supports it, Auto HDR adds HDR-style brightness and color to many games that were not made for HDR. Switch it on or off from the same page, depending on how the games look to you.
If the desktop looks washed out with HDR on, run the calibration tool first before you give up on it. You can switch Use HDR back to Off at any time.
Troubleshooting Graphics Driver Conflicts
Missing monitor arrangements and other display glitches are often caused by the graphics driver, the software that lets Windows talk to your video card. Updating or reinstalling it is a good next step. You open Device Manager from the Start button's right-click menu. This step requires administrator privileges to apply changes to your system.
- Right-click the Start button and select Device Manager. Accept the User Account Control prompt if it appears.
- Expand the Display adapters category by clicking the arrow next to it. Your graphics card appears in the list. Some PCs show two, such as an Intel one and an NVIDIA one.
- Right-click your graphics card, such as NVIDIA GeForce, AMD Radeon, or Intel Iris Xe, and select Update driver.
- Click Search automatically for drivers to let Windows fetch updated packages from Windows Update. If it says the best driver is already installed, try the manufacturer's website for a newer one.
- If the problem started after a driver update and you need a stable previous version, select Browse my computer for drivers. Then select Let me pick from a list of available drivers on my computer and choose an older entry.
- Restart your computer to complete the driver re-initialization.
After the restart, go back to System Display and check that your monitors are still in the right positions.
Manage display layouts in Registry Editor
If Windows still forgets your multi-monitor setup after the steps above, you can look in the registry, the database where Windows stores its settings. Improper registry changes can cause system instability, so back up your registry before making any edits.
Be realistic about what you will find here. The key below holds Windows Explorer settings, such as how the desktop and windows behave. It is not where Windows stores monitor positions, so do not expect a ready-made value to fix your layout. Treat this as a place to review settings, not a guaranteed fix.
- Press the Windows key and R together, type regedit, and press Enter. This step requires administrator privileges, so accept the User Account Control prompt.
- Back up first. Click File Export, choose All as the export range, give the file a name, and save it somewhere safe. Double-clicking that file later restores the backup.
- Navigate to the path HKEY_CURRENT_USER\Software\Microsoft\Windows\CurrentVersion\Explorer\Advanced using the left sidebar.
- Look through the values on the right for settings that govern desktop icon alignment and window placement behaviors. Change nothing unless you know what the value does.
- Close Registry Editor and restart your computer to apply system-level layout caching changes.
What to do next
Once your main screen is correctly configured and scaled, you can customize your desktop background, set up virtual desktops, or adjust power plans. If display problems continue after these steps, test your hardware.
Swap out your video cable, or connect to a different port on your dedicated graphics card. A bad cable or port causes dropped monitors more often than people expect.
Frequently asked questions
What is the main screen called?
The main screen is called your primary display. It's the monitor where your taskbar, Start menu, and notification area appear by default. In Windows 11, you can choose which physical monitor becomes your primary display in Settings System Display
What is the main computer screen called?
The main computer screen is your primary display or primary monitor. This is the screen Windows treats as your default — it shows your taskbar and is where new applications open unless you move them. You can set which monitor is primary in Display settings.
What is the difference between a screen and a display?
Screen and display are essentially the same thing — both refer to a monitor. Screen is casual language, while display is the technical term Windows uses. In Settings, you'll see "Display settings" and "primary display," but they're talking about your physical monitors.
What are desktop screens called?
Desktop screens are called monitors or displays. When you have multiple monitors connected, Windows calls them your primary display and secondary displays. You can arrange them and change which one is primary in Settings System Display
Still have a question?
Answered by AI from this guide. Good questions may be added to this page — please don't include personal details.
Did this guide fix your problem?

About the Author
Richard
Tech Writer, IT Professional
Richard is a writer at Geek Rewind who turns complex IT tasks into clear, step-by-step guides. He draws on years of hands-on experience in system administration and enterprise IT operations, focusing on Windows, Linux and WordPress: the problems people actually run into, and the fixes that work. His server and WordPress guides come from systems he runs himself. Richard builds and maintains the platform behind Geek Rewind, from its Ubuntu servers and Nginx configuration to its custom WordPress plugins. Many new tutorials start with readers' questions, and he's always glad to answer them in the comments.
No comments yet — be the first to share your thoughts!