How to Rotate Your Display to Portrait or Landscape Mode in Windows 11

Windows 11 lets you rotate your display between landscape (wide) and portrait (tall) modes in seconds, without restarting your computer. It helps if you have a monitor you can physically turn, or if you want to change how content fits on your screen, such as a tall window for reading documents or code.
The rotation happens in Settings under Display orientation. You pick from four options: Landscape, Portrait, Landscape (flipped), or Portrait (flipped). The change takes effect right away, and Windows asks you to confirm it, so you can easily go back if it’s not what you wanted. The setting is the same on Windows 11 Home and Pro.
Most graphics cards and monitors support this feature, but older hardware occasionally has problems. If your display doesn’t rotate after you change the setting, check that your graphics drivers are up to date. The troubleshooting section below covers this in more detail.
Open Settings System Display, scroll down to Display orientation, click the drop-down menu, and select Landscape. The screen rotates immediately without requiring a restart or confirmation.
Rotate your display using Settings
This method works on any Windows 11 PC with a graphics driver that supports rotation. That includes laptops, desktops and external monitors. There are two ways to reach the setting. The right-click route is quicker, and the Settings path is there if the right-click menu isn’t available to you.
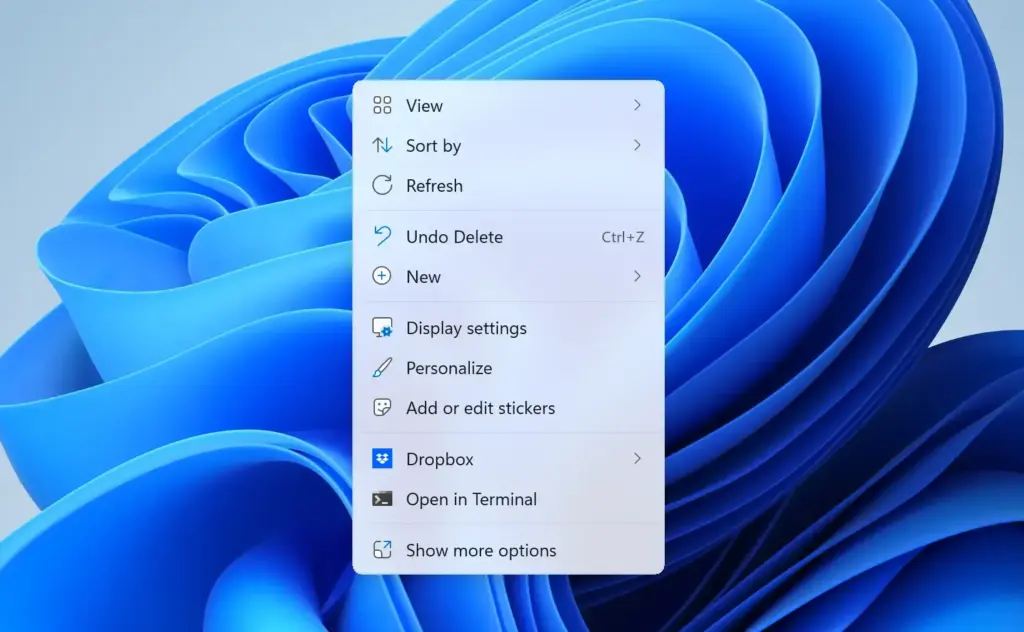
- Right-click an empty area of your desktop and choose Display settings. The Settings app opens on the Display page.
- Or open the page from Settings. Press Win+I, then go to Settings System Display This is the route to use if the desktop menu is missing, for example on a locked-down work PC or when the desktop is covered by a full-screen app.
- Scroll down to the Scale & layout section and find Display orientation. The path in full is Settings System Display Scale & layout > Display orientation. You’ll see a drop-down currently set to Landscape, which is the default on almost all monitors.
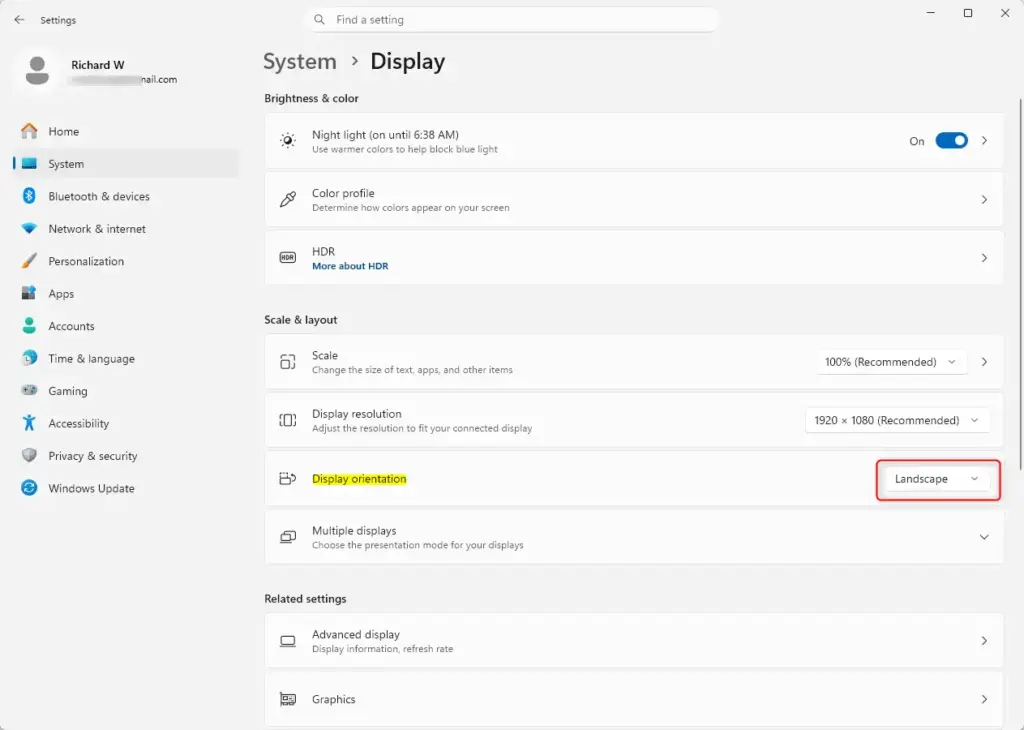
Settings › System › Display › Display orientation - Click the Display orientation drop-down and select Portrait, Landscape (flipped), or Portrait (flipped). The screen rotates as soon as you make your selection. There is no Apply button.
- Check for a confirmation prompt. After the screen rotates, Windows often shows a small dialog asking “Keep these display settings?” with a countdown timer. If you can read it, click Keep changes. If the screen is unreadable or facing the wrong way, do nothing. Windows reverts to your previous orientation automatically after about 15 seconds.
If you don’t see a confirmation prompt at all, that’s normal too, because not every driver shows one. Check that the screen looks right and move on. No restart is needed.
Rotate your display with a keyboard shortcut
Some PCs with Intel integrated graphics support a keyboard shortcut that rotates the screen without opening Settings. This is a graphics driver feature, not a Windows feature, so it doesn’t work on every machine. Many recent Intel drivers ship with these hotkeys turned off.
- Press Ctrl + Alt + the arrow key for the orientation you want. Use Ctrl+Alt+↑ Arrow for standard landscape, or Ctrl+Alt+← Arrow or Right Arrow for portrait.
- Watch for an immediate rotation. If your graphics driver supports the shortcut, the screen flips right away, the same as with the Settings method.
- If nothing happens, the shortcut is disabled in your driver or your GPU doesn’t support it. Use the Settings method instead. It’s the more reliable option on newer AMD and NVIDIA systems.
Why Display orientation might be missing or greyed out
It’s easy to assume the orientation option is always there, but several things commonly block it. If it’s missing or greyed out, work through this list.
- Outdated or generic graphics driver. If Windows is using the “Microsoft Basic Display Adapter” driver instead of your GPU maker’s driver, the orientation option is often missing entirely. Open Device Manager, expand Display adapters and check which adapter is listed. If it’s the basic adapter, or the driver is old, install the latest one from the manufacturer’s site.
- Your GPU’s own control panel. NVIDIA Control Panel, AMD Software and Intel Graphics Command Center all have their own rotation settings. If the Windows setting is missing or greyed out, try rotating the display from there instead. Look for a rotation or orientation option in the display section of whichever app matches your graphics card. These apps are installed with the manufacturer’s driver, so if you can’t find one, that’s another sign you’re on a generic driver.
- Monitor hardware limitation. Some monitors, docking stations and KVM switches don’t pass rotation through properly even though Windows can handle it. If the option is there but the screen looks stretched or broken after rotating, this is usually the cause. Try connecting the monitor directly to the PC to rule it out.
- Remote Desktop or virtual machine sessions. If you’re connected to a PC remotely or working inside a VM, the orientation control may not apply, or may need to be set from the host session instead.
- Tablet or 2-in-1 auto-rotate conflict. On devices with a motion sensor (an accelerometer), Windows can rotate the screen automatically based on how you hold the device. With auto-rotate on, your manual choice can be overridden the moment you move the device. Open Quick Settings by clicking the network/volume icons at the right of the taskbar, or press Win+A, then turn on Rotation lock to keep your chosen orientation. The Rotation lock tile only appears on devices that have the sensor.
Rotating one monitor in a multi-monitor setup
- Open Settings System Display and look at the numbered monitor diagram near the top of the page.
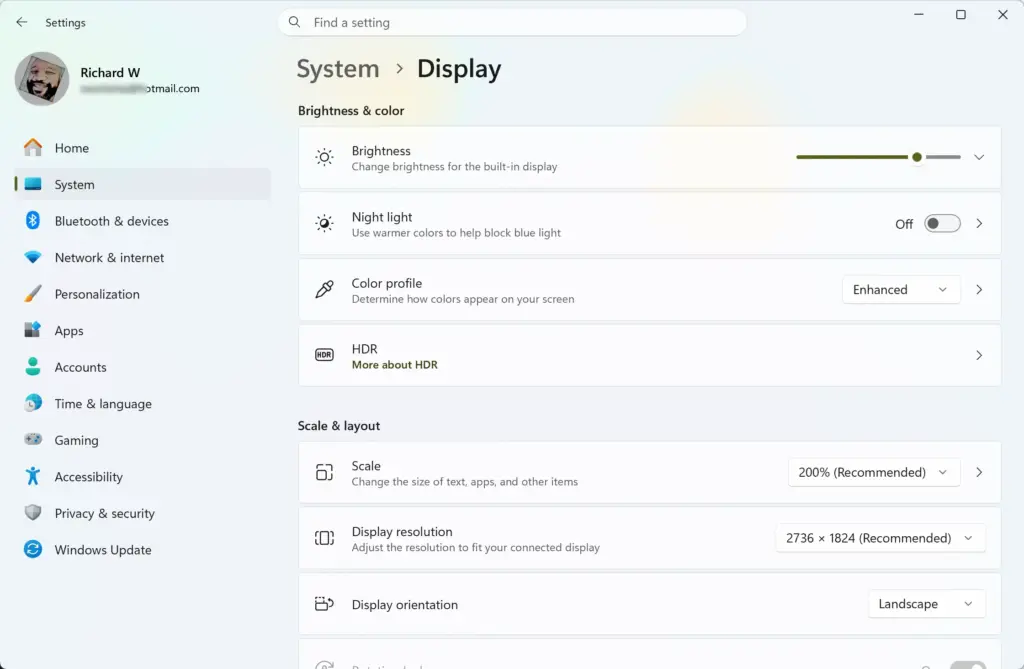
Settings › System › Display - Click the number that matches the monitor you want to rotate. If you’re not sure which is which, click Identify and Windows shows a number on each screen. The page below updates to show settings for that display, including its own Display orientation drop-down.
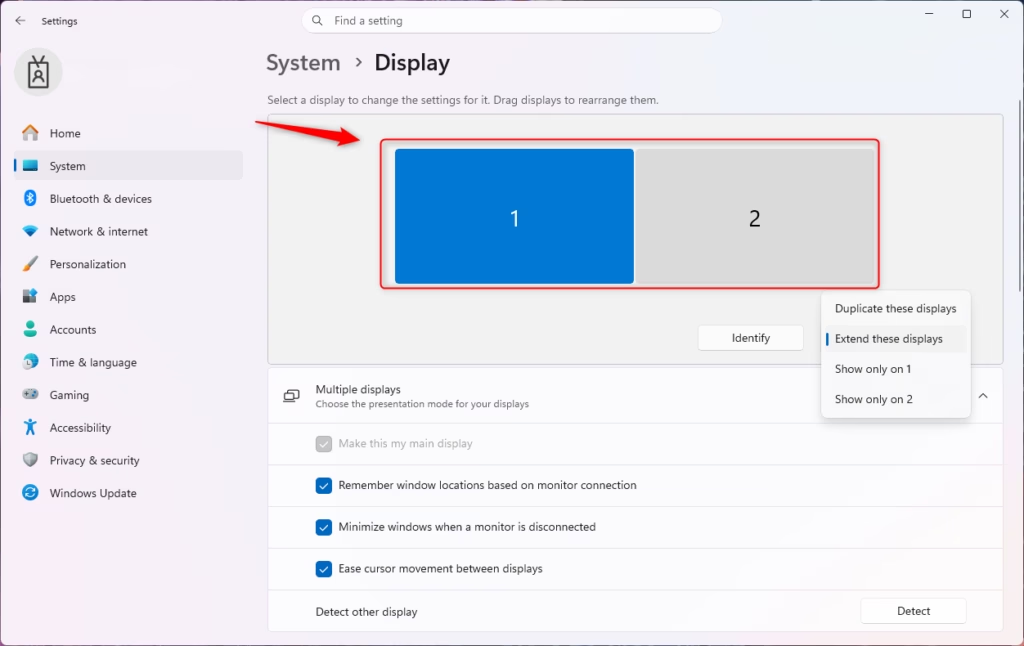
Windows 11 multiple displays settings showing arrangement options. - Change Display orientation for that monitor only, using the same steps as above. Your other monitors keep their current orientation.
- Repeat for each monitor you want to rotate. Select it first, then change its orientation.
A common setup is a secondary monitor in portrait for reading documents or code, with the main monitor left in landscape. After rotating, check the monitor diagram. Its boxes should match the physical layout of your screens, or the mouse will move between them in the wrong places. You can drag the boxes to fix that.
Undo a rotation and go back to normal
If you change your mind, or a rotation made the screen hard to use, you can always get back to the original orientation.
- Open Display settings again the same way: right-click the desktop and choose Display settings, even if the screen is now sideways. You can also press Win + I and go to System Display The menu is just rotated along with everything else, so read it carefully.
- Select Landscape from the Display orientation drop-down to return to the standard orientation most monitors ship with. The screen rotates back straight away.
- If the screen is rotated and you can't comfortably navigate it, try the keyboard shortcut from the section above. Pressing Ctrl + Alt + Up Arrow resets most Intel-based systems straight back to standard landscape. If the shortcut does nothing, you can also tilt your head, or physically turn the monitor, and use the Settings steps.
If the screen goes black or stays rotated incorrectly
A rotation change sometimes makes the screen go black briefly, flicker, or get stuck at an odd angle. This is usually because the monitor or driver is still processing the signal change.
- Wait 10–15 seconds before doing anything else. Most displays recover on their own once the new signal settles. If the "Keep these display settings?" dialog was showing, Windows will also revert on its own.
- If it stays black, press Win + Ctrl + Shift + B. This restarts the graphics driver without rebooting the PC and often fixes a stuck display immediately. You may hear a short beep and the screen will blink once.
- If the screen comes back but the orientation is still wrong, repeat the Settings steps above and choose Landscape to reset it.
- If the problem keeps coming back, update the graphics driver, as described in the troubleshooting section, and try a different cable or port if you can.
What to do next
Once your display is rotated the way you want, you may also want to adjust scaling or resolution, since text and icons can look oversized or cramped after switching to portrait. Both settings are on the same Display page, under Scale & layout. If you regularly connect an external monitor or projector, it's worth learning how Windows handles multiple displays overall, including extending versus duplicating screens. And if updating your driver was part of fixing a greyed-out orientation option, keep an eye on Windows Update. A later driver update can occasionally reset custom display settings to default, so you may need to set the orientation again.
Frequently asked questions
How do I rotate my display in 🪟 Windows 11?
Right-click your desktop and select Display settings. Scroll down to Display orientation, click the dropdown menu, and choose Portrait, Landscape (flipped), or Portrait (flipped). The change applies immediately without restarting your computer.
Why won't the Ctrl+Alt+Arrow work?
Ctrl+Alt+Arrow is a graphics driver (mostly Intel) feature, not a Windows one. It works on some Windows 11 PCs and not on others, depending on the driver. Use Settings instead: right-click your desktop, choose Display settings, find Display orientation, and select your preferred rotation from the dropdown menu.
How do I flip my screen 90 degrees?
Open Display settings by right-clicking your desktop. Scroll to Display orientation and click the dropdown. Select Portrait to rotate the screen 90 degrees, or Portrait (flipped) to rotate it 90 degrees the other way. The change takes effect instantly.
How to rotate screen ctrl alt?
Ctrl+Alt+Arrow only works if your graphics driver (often Intel) supports it. If it doesn't work, right-click your desktop and select Display settings. Under Display orientation, choose your desired rotation from the dropdown menu — Landscape, Portrait, Landscape (flipped), or Portrait (flipped).
Still have a question?
Answered by AI from this guide. Good questions may be added to this page — please don't include personal details.
Did this guide fix your problem?

About the Author
Richard
Tech Writer, IT Professional
Richard is a writer at Geek Rewind who turns complex IT tasks into clear, step-by-step guides. He draws on years of hands-on experience in system administration and enterprise IT operations, focusing on Windows, Linux and WordPress: the problems people actually run into, and the fixes that work. His server and WordPress guides come from systems he runs himself. Richard builds and maintains the platform behind Geek Rewind, from its Ubuntu servers and Nginx configuration to its custom WordPress plugins. Many new tutorials start with readers' questions, and he's always glad to answer them in the comments.
No comments yet — be the first to share your thoughts!