Change the Microsoft Store Download Path in Windows 11

Changing the Microsoft Store download path in Windows 11 means telling Windows to install new Store apps and games on a different drive than C:. The quickest way is Settings System Storage Advanced storage settings Where new content is saved, then pick a drive under New apps will save to.
The Microsoft Store has no separate download folder to point elsewhere. Windows treats the install location as a system-wide storage setting, and the change takes effect for the next app you install.
To change the Microsoft Store download path in Windows 11, open Settings , go to System Storage Advanced storage settings Where new content is saved, then choose a drive under New apps will save to and click Apply. New Store apps will install on that drive. Existing apps stay where they are, and the drive must be connected and formatted as NTFS.
What This Setting Changes (and What It Doesn’t)
Read what the setting does before you change it. That way, you will not expect a result Windows cannot give.
New installs go to the drive you choose
By default, Windows puts Microsoft Store apps in a protected WindowsApps folder inside Program Files on the C: drive. After you change the setting, new Store apps install to a WindowsApps folder on the drive you pick. Windows creates that folder for you.
The setting is the same on Windows 11 Home and Pro. It needs no restart in normal use.
Apps already installed stay where they are
The setting never moves existing apps. Anything installed before the change stays on C: until you move it yourself. The section on moving installed apps below covers that, including why the option is sometimes missing.
What the new drive needs
Choose a drive that is connected, has free space and is formatted as NTFS (the standard Windows file system). Store apps expect NTFS. If the drive is external, keep it plugged in. Apps on a disconnected drive will not start.
Administrator privileges: Windows may ask for approval when you apply the change. If you use a standard account, have an administrator sign in or approve the prompt.
How to Change the Microsoft Store Download Path in 🪟 Windows 11
Follow the numbered steps below to set a new default drive for Store apps. They use the Settings app only. No registry edit is needed.
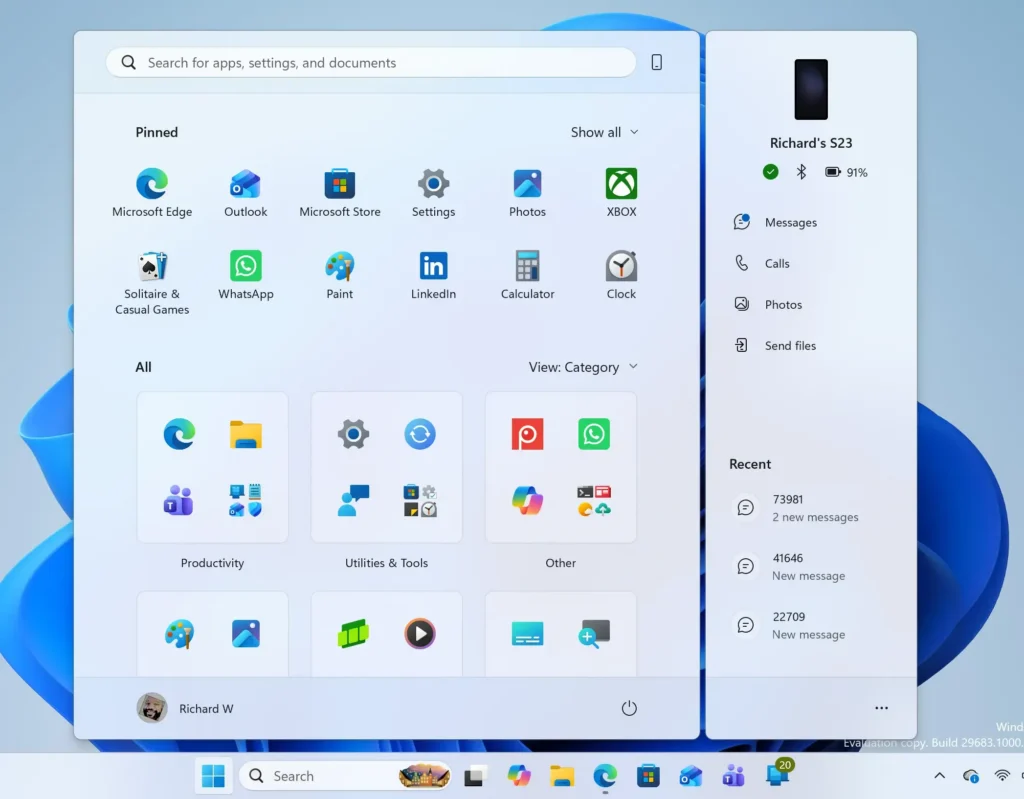
- Press Windows + I to open Settings. The Settings window opens with a list of categories on the left.
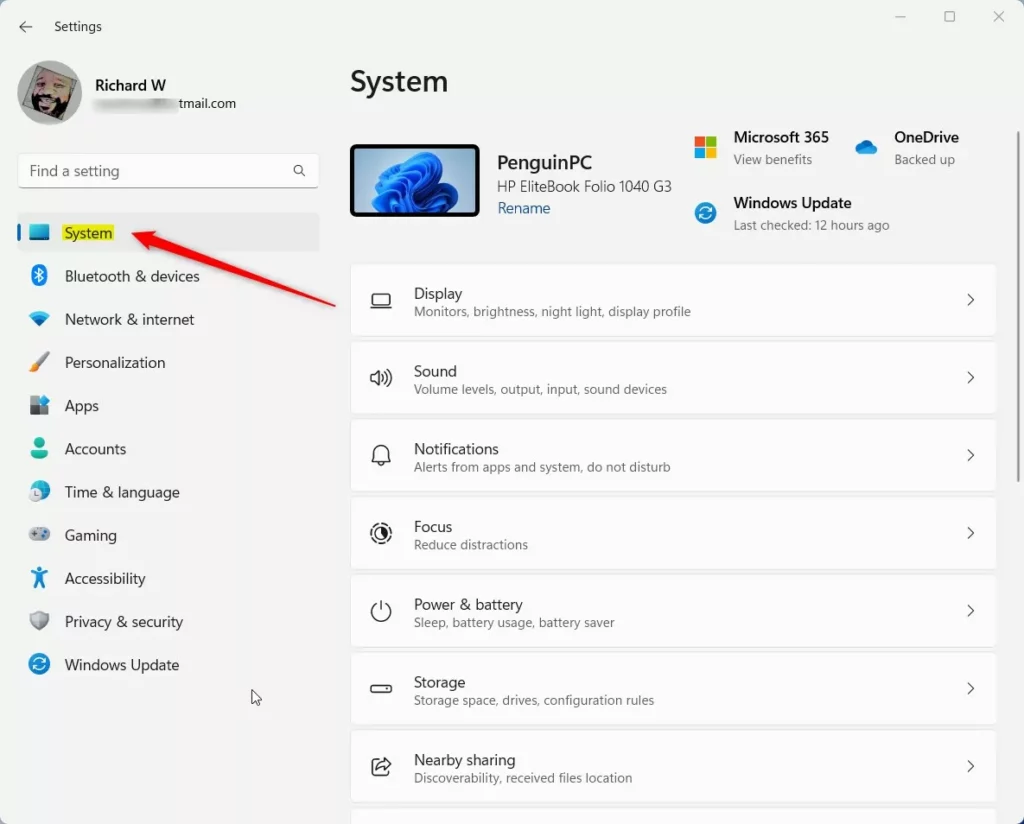
- Click System in the left pane. The main pane shows Display, Sound, Notifications and other System pages.
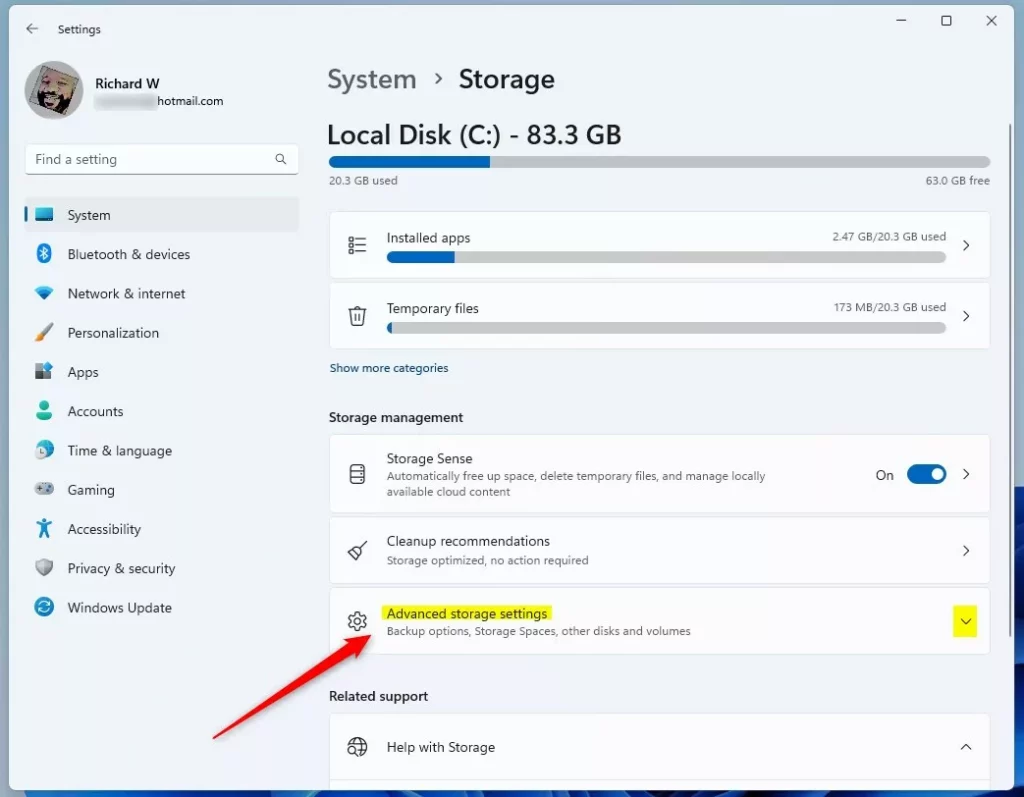
- Scroll down and click Storage. This page shows how much space each type of file uses on C:.
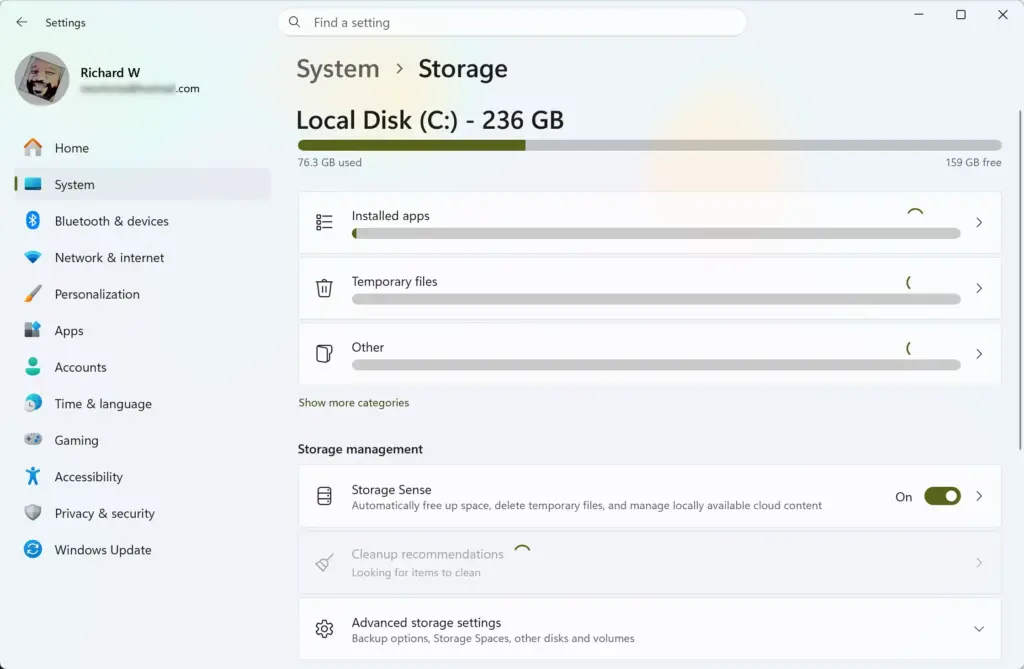
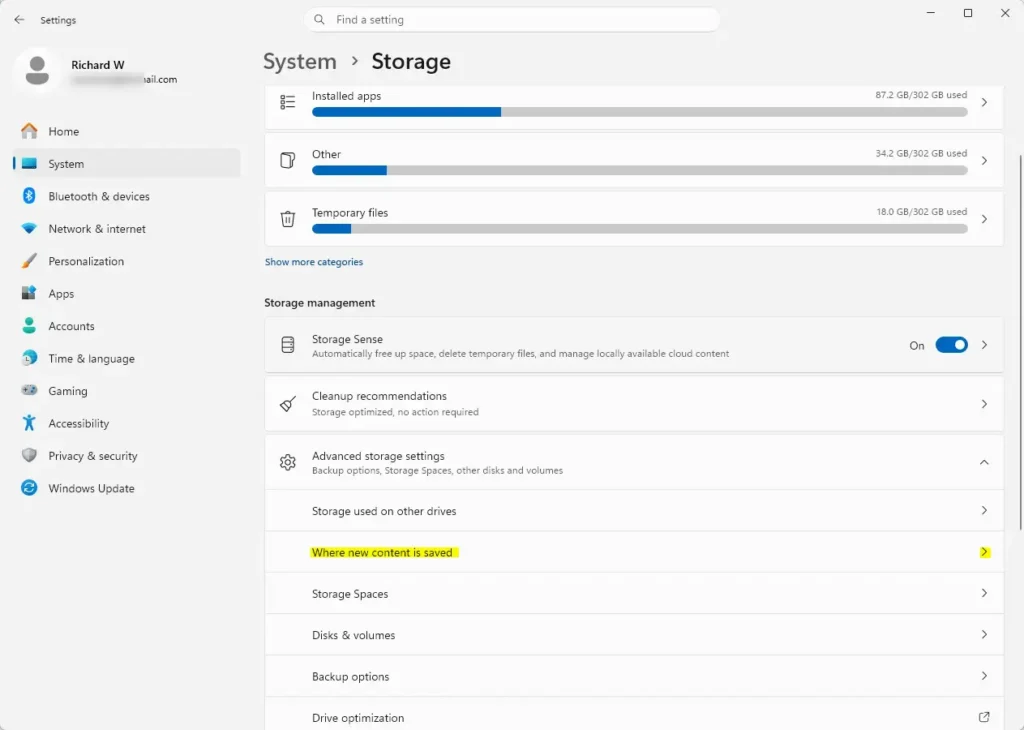
Settings › System › Storage - Click Advanced storage settings to expand it. A short list of extra options appears underneath.
windows advanced storage settings tile - Click Where new content is saved. A page opens with several dropdown lists, one for each type of content.
- Find New apps will save to and open its dropdown. The list shows each drive Windows detects, with a letter such as C: or D:.
- Select the drive you want. If the drive you expect is missing, see the troubleshooting section below.
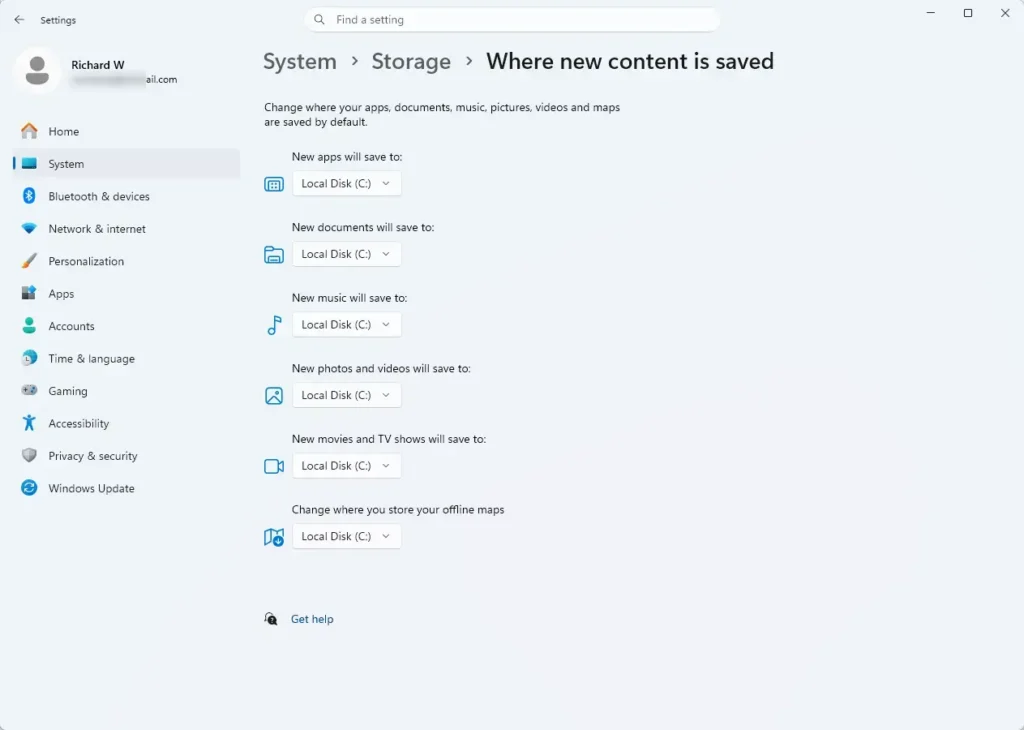
- Click Apply next to the dropdown. The button appears once you pick a different drive. Approve the administrator prompt if Windows shows one.
- Check that the dropdown now shows your chosen drive. If it reverts to C:, the change did not save.
- Open the Microsoft Store and install a small free app. This confirms the setting works before you download anything large.
On Windows 10, a link called Change where new content is saved takes you to the same page. On Windows 11, the label sits under Advanced storage settings. Microsoft changes Settings layouts between builds, so a label may differ slightly on your version.
Leave the other dropdowns alone
The same page lists save locations for documents, music, photos and videos, and other content. Each one moves a different kind of file. Change them only if you want those files on the new drive as well. They have no effect on Store app installs.
Check That the New Location Works
Install any Store app after you change the setting. Then open File Explorer and go to the drive you chose. Windows creates a WindowsApps folder there on the first install. The folder is hidden by default. To see it, click View in the File Explorer toolbar, choose Show, and then click Hidden items.
Windows protects it for a reason. Files changed by hand can leave an app broken, and the usual fix is to reinstall the app.
If the folder does not appear after the install, check the dropdown in Settings again. The most common cause is that the change never applied. The troubleshooting section below covers that case.
Move Apps You Have Already Installed
The Store setting only affects future downloads. To move an existing app, use the app list in Settings. Not every app supports this, and Windows decides which ones do.
Steps to move an installed app
The steps below move one installed Store app to another drive.
- Open Settings and click Apps in the left pane.
- Click Installed apps. A list of everything installed on the PC appears.
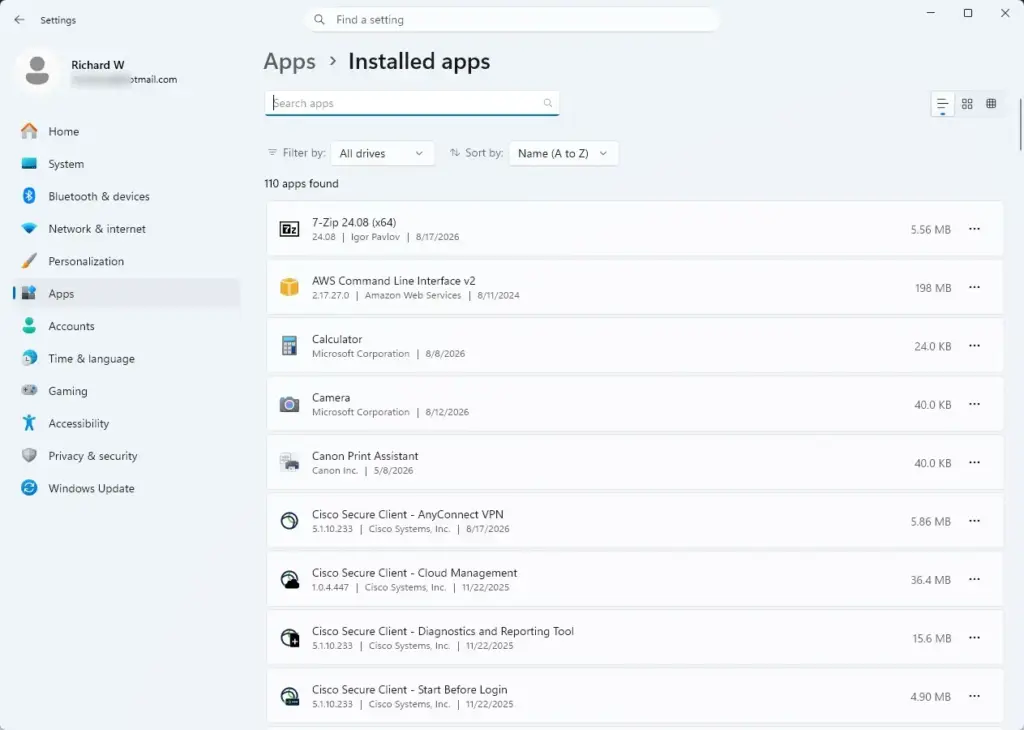
Settings › Apps › Installed apps - Find the app you want to move. Use the search box at the top if the list is long.
- Click the three-dot menu to the right of the app name. A short menu opens.
- Click Move if it appears in that menu. A prompt asks you to choose a drive.
- Select the destination drive, then click Move again. Windows copies the app and shows progress while it works.
Close the app before you start. Moving a running app can fail or leave it in a bad state.
Why Move is missing or greyed out
Not every app has a Move option. The usual reasons are listed below.
- The app is a desktop program installed from an installer (an .exe file), not from the Microsoft Store. Windows offers Move only for Store apps.
- The app's developer did not build it to be moved. Windows 11 shows the option only for apps that allow it.
- The app is built into Windows. Built-in apps stay on C:.
- Only one drive is available. With a single drive, there is nowhere to move to.
The reinstall puts it on the new drive. Check first that the app does not hold data you cannot recover. Most Store apps keep their data in your account or in a separate folder, but check before you remove it.
Games From the Xbox App
Games from the Microsoft Store often install through the Xbox app. That app can have its own install location, which may not follow the Windows setting above. If a game still lands on C: after you change the Store path, open the Xbox app and look in its Settings for an install folder option. The exact label can vary between builds. Look through the General settings page in the Xbox app.
Large games make this check worthwhile. A game can use tens of gigabytes, so a wrong install location fills C: quickly.
If the Drive Isn't Listed or the Change Won't Apply
Most failures come from the drive, not from the setting. Work through these in order.
The drive does not appear in the dropdown
Open File Explorer and select This PC. If the drive is not there, Windows does not see it. Reconnect an external drive, try a different USB port, and check that it is not offline in Disk Management (the Windows tool for managing drives). If it shows in File Explorer but not in the dropdown, close Settings and reopen it.
Also check the file system. Right-click the drive in File Explorer, choose Properties, and read the File system line on the General tab. If it says FAT32 or exFAT, Store apps may not install there. Before you reformat, copy your files off the drive. Reformatting erases everything on it.
Apply does nothing or the setting reverts
A standard account may lack the rights to save the change. Sign in with an administrator account and repeat the steps. Restart the PC and try again if the dropdown still snaps back to C:.
The Store says it cannot install the app
If the Store shows an error after you change the path, the target drive may be full or disconnected. Free up space or reconnect the drive. If the error persists, set the dropdown back to C: to confirm that the new drive is the cause. Installs that work on C: and fail on the new drive point to a drive problem.
How to Undo the Change
To go back to the default, repeat the steps above and select C: in the New apps will save to dropdown. Click Apply. New apps then install to C: again.
Apps already installed on the other drive stay there. Windows does not move them back on its own. Use Move in Settings Apps Installed apps to bring each one back, if the app supports it.
What to Do Next
If the drive you chose is external, keep it connected whenever you want to use the apps stored on it. To free more space on C:, move large installed apps with the Move option and check the Xbox app's own install folder for games. If a Store app fails after a move, uninstall it and reinstall it with the new path already set.
Have a question about this guide?
Answered by AI from this guide. Good questions may be added to this page — please don't include personal details.
Did this guide fix your problem?

About the Author
Richard
Tech Writer, IT Professional
Richard is a writer at Geek Rewind who turns complex IT tasks into clear, step-by-step guides. He draws on years of hands-on experience in system administration and enterprise IT operations, focusing on Windows, Linux and WordPress: the problems people actually run into, and the fixes that work. His server and WordPress guides come from systems he runs himself. Richard builds and maintains the platform behind Geek Rewind, from its Ubuntu servers and Nginx configuration to its custom WordPress plugins. Many new tutorials start with readers' questions, and he's always glad to answer them in the comments.
No comments yet — be the first to share your thoughts!