How to Reset Microsoft Store Cache in Windows 11

- 2 ways to do it
- Needs administrator rights
- Includes a restart or sign-out
Clearing the Microsoft Store cache is one of the first fixes to try when app downloads or updates stop working in Windows 11. It takes only a minute and doesn’t need any special tools.
To reset the Microsoft Store cache, close the Store, press Win+R, type WSReset.exe, and press OK. A command prompt will appear briefly, and the Store will then open. This common fix resolves app installation and update problems.
The Store cache is a set of temporary files that help the Store load pages, app listings and images faster. Your web browser does the same thing with website data. Normally you never notice it. But if some of those files become corrupted or out of date, the Store can start to misbehave.
Signs That the Store Cache Is the Problem
A bad cache can show up in several ways. These are the ones I see most often:
- The Microsoft Store opens to a blank or half-loaded page, or closes right after you launch it.
- A download or update sits on Pending or Downloading and never finishes.
- The Store shows an error code when you install or update an app.
- Search results or app pages don’t load, even though your internet connection works for other things.
If any of this sounds familiar, resetting the cache is a safe first step.
What a Cache Reset Does and Does Not Do
Resetting the cache removes only the temporary files the Store has built up. It does not uninstall any apps. It does not remove apps you have already bought or installed, and it does not touch your purchase history. Your Microsoft account stays the same.
The fix works the same way on Windows 11 Home and Pro, so you don’t need a particular edition. Close the Microsoft Store before you start. A restart is not normally needed, but if the Store still acts up afterwards, restart the PC and try again.
If the Reset Doesn’t Help
A cache reset only fixes problems caused by the cache. If the Store still fails, check a few basics:
- Make sure your internet connection is working.
- Check that the date, time and time zone on the PC are correct. Wrong values can stop the Store from signing in or downloading.
- Install any pending Windows updates, then restart the PC.
The steps below show how to reset the cache.
Resetting the Microsoft Store Cache
Method 1For Default Apps
To reset microsoft store cache for default apps, use the built-in WSReset command when downloads freeze or apps fail to update. This quick tool clears temporary files without deleting your installed programs and automatically reopens the Store when it finishes.- Close the Microsoft Store app if it’s open.
- Press the Win+R on your keyboard. This opens a small window called “Run.”
- In the “Open” box, type
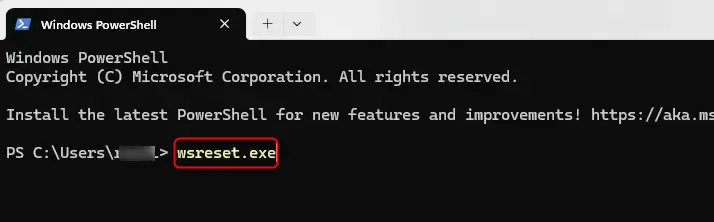
WSReset.exeand then click OK. - A black Command Prompt window will appear for a few seconds, then close automatically. The Microsoft Store will then open.
Method 2For Third-Party Apps (Requires Admin Rights)
To reset microsoft store cache for third-party apps, you need administrator rights and Windows PowerShell to clear stored data that the standard tool misses. This advanced fix solves stubborn errors with specific non-Microsoft programs by deleting their corrupted temporary files.
- Close the Microsoft Store app if it's open.
- Open Windows Terminal. You can usually find this by searching for it in the Start menu. Make sure to select Windows PowerShell from the options.
- Copy the command below and paste it into the PowerShell window. Press Enter. This command shows you a unique ID (called a SID) for each user account on your computer.
- Get-WmiObject win32_useraccount | Select name,sid
- Look at the list and find the username of the account that is having problems. Note down its corresponding SID (it looks like a long number starting with "S-1-5-...").
- Open the Registry Editor. You can do this by typing
regedit.exein the Windows search bar and pressing Enter. - In the Registry Editor, go to this location in the left-hand pane:
HKEY_LOCAL_MACHINE\SOFTWARE\Microsoft\Windows\CurrentVersion\Appx\AppxAllUserStore- Now, follow these steps:
- In the left pane, find and click on the AppxAllUserStore key to expand it.
- Find the key that matches the SID you wrote down earlier.
- Right-click on that SID key and select Delete.
- A confirmation message will appear. Click Yes to confirm you want to delete it.
- Finally, restart your computer for the changes to take effect.
References:
https://support.microsoft.com/en-US/accounts-billing/microsoft-store-doesnt-open
Summary
Use the WSReset.exe tool for general issues, or for specific third-party app problems, you can manually clear their cache data through the Windows Registry. Remember to restart your PC after making registry changes.
Have a question about this guide?
Answered by AI from this guide. Good questions may be added to this page — please don't include personal details.
Did this guide fix your problem?

About the Author
Richard
Tech Writer, IT Professional
Richard is a writer at Geek Rewind who turns complex IT tasks into clear, step-by-step guides. He draws on years of hands-on experience in system administration and enterprise IT operations, focusing on Windows, Linux and WordPress: the problems people actually run into, and the fixes that work. His server and WordPress guides come from systems he runs himself. Richard builds and maintains the platform behind Geek Rewind, from its Ubuntu servers and Nginx configuration to its custom WordPress plugins. Many new tutorials start with readers' questions, and he's always glad to answer them in the comments.
No comments yet — be the first to share your thoughts!