How to Enable Dropbox LAN Sync On Windows 11

Dropbox LAN sync speeds up file transfers by copying data directly between computers on your local Wi-Fi or Ethernet network instead of downloading files through the internet. It works automatically when Dropbox detects another PC on the same router that holds the exact same file.
You can turn on LAN sync in the Dropbox app settings on Windows 11. It saves bandwidth and speeds up transfers of large files. Before you start, check that Dropbox is installed and signed in on each computer that should share files.
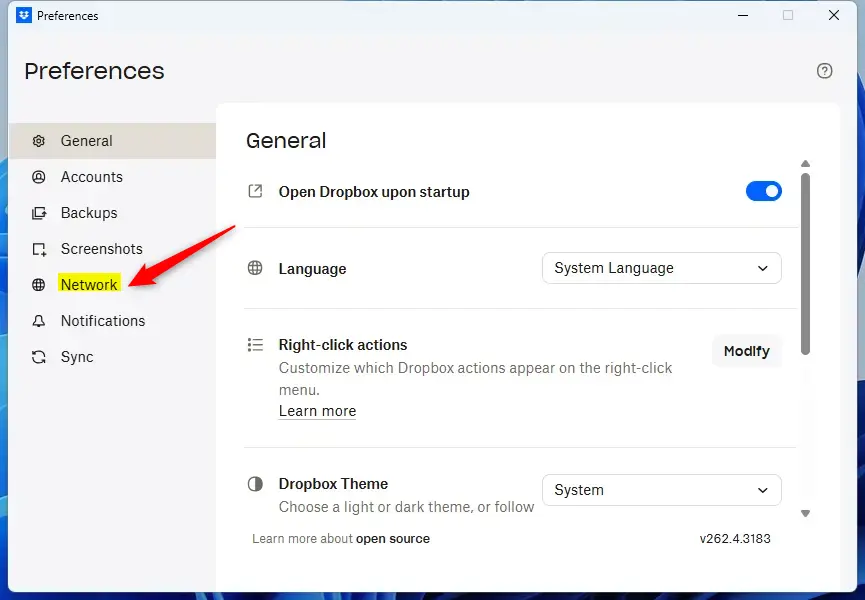
To enable LAN sync in Dropbox on Windows 11, click the Dropbox icon in the system tray , select your profile picture, then Preferences, and finally toggle on the LAN Sync option in the Network tab. This allows Dropbox to sync directly between computers on your local network for faster transfers.
How LAN Sync Works
Dropbox LAN sync shares files directly with other computers on your home or work network. Instead of routing files over the internet, Dropbox sends them between your devices. This makes syncing large or numerous files much faster.
A few things to know before you change anything:
- Both computers must be on the same local network, such as the same router or office network.
- The other computer must already have the file, or an earlier version of it, in its Dropbox folder.
- If a computer can’t reach another one on the network, Dropbox falls back to the internet. Nothing breaks. The transfer is just slower.
- Recent Dropbox versions may already have LAN sync turned on. Check the setting anyway so you know it is on.
Turning On LAN Sync in Dropbox
Setting up LAN sync takes only a few clicks in the Dropbox desktop app. The steps are much the same on Windows and macOS, though these instructions focus on Windows 11. Repeat them on every computer you want to use LAN sync, because the setting applies to each computer separately.
Step 1Find the Dropbox Icon
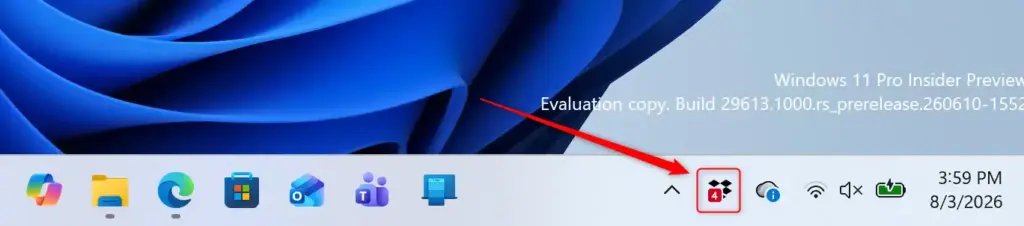
- Look at the bottom-right corner of your screen, near the clock, for the Dropbox icon. It is a blue or white cloud.
- If you don’t see it, click the small up arrow (Show hidden icons) next to the clock. You should now see a pop-up with the icons that Windows has tucked away.
- Click the Dropbox icon. A Dropbox menu opens above the taskbar .
If the icon is not in either place, Dropbox isn’t running. Open the Start menu , search for Dropbox, and open it. Then look for the icon again.
Step 2Access Your Preferences
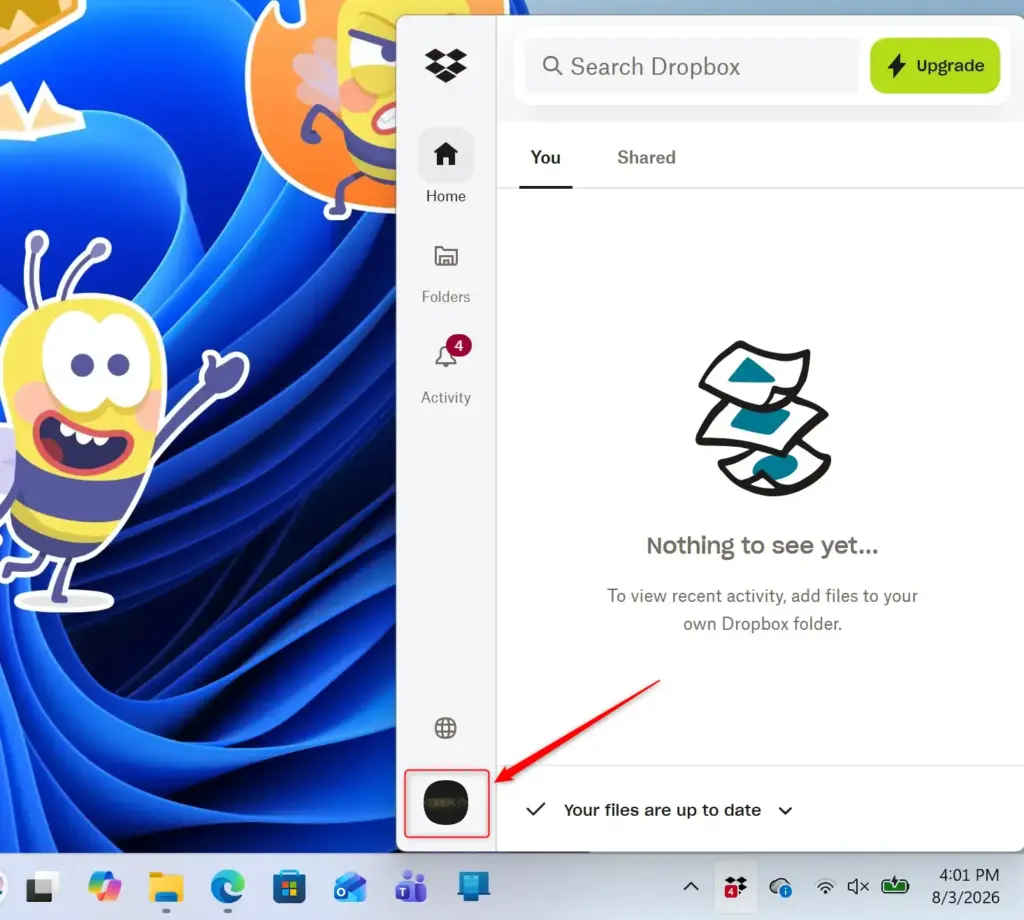
- In the menu that appeared, click your profile picture or initials in the bottom-left corner. A second menu opens with more options.
The exact position of this button can differ slightly between Dropbox versions. If you don't see it in the bottom-left, look for your picture or initials elsewhere along the edge of the menu.
Step 3Go to Network Settings
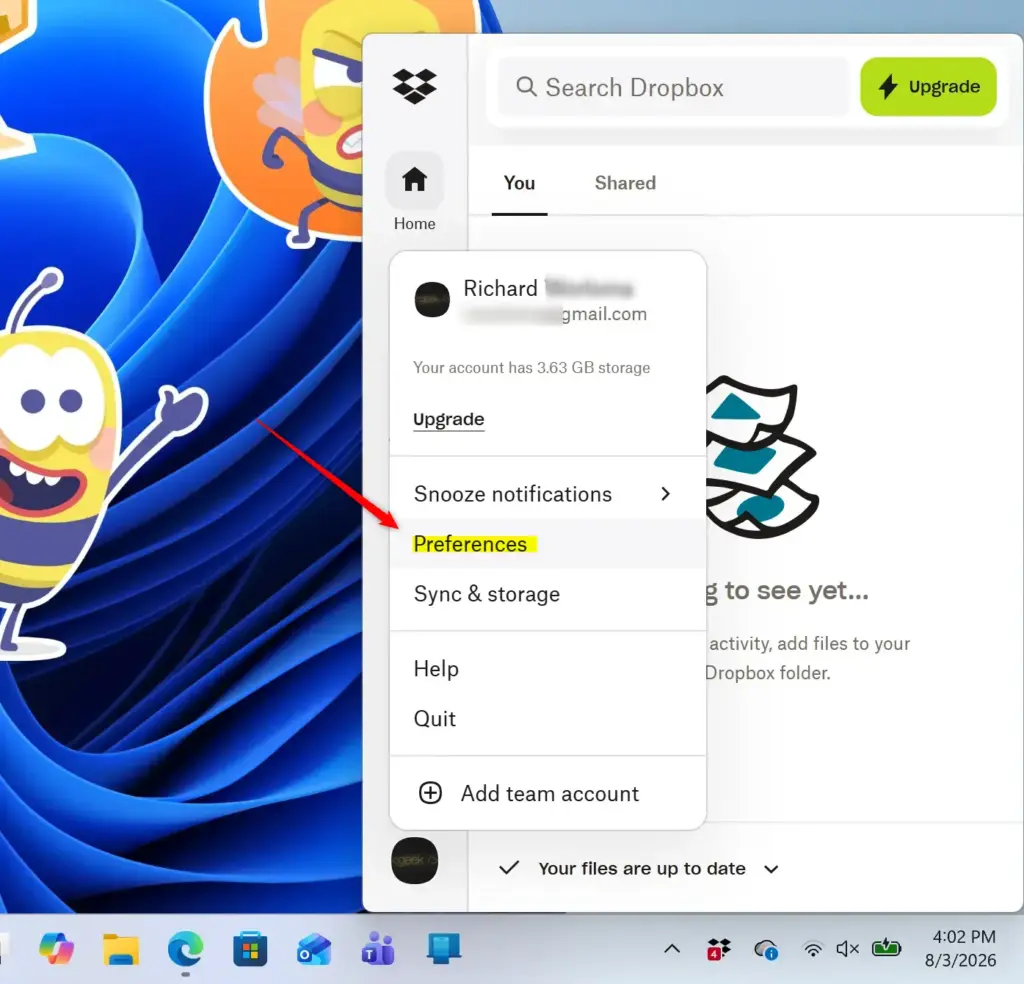
- Click Preferences in the menu. The main Dropbox settings window opens.
- Click the Network tab at the top of the Preferences window. You should now see the network-related options, including the LAN sync setting.
If you can't find a Network tab, your Dropbox version may arrange its settings differently. Look through the other tabs in Preferences for the LAN sync option. Updating the Dropbox app to the latest version can also help.
Step 4Turn On LAN Sync
LAN sync lets you share files quickly between computers on the same Wi-Fi or Ethernet network without downloading them from the internet again. You turn it on in the app preferences by checking the box next to the LAN sync setting. This speeds up large file transfers between your home or office computers.
- Find the LAN sync setting in the Network tab.
- Check the box next to it. If the box is already checked, leave it as it is.
- Close the Preferences window. Dropbox saves the change without a restart.
To undo the change, return to the same tab and clear the box. Dropbox will then download files through the internet again.
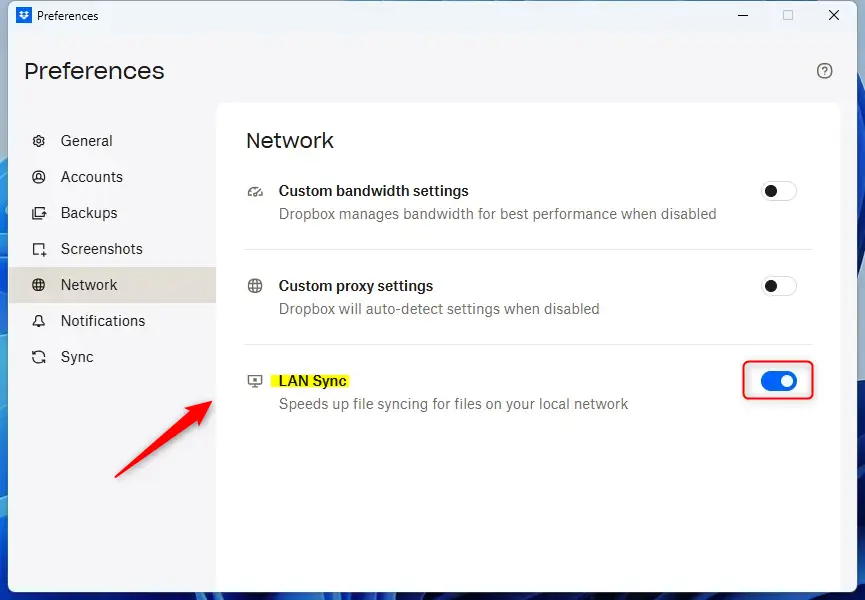
LAN sync is now active. Dropbox tries to use your local network to sync files with other Dropbox users on the same network, which speeds up file transfers.
If you don't see any speed improvement, check these points:
- Make sure LAN sync is turned on for the other computer too.
- Confirm both computers are on the same network and not on separate Wi-Fi networks, such as a guest network.
- Check whether your firewall or security software is blocking Dropbox on the local network. In that case, allow Dropbox through it.
A Quick Tip for Faster Syncing
LAN sync speeds up file transfers, especially for large files or when you have several computers. It uses your local network for transfers instead of the internet. You notice the improvement most when updating files that already exist on both machines. Because only a copy goes over the local network, the speed doesn't depend on your internet connection.
References:
Summary
Dropbox LAN sync speeds up file transfers between computers on the same network. Turning it on in Dropbox Preferences lets Dropbox send files directly between your devices instead of routing them through the internet. This cuts sync times for large files. Remember to set it up on each computer you want to use it on.
Was this guide helpful?

About the Author
Richard
Tech Writer, IT Professional
Richard is a writer at Geek Rewind who turns complex IT tasks into clear, step-by-step guides. He draws on years of hands-on experience in system administration and enterprise IT operations, focusing on Windows, Linux and WordPress: the problems people actually run into, and the fixes that work. His server and WordPress guides come from systems he runs himself. Richard builds and maintains the platform behind Geek Rewind, from its Ubuntu servers and Nginx configuration to its custom WordPress plugins. Many new tutorials start with readers' questions, and he's always glad to answer them in the comments.

No comments yet — be the first to share your thoughts!