How to Tell Dropbox to Ignore Files on Windows 11

Dropbox can ignore specific files and folders on your Windows 11 PC. Ignored items stay on your computer and keep working as normal, but Dropbox does not upload them, and they don’t show up on the Dropbox website or your other devices.
This helps you save space in your Dropbox account or keep sensitive data off Dropbox’s servers. There is no setting for it in the Dropbox app. You do it with one PowerShell command per item, and you undo it with another. This guide walks through both, and every step uses only File Explorer and PowerShell.
The ignore attribute is stored in an NTFS alternate data stream. Your Dropbox folder therefore needs to be on an NTFS drive, which is the default for Windows 11 system drives. If the command fails on an external or differently formatted drive, the file system is the likely cause.
Open PowerShell as administrator, then run the command `Set-Content -Path “📁C:\
Why You Might Want to Ignore Files in Dropbox
Ignoring files and folders saves space in your cloud storage without deleting anything from your hard drive. It stops Dropbox from syncing large local files, bulky application data, or temporary project files that you only need on this computer. That keeps your cloud quota free for the things you need everywhere.
- Save Cloud Space: If you have very large files that you only need on your computer, ignoring them frees up Dropbox storage.
- Temporary Files: Some programs create temporary files that you don’t need to save in the cloud. Ignoring them also cuts down on pointless sync activity.
- Large Projects: If you work with large files like videos or graphics, you might only want to keep the latest versions on your computer and not sync every single change to the cloud.
- App Folders: Some applications create their own folders inside your Dropbox that you don’t want synced.
- Private Files: You might have personal documents you want to keep on your computer but not make available on the Dropbox website or other devices.
Ignored files are not saved by Dropbox. If your computer's hard drive fails, you will lose these ignored files unless you have another backup plan. Decide how you will back up these items before you ignore them.
If an item is already synced when you ignore it, expect it to disappear from the Dropbox website and your other devices. The copy on this PC stays where it is. If you aren’t sure, test with a small, unimportant file first.
How to Tell Dropbox to Ignore a File or Folder on Windows
On Windows, you tell Dropbox to ignore a file or folder with PowerShell. It's easier than it sounds. You open PowerShell, copy the item's path from File Explorer, and run one command with that path in it. The steps below cover each part.
Step 1Open PowerShell as an Administrator
PowerShell is a command-line tool for running tasks and managing system settings. Open it with administrator rights, which avoids permission errors when you change file attributes. Items inside your own user folder often work without elevation, but running as administrator is the safer choice.
- Click the Start button in the bottom-left corner of your screen (or in the center, if your taskbar is centered, which is the Windows 11 default).
- Type PowerShell in the search box. Windows PowerShell should appear at the top of the results.
- Right-click Windows PowerShell in the results.
- Choose Run as administrator from the menu that appears.
- If a message asks, "Do you want to allow this app to make changes to your device?", click Yes.
If Run as administrator is greyed out or the prompt asks for a password, you are signed in with a standard account. Enter an administrator's credentials when asked, or ask the person who manages the PC.
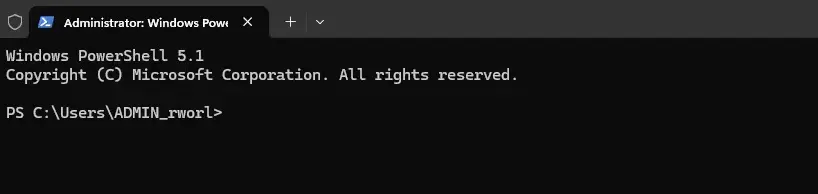
A PowerShell window opens. It is a command-line interface where you type commands, and the background is usually blue (or black if it opened in Windows Terminal). You will run a specific command here to tell Dropbox to ignore a file or folder. Leave the window open and go on to the next step.
Step 2Get the Exact Address of Your File or Folder
File Explorer is the built-in file manager. Its Copy as path feature puts the exact address of any item on your clipboard, so you don't have to type it and risk a typo.
- Open File Explorer by pressing Windows key + E on your keyboard.
- Browse to the file or folder you want to ignore. It must be inside your Dropbox folder.
- Right-click the file or folder.
- Click Copy as path. In the compact Windows 11 right-click menu, this may be an icon in the row at the top. If you don't see it, choose Show more options (or hold Shift while you right-click) to get the full classic menu.
Nothing visible happens when you copy. The path is now on your clipboard. Selecting the item and pressing Ctrl + Shift + C does the same thing.
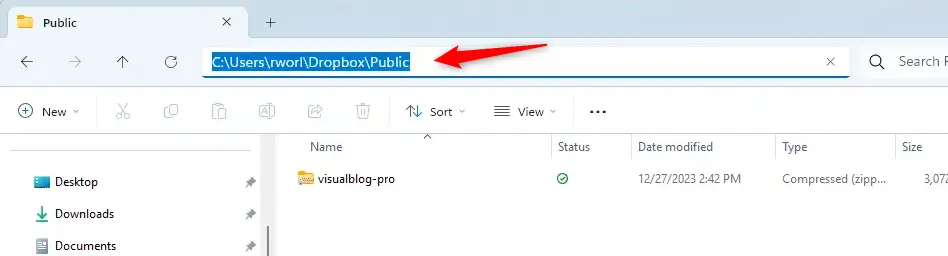
This copies the full path to your clipboard, wrapped in double quotation marks. It will look something like this: 'C:\Users\YourName\Dropbox (Personal)\MyImportantDocument.docx'
If you're not sure, open your Dropbox folder in File Explorer and find the item from there. Ignoring an item outside the Dropbox folder does nothing, because Dropbox wasn't syncing it anyway.
Step 3Enter the Command to Ignore the Item
You use the Set-Content command in PowerShell to apply the ignore attribute to your chosen file or folder. The command is Set-Content -Path 'PASTE_YOUR_PATH_HERE' -Stream com.dropbox.ignored -Value 1. You paste your copied path between the single quotes, then press Enter to stop Dropbox from syncing that item.
- Go back to the PowerShell window you opened in Step 1.
- Type the following command, but do not press Enter yet:
Set-Content -Path 'C:\Users\rworl\Dropbox\Public' -Stream com.dropbox.ignored -Value 1- Place the cursor between the two single quotes, then right-click inside the PowerShell window to paste the path you copied. (Ctrl + V also works.) Your file or folder address should now sit inside the quotes.
- Check the command carefully. The path should be wrapped in single quotes, not double quotes, and there should be no stray characters.
Warning: Make sure the address is surrounded by single quotes (') as shown in the example. Copy as path wraps the path in double quotes, so delete those and keep only the single quotes from the example. Single quotes make PowerShell read the path exactly as written, which matters if your folder name contains characters like $. Do not change the -Stream com.dropbox.ignored -Value 1 part of the command.
- Once you are sure the command is correct, press the Enter key on your keyboard.
The command ran successfully if you see no error messages. PowerShell shows the prompt again, which means the command finished. You can now close the PowerShell window.
If you see a red error saying the path can't be found, the path is probably wrong or has a leftover double quote in it. Check that the item exists, then copy the path again and retry.
Step 4: Check the Icon in Dropbox
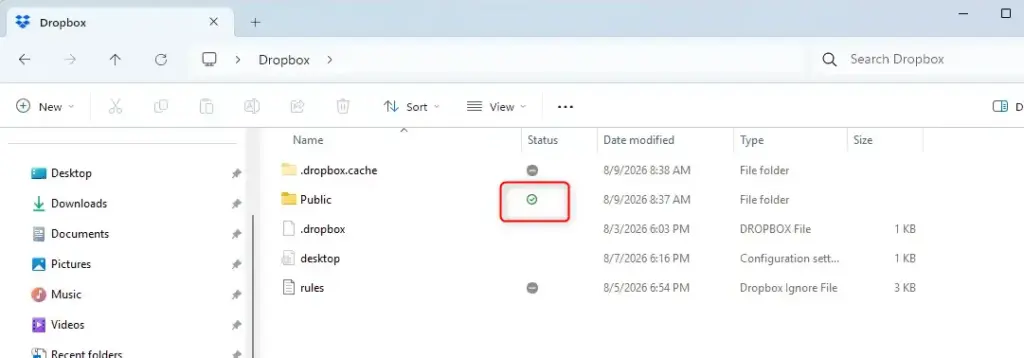
When Dropbox successfully ignores an item, a small gray minus sign icon appears next to its name in File Explorer. This confirms that Dropbox will no longer upload the item to the cloud. Any new items placed inside an ignored folder are also ignored automatically.
The icon can take a few moments to appear. If it doesn't, make sure the Dropbox app is running (look for its icon in the system tray), then press F5 in File Explorer to refresh the view.
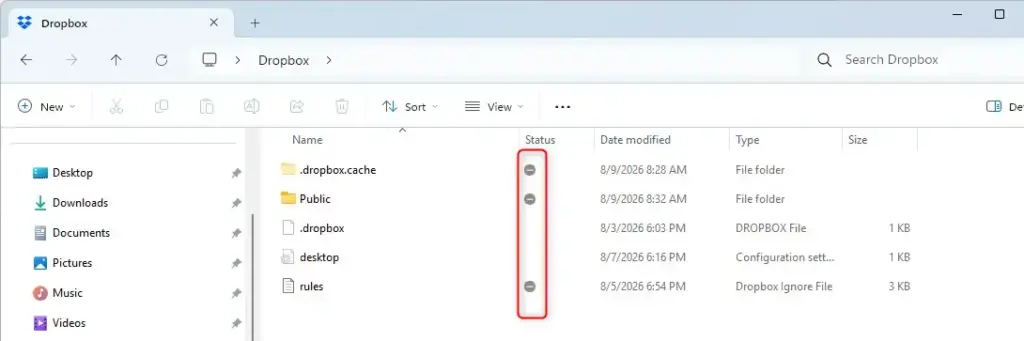
Any new files or folders you put inside that ignored folder will also be ignored automatically.
How to Stop Ignoring a File or Folder in Dropbox
You can reverse the setting at any time to make Dropbox sync a specific file or folder again. The process mirrors the steps above, with a different command at the end.
Step 1: Open PowerShell as an Administrator (Again)
Just like before, open PowerShell with administrator rights.
- Click the Start button.
- Type PowerShell.
- Right-click Windows PowerShell.
- Choose Run as administrator.
- Click Yes if the User Account Control prompt appears.
A PowerShell window opens and waits for a command.
Step 2: Get the Exact Address of the Item You Want to Re-Sync
You need the full address of the file or folder you previously ignored.
- Open File Explorer (Windows key + E).
- Find the ignored file or folder inside your Dropbox folder. It has the gray minus sign next to it.
- Right-click it.
- Select Copy as path. If you only see a short menu, choose Show more options first.
The path is now on your clipboard.
Step 3: Enter the Command to Stop Ignoring
You use the Clear-Content command in PowerShell to remove the ignore attribute and let Dropbox sync the item again. The command is Clear-Content -Path 'PASTE_YOUR_PATH_HERE' -Stream com.dropbox.ignored. You put your file path inside the single quotes and press Enter.
- Go back to your PowerShell window.
- Type the following command, but do not press Enter yet:
Clear-Content -Path 'PASTE_YOUR_PATH_HERE' -Stream com.dropbox.ignored- Place the cursor between the single quotes and right-click inside the PowerShell window to paste the address you copied. Remove any double quotes that came with the path.

Your command should look something like this:
Clear-Content -Path 'C:\Users\rworl\Dropbox\Public' -Stream com.dropbox.ignoredImportant: Make sure the address is pasted correctly and is surrounded by single quotes. The -Stream com.dropbox.ignored part of the command is important, so don't edit it.
- Press the Enter key.
PowerShell runs the command. If it works, you'll see the prompt again with no errors. You can now close PowerShell.
Step 4: Verify the Icon Change
Once you stop ignoring a file or folder, the gray minus sign disappears and normal sync icons return in File Explorer. You will see a spinning sync icon while Dropbox uploads, then a green checkmark when the item is up to date. This confirms Dropbox is including the item in your cloud storage again.
Large items can take a while to upload, and they count against your Dropbox storage quota once they do. If the icon doesn't change, check that the Dropbox app is running and not paused, and refresh File Explorer with F5.
References:
https://help.dropbox.com/sync/ignored-files
Summary
You can tell Dropbox to ignore specific files or folders on Windows 11 by using PowerShell to manage your cloud storage space. The process has four parts: open PowerShell as an administrator, copy the item's path with Copy as path, run the Set-Content command with that path in single quotes, and check for the gray minus sign in File Explorer.
To reverse it, run the Clear-Content command on the same path. Dropbox then picks the item up again. Ignored items are not backed up by Dropbox, so keep a separate backup of anything you can't afford to lose.
Have a question about this guide?
Answered by AI from this guide. Good questions may be added to this page — please don't include personal details.
Did this guide fix your problem?

About the Author
Richard
Tech Writer, IT Professional
Richard is a writer at Geek Rewind who turns complex IT tasks into clear, step-by-step guides. He draws on years of hands-on experience in system administration and enterprise IT operations, focusing on Windows, Linux and WordPress: the problems people actually run into, and the fixes that work. His server and WordPress guides come from systems he runs himself. Richard builds and maintains the platform behind Geek Rewind, from its Ubuntu servers and Nginx configuration to its custom WordPress plugins. Many new tutorials start with readers' questions, and he's always glad to answer them in the comments.
No comments yet — be the first to share your thoughts!