How to Pause Dropbox Sync On Windows 11 PC

Pausing Dropbox temporarily stops the desktop app from uploading and downloading files on your Windows 11 PC. That frees up bandwidth when you need a fast connection for gaming, video calls or a large download. No restart is needed, and the same steps work on Free, Plus and Business accounts.
You can pause syncing for a set interval, from 30 minutes up to 24 hours, from the Dropbox icon in the system tray . While sync is paused, any edits you make stay on your computer. They do not reach the cloud until you resume.
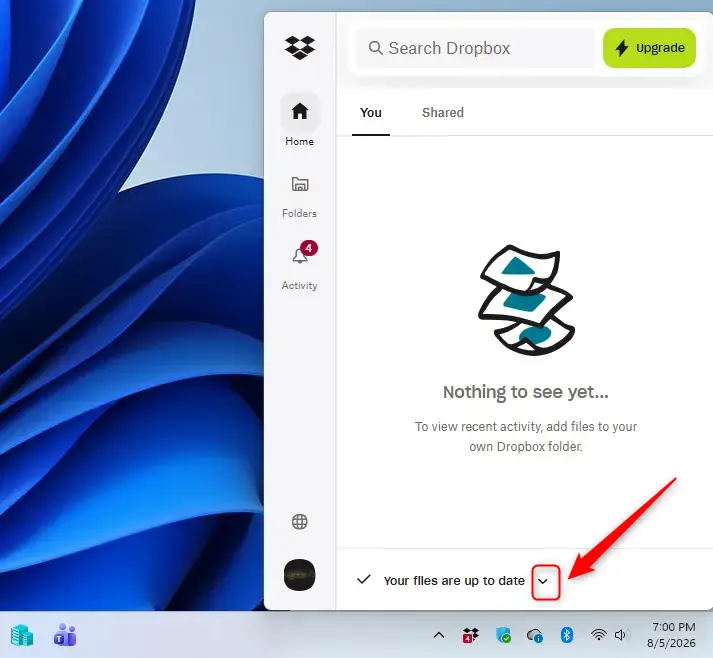
Click the Dropbox icon in the system tray , then click the sync status text and choose a pause duration from the menu. This stops Dropbox from sending or receiving files temporarily, preventing it from using your internet or updating files across devices.
Step 1Find the Dropbox Icon
The Dropbox icon normally sits in the system tray at the bottom right of the screen, next to the clock. You use it to pause sync. If you don’t see it right away, it is probably in the hidden icons area.
- Look at the bottom right corner of the taskbar for the Dropbox cloud icon.
- If it isn’t there, click the small upward-pointing arrow (^) next to the tray icons. A small panel opens with the hidden icons.
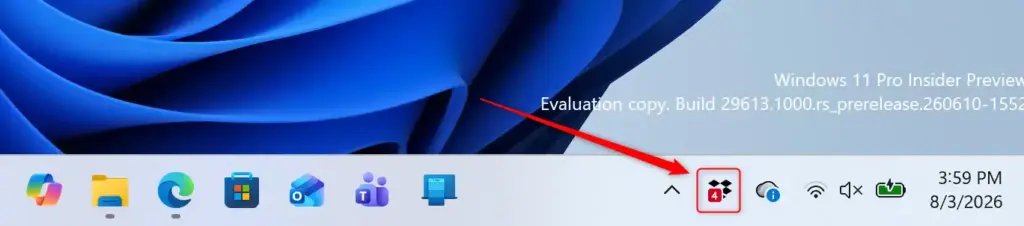
If the Dropbox icon isn’t in the hidden icons panel either, Dropbox probably isn’t running. Open the Start menu , search for Dropbox and launch it, then check the tray again. If it isn’t in the Start menu, Dropbox may not be installed on this PC, so you will need to install it first. You can drag the icon from the hidden panel onto the taskbar to keep it visible.
Step 2Click the Dropbox Icon
Once you find the blue Dropbox cloud icon, you can open the Dropbox window from it.
- Click the blue Dropbox cloud icon in the system tray .
- A small window opens. It lists your recent Dropbox activity and shows whether Dropbox is currently syncing files.
Step 3Access the Sync Options
The sync options are in the Dropbox menu, which you open from your profile picture or initials in the pop-up window. Depending on your Dropbox version, the pause control may also be next to the sync status text.
- In the Dropbox pop-up window, click your profile picture or initials.
- The main menu opens, where you can control your syncing settings.
Clicking elsewhere in the window won't work. You need to click the down arrow next to that status text.
Step 4Choose How Long to Pause
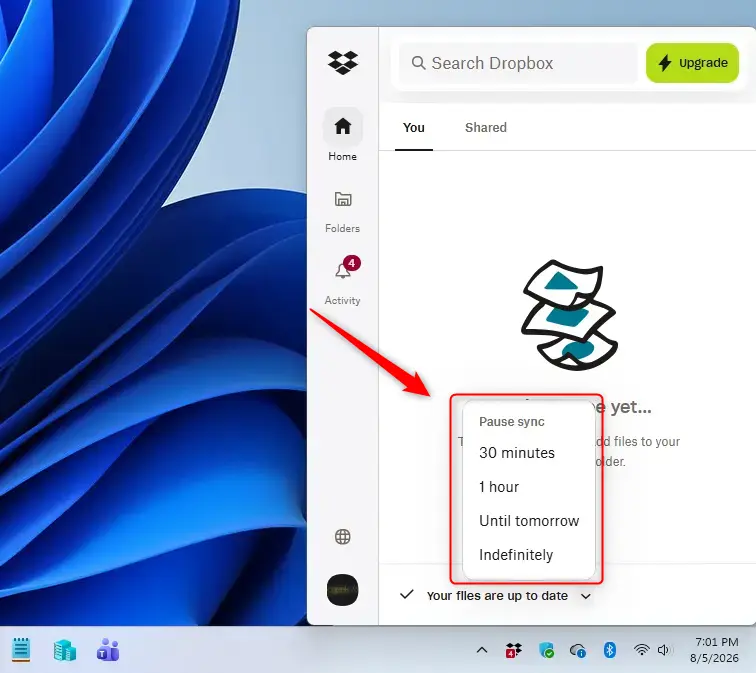
After you click the sync status, a menu offers pause durations. Choose how long Dropbox should stay paused. The exact list can vary a little between Dropbox versions, but these are the choices:
- 30 minutes: Use this if you only need a short break.
- 1 hour: This is a bit longer and good if you have a task that will take some time.
- Until tomorrow: Syncing will pause until the next day begins.
- Indefinitely: This will keep syncing paused until you choose to start it again yourself.
Pick the option that fits what you are doing. If you are about to download a big file and don't want Dropbox competing for bandwidth, 30 minutes or an hour is usually enough. If you are going on vacation and don't want any syncing while you are away, choose "Indefinitely."
- Click the pause duration you want.
- The menu closes and Dropbox stops syncing. The status text should now say that syncing is paused.
Step 5Confirm the Pause
To confirm the pause worked, look at the Dropbox icon in the tray or on the taskbar. A small pause symbol should appear on it. The Dropbox menu also shows when syncing is set to start again.
To undo the pause early, click the Dropbox icon, open the menu again and choose the option to resume syncing. Dropbox then catches up on any changes that were made while it was paused. That can take a while if you changed many files.
However, these changes will not be downloaded to your computer or uploaded from it until you start syncing again.
References:
https://help.dropbox.com/sync/pause-resume
Summary
Pausing Dropbox syncing on Windows 11 is simple: click the icon, select the sync status text, and choose a pause duration from the menu. To undo it, open the same menu and resume syncing.
Was this guide helpful?

About the Author
Richard
Tech Writer, IT Professional
Richard is a writer at Geek Rewind who turns complex IT tasks into clear, step-by-step guides. He draws on years of hands-on experience in system administration and enterprise IT operations, focusing on Windows, Linux and WordPress: the problems people actually run into, and the fixes that work. His server and WordPress guides come from systems he runs himself. Richard builds and maintains the platform behind Geek Rewind, from its Ubuntu servers and Nginx configuration to its custom WordPress plugins. Many new tutorials start with readers' questions, and he's always glad to answer them in the comments.


No comments yet — be the first to share your thoughts!