How to Add or Remove Switch User on User Tile in Start Menu in Windows 11


- 17 steps
- Needs administrator rights
- Group Policy needs Windows 11 Pro, Enterprise or Education
- Includes a restart or sign-out
Switch user in Windows 11 adds a shortcut to the user tile in the Start menu. It lets you jump to another account on your PC without closing your own open apps and files. You can show or hide this button on Windows 11 Home, Pro, or Enterprise with a small change in the Registry Editor.
Hiding the button keeps the Start menu clean and stops accidental clicks if you are the only person who uses the computer. The change takes a few steps, and you can reverse it at any time by setting the same value back.
On Pro and Enterprise there is also a Local Group Policy Editor route, but Home does not include that tool. This guide uses the Registry Editor because it works on every edition.
Open Registry Editor with Win+R, type regedit, and navigate to 🗝️HKEY_LOCAL_MACHINE\
Why Change the Switch User Option?
Removing the Switch user button from the user tile helps if you are the only person using the PC. It tidies the Start menu, but it does not remove your ability to use other accounts. You can still sign out and sign in with a different account whenever you need to.
If other people share the PC, think twice before hiding it. They lose the quick way to move between accounts without signing out.
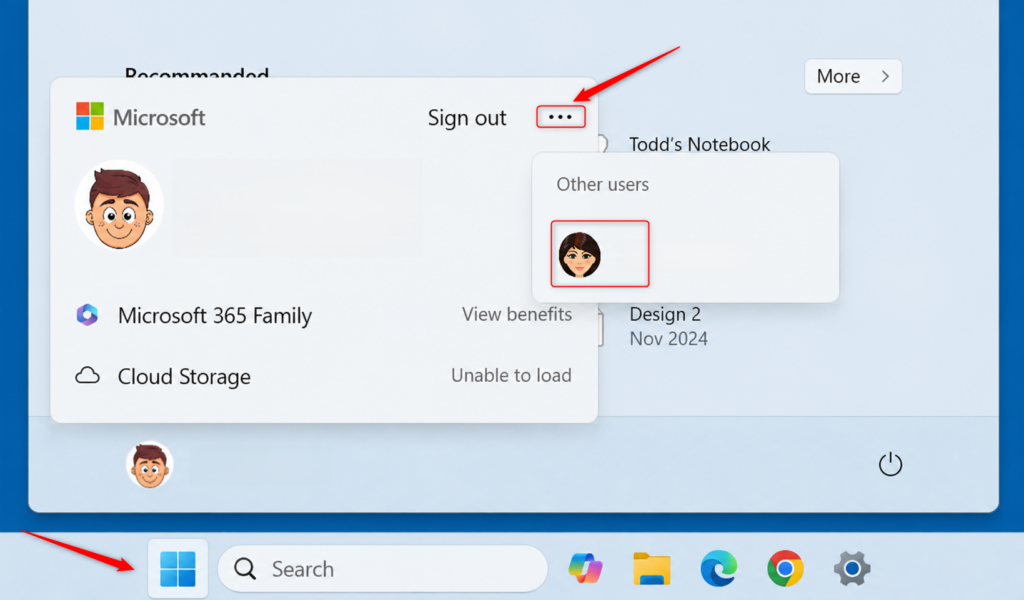
If you are signed in with a standard account, Windows will ask for an administrator password when you open the Registry Editor. Without one, you cannot save the change.
How to Add or Remove Switch User
It is a tool for changing hidden Windows settings. Be careful in it, because a wrong change can cause problems. Only touch the one value described below.
If you want a safety net, back up first. In Registry Editor, choose File Export, pick a location, and save a copy. You can double-click that file later to restore the settings.
Step 1Open Registry Editor
- Press Win+R on your keyboard to open the Run box.
- Type
regeditand press Enter or click OK. - Click Yes if User Account Control prompts you. This is where Windows checks that you have administrator permission. You should now see the Registry Editor window.
Step 2Navigate to the Correct Folder
Next, go to the right location in the Registry Editor. Click the address bar at the top of the window, paste the following path, and press Enter:
HKEY_LOCAL_MACHINE\SOFTWARE\Microsoft\Windows\CurrentVersion\Policies\System
The left pane should expand to the System key, and its values appear in the right pane.
Step 3Add or Modify the ‘HideSwitchUser’ Value
The Switch user setting depends on one registry value in this folder. The full path is 🗝️HKEY_LOCAL_MACHINE\
- Look in the right-hand pane for an entry named
HideFastUserSwitching. - If
HideFastUserSwitchingalready exists, skip to step 5. If it does not exist, right-click an empty space in the right-hand pane. - Select New, then select DWORD (32-bit) Value. A new entry appears with its name highlighted for editing.
- Type
HideFastUserSwitchingas the name and press Enter. - Double-click the
HideFastUserSwitchingvalue, whether you just created it or it was already there. An Edit DWORD (32-bit) Value box opens.
Create it as a DWORD (32-bit) Value even on a 64-bit version of Windows 11. That is the correct type for this setting.
Step 4Set the Value Data
The number in the value data decides whether the button shows. Setting the Value data to 1 hides the Switch user button on your user tile. Setting it back to 0 makes the button visible again.
To remove (hide) the Switch user button:
- In the Value data box, type
1. - Make sure Base is set to Hexadecimal. For the values 0 and 1 the number is the same in either base, but keep it consistent.
- Click OK. The value now shows your number in the right-hand pane.
To add (show) the Switch user button:
- In the Value data box, type
0. - Make sure Base is set to Hexadecimal.
- Click OK. The value now shows your number in the right-hand pane.
Once you have clicked OK, you can close the Registry Editor.
Step 5Restart Your Computer
The change does not take effect until you restart your computer. Signing out and back in may not be enough, so do a full restart.
- Save your work and restart the PC.
- Sign in and open the Start menu.
- Click your user tile (your name or picture). The menu that opens should now show or hide the Switch user option, depending on the value you set.
If the option has not changed, reopen the Registry Editor and check that the value is in the right folder and is a DWORD. A common cause is a value created under the wrong key.
Summary
To sum up, controlling the Switch user button is one registry change. You create the HideSwitchUser entry in the System folder and switch its value between 1 (hide) and 0 (show), then restart. To undo it, go back to the same value and set it to the opposite number.
Have a question about this guide?
Answered by AI from this guide. Good questions may be added to this page — please don't include personal details.
Did this guide fix your problem?

About the Author
Richard
Tech Writer, IT Professional
Richard is a writer at Geek Rewind who turns complex IT tasks into clear, step-by-step guides. He draws on years of hands-on experience in system administration and enterprise IT operations, focusing on Windows, Linux and WordPress: the problems people actually run into, and the fixes that work. His server and WordPress guides come from systems he runs himself. Richard builds and maintains the platform behind Geek Rewind, from its Ubuntu servers and Nginx configuration to its custom WordPress plugins. Many new tutorials start with readers' questions, and he's always glad to answer them in the comments.
No comments yet — be the first to share your thoughts!