Understanding and Managing User Accounts in Windows 11

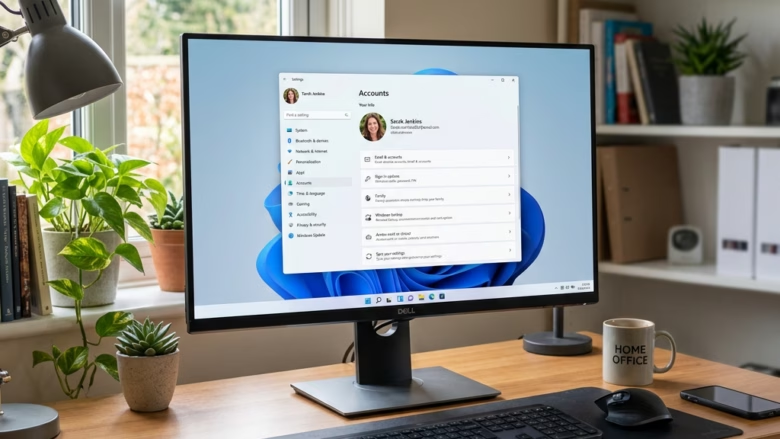
User accounts in Windows 11 create separate spaces on one PC so several people can share it without mixing up their files, apps, and settings. Each profile holds its own desktop background, browser history, saved passwords, and personal documents.
You can set up different types of accounts. An Administrator account has full control over the system. A Standard account has restricted access, which suits kids or guests. This keeps personal information private and lets everyone customize their own workspace.
User accounts in Windows 11 create separate spaces on one PC so multiple people can share it without mixing files, apps, and settings. Administrator accounts have full control over the system, while Standard accounts have restricted access.
Why are user accounts important?
- Privacy: Your files and settings stay private to your account. Other standard users can’t browse your user folder.
- Security: You can set different permission levels. Some accounts can make big changes to the system, others can’t.
- Organization: Everyone’s documents, downloads, and app data stay separate and easy to find.
- Customization: Each user can personalize their own desktop, background, and settings.
What happens when you use different user accounts?
When you switch Windows 11 user accounts, Windows loads a separate user profile for each one. That profile includes its own desktop background, saved passwords, and personal files. Think of it like logging into a different social media profile: same device, completely different experience.
Types of User Accounts in 🪟 Windows 11
Windows 11 offers a few main types of user accounts. Knowing the differences helps you pick the right fit for everyone who uses your PC.
Microsoft Accounts vs. Local Accounts
When you create a user account in Windows 11, you have two main choices:
- A Microsoft account is tied to an email address, such as an @outlook.com address.
- A local account exists only on that one computer and doesn’t need an email address to set up.
Either kind can be an Administrator or a Standard user. The account type (how a person signs in) and the permission level (what they can change) are two separate choices.
Microsoft Account
Why use a Microsoft account?
- Syncing: Settings, passwords, and preferences sync across every device where you use that Microsoft account.
- Access to Microsoft Services: You can use OneDrive, the Microsoft Store, and Office without extra sign-ins.
- Password Reset: If you forget your password, you can reset it online from another device.
- Security: You get features like two-factor authentication.
What happens when you use a Microsoft account?
A Microsoft account connects your computer to online Microsoft services. Your settings, passwords, and preferences sync automatically across your devices. You also get built-in password recovery, two-factor authentication, and direct access to OneDrive, the Microsoft Store, and Office apps.
The trade-off is that the account depends on an online service. You need an internet connection to set it up, and some of your settings are stored in the cloud.
Local Account
Why use a local account?
- Simplicity: You don't need an email address or an online account.
- Privacy: Your data is kept only on that computer.
- Offline Use: It works fine without an internet connection.
What happens when you use a local account?
A local account gives you a private way to use your computer without an email address or an online login. Your files, apps, and settings stay on that specific machine. That makes it a good choice if you want to work offline and keep your data out of the cloud.
Set a password hint you will understand later, and write the password down somewhere safe. Another administrator on the PC can also reset it for you.
Administrator Accounts
An administrator account gives you full control over the computer. You can install software, change deep system settings, and manage other user accounts. You need this level of access to make system-wide changes, set up new hardware, and run programs that affect every user on the PC.
The first account created when you set up Windows 11 is an administrator. It's a good idea to have at least one other administrator, or to be sure you know the password of the one you have, so you never get locked out of system changes.
Why have an administrator account?
- Full Control: You need it to perform system-wide tasks, including creating, changing, and removing other accounts.
- Software Installation: Most programs need admin rights to install.
- System Updates: Admin rights are essential for installing major Windows updates and many driver updates.
What happens when you use an administrator account?
When you're signed in as an administrator, you can make significant changes to Windows. You will often see a "User Account Control" (UAC) prompt. UAC is a security feature that asks for your permission before a change goes ahead. It exists to prevent accidental or malicious changes.
If you didn't start the action that caused a prompt, click No. A prompt you weren't expecting is a warning sign.
Standard User Accounts
A standard user account lets you run installed programs and save personal files. It blocks you from changing system-wide settings or installing new software. This restriction is an important security measure. It protects the computer from accidental damage and stops malware from making unauthorized changes.
Why use a standard user account?
- Security: It reduces the risk of malware or accidental damage to the system, because malware running under a standard account can't change much.
- Control: It stops children or less experienced users from making harmful changes.
- Simplicity: For everyday use, it's often all you need. Many administrators use a standard account day to day and keep an admin account for maintenance.
What happens when you use a standard user account?
When a standard user tries something that needs administrator rights, such as installing a program, Windows either blocks the action or shows a UAC prompt asking for an administrator's password. Someone who knows an admin password can type it in and approve the action. This keeps the system stable and secure.
Managing User Accounts in 🪟 Windows 11
Managing user accounts in Windows 11 is straightforward. You can add new users, change account types, and remove accounts you no longer need. All of this takes administrator rights.
Accessing Account Settings
Account settings in Windows 11 live in the Settings app. There you can view your own profile, change your sign-in options, and add or manage other users on your PC.
- Click the Start button.
- Click the Settings icon (it looks like a gear).
- In the Settings window, click Accounts in the left-hand menu.
The Accounts page opens, with your own account details at the top and a list of account-related sections below.
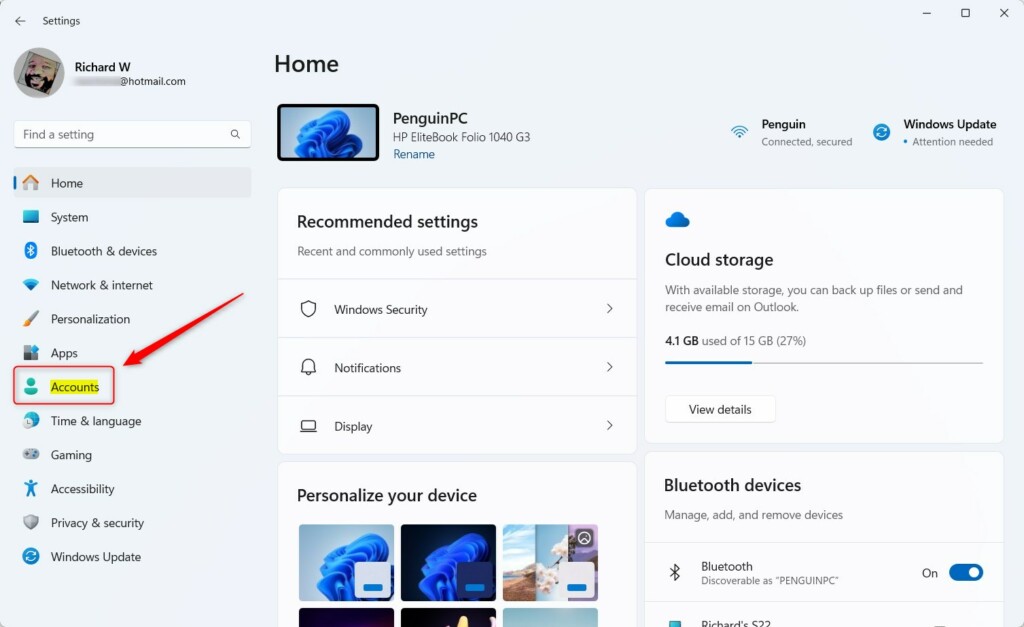
On this page you will see options for your own account, such as Your info and Sign-in options. You will also find the section for adding and managing other accounts on the PC. The label for that section depends on your Windows 11 build: it reads Family & other users on most versions and Other users on some newer ones.
Adding a New User Account
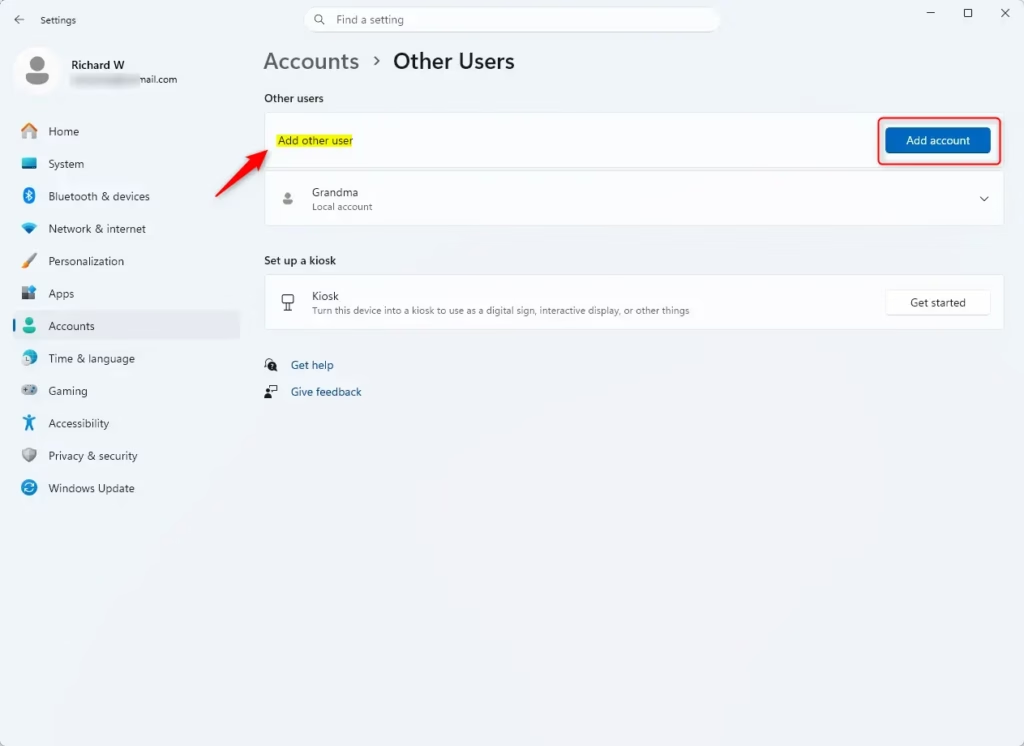
You add a new user in the Settings app under Accounts, in the Family & other users section. You can create a Microsoft account by entering an email address, or set up an offline local account for another person who uses your computer. You need to be signed in as an administrator.
- Go to Settings Accounts.
- Click Family & other users (on some builds it's just Other users).
- Under "Other users," click Add account.
A Microsoft sign-in window opens. What you do next depends on the kind of account you want.
To add a Microsoft account:
- Type the person's Microsoft account email address when Windows asks for it.
- Click Next.
- Follow the prompts to finish setting up the account.
The person will be asked for their Microsoft password the first time they sign in, and the PC needs an internet connection for that first sign-in.
To create a local account (for someone who won't use a Microsoft email):
- After clicking Add account, you'll see a prompt to enter an email. Click I don't have this person's sign-in information.
- On the next screen, click I don't have this person's Microsoft account. On some builds the equivalent link reads Add a user without a Microsoft account.
- Enter a username for the local account.
- Enter a password, and a password hint if you wish.
- Click Next.
If you don't see a local account option, your build or setup may be pushing a Microsoft account. Check you're on the sign-in screen for adding another user, and not the one for your own account.
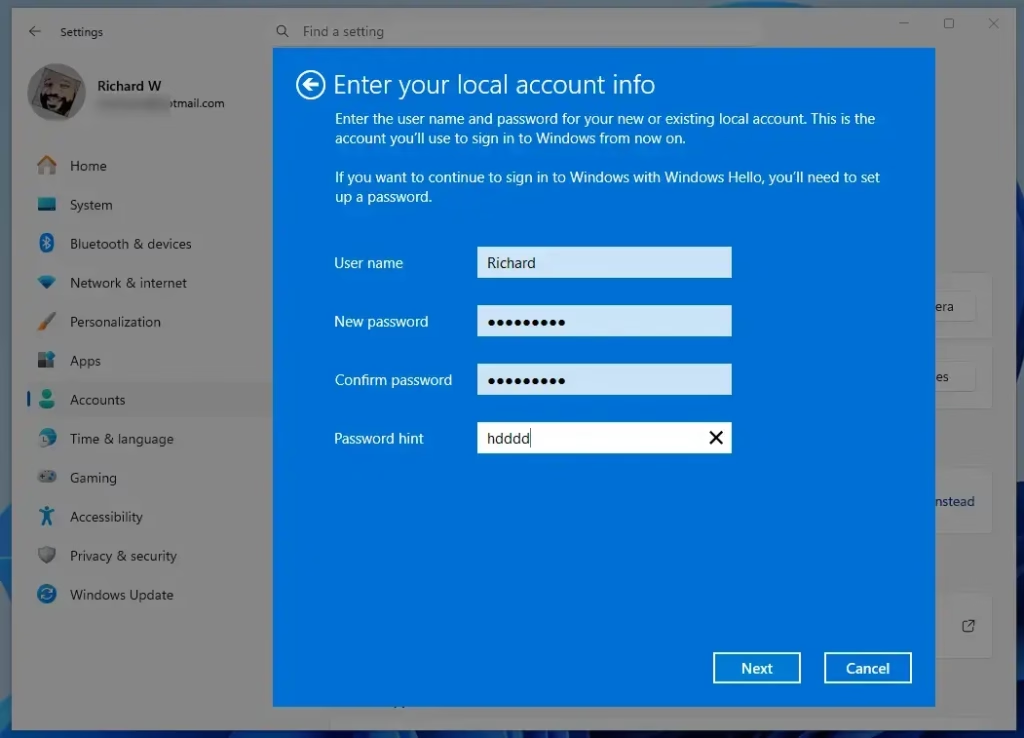
You'll now see the new account listed under "Other users." New accounts are created as Standard users by default.
Changing an Account Type (Standard to Administrator)
You can promote a Standard account to Administrator through the Settings app. This gives that person full control of the system, so only do it for someone you trust. You must be signed in as an administrator yourself.
- Go to Settings Accounts Family & other users.
- Under "Other users," click the account you want to change.
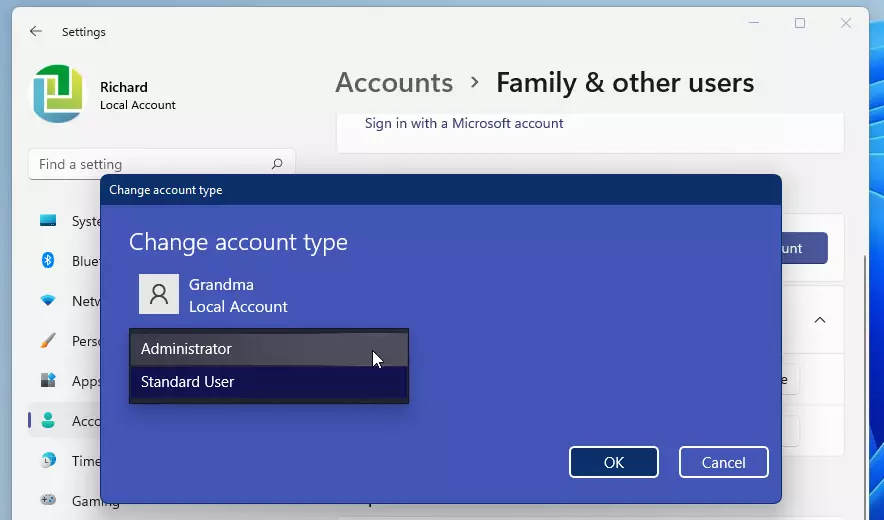
- Click the Change account type button.
A small "Change account type" window opens.
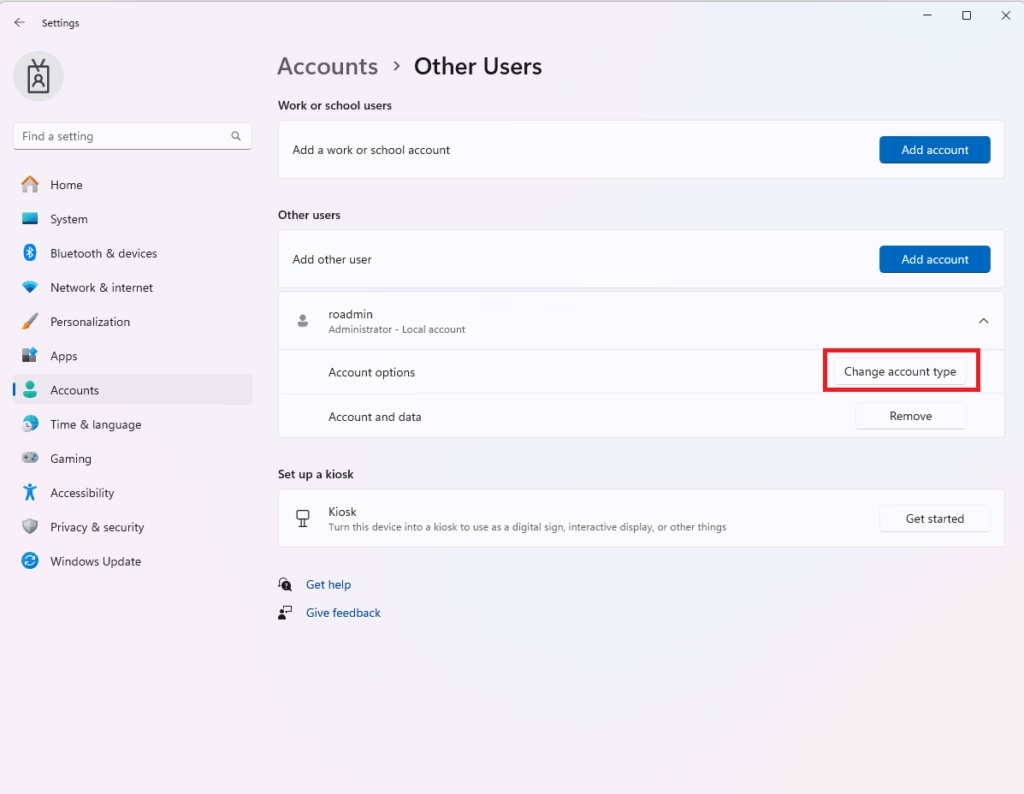
- In the "Change account type" window, click the dropdown menu under "Account type."
- Select Administrator.
- Click OK.
The user account now has administrator privileges. The change usually applies the next time that person signs in. To undo it, repeat the steps and choose Standard User.
If the button is greyed out or missing, you are probably signed in with a standard account, or you selected your own account while being the only administrator.
The user account will now have administrator privileges.
Removing a User Account
You do it in the Settings app under Accounts and Family & other users. Back up anything important first. Copy the person's Documents, Pictures, Desktop, and Downloads to an external drive, because there is no undo.
You'll need administrator rights for this:
- Go to Settings Accounts Family & other users.
- Under "Other users," click the account you want to remove.
- Click the Remove button.
A confirmation message appears.
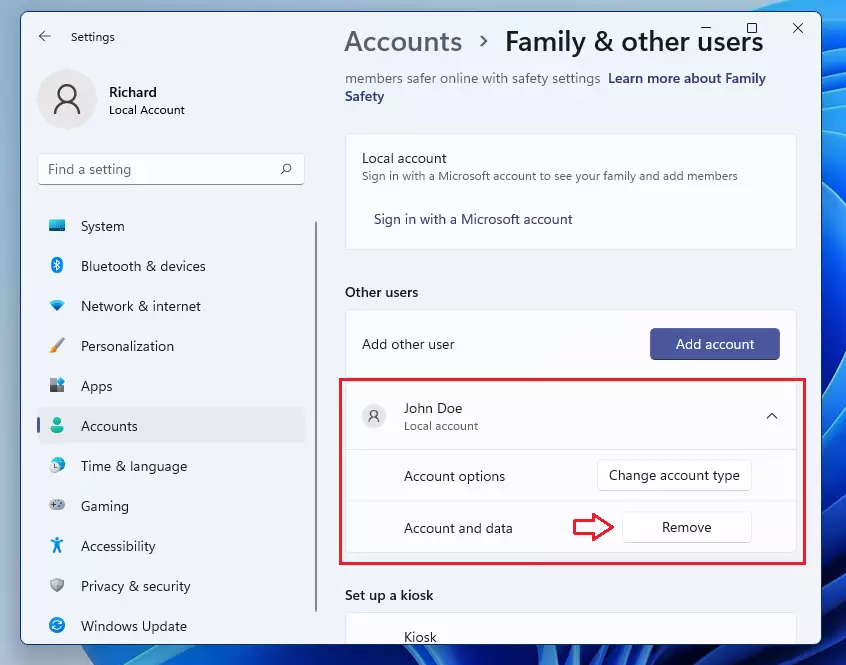
- Read the confirmation message. It warns you that deleting the account will remove all its data.
- Click Delete account and data to confirm.
The account and all its associated files are removed from the computer. If the person was signed in at the time, make sure they sign out first so the removal goes through cleanly.
Switching Between User Accounts
Switching users lets you jump to another person's desktop without signing out or closing the apps you have running. The quickest way is from the Start menu:
- Click the Start button.
- Click your current user profile picture or name at the bottom of the Start menu.
- When the menu pops up, click the user account you want to switch to.
You will land on the sign-in screen for that account. Enter their password or PIN to continue.
Alternatively, press Windows key + L to lock your screen. From the lock screen, you can select a different user to sign in as.
What happens when you switch users?
Switching users keeps your applications and files open and running in the background. The new user gets their own desktop. This is faster than signing out and back in, because nothing has to close and reopen.
Programs left running under another account still use memory, so a PC with little RAM may slow down. And if the PC is shut down or restarted while someone else is still signed in, Windows warns you that their unsaved work could be lost.
Advanced User Account Management (Expert Tips)
If you need more granular control, or you manage several PCs, there are more advanced ways to handle user accounts.
Using the Local Users and Groups Manager
The Local Users and Groups Manager (lusrmgr.msc) gives you detailed control over user accounts and security groups. It is available in Windows 11 Pro, Enterprise, and Education editions, but not in Home. On Home, the Run command below will report that it can't be used with this edition of Windows.
You'll need administrator rights for this:
- Press Windows key + R to open the Run dialog box.
- Type
lusrmgr.mscand press Enter or click OK.
This opens the "Local Users and Groups" console. Click the Users or Groups folder in the left pane to see its contents. Here you can:
- Create new users: Right-click in the "Users" folder and select New User.
- Manage groups: See which users belong to which groups, such as Administrators and Users. You can add users to a group or remove them.
- Set account options: Control per-account password settings, such as requiring a password change at next sign-in or setting a password to never expire. Wider password requirements and account lockout settings are handled in the separate Local Security Policy tool on Pro and above.
- Disable accounts: Temporarily disable an account without deleting it. Double-click the user and tick Account is disabled. Untick it to turn the account back on.
Why use this tool?
This tool is useful for managing accounts on a single PC without needing a Microsoft account, or for setting up specific security arrangements. For example, you could create a group called "Limited Access," add the right users to it, and then assign specific permissions to that group.
Understanding User Account Control (UAC)
User Account Control (UAC) is a security gatekeeper. It stops unauthorized changes by asking for your permission before a program makes system-level modifications. Even when you are signed in as an administrator, UAC makes you consciously approve apps that need high-level system privileges.
Why is UAC important?
Because of this, malware can't quietly change the system without you knowing. Standard users get a prompt asking for an administrator's password, while administrators just get a Yes/No confirmation. In both cases the prompt gives you a moment to decide whether the action is something you actually started.
How to adjust UAC settings:
You can adjust how often UAC prompts you, but it's best to keep the default level for security.
Administrator rights are needed for this:
- Search for "User Account Control" in the Windows search bar and select Change User Account Control settings.
- Look at the slider in the window that opens. It has four levels.
- Leave the slider at the default level, which is recommended. It's the second level from the top. Moving the slider down makes UAC less intrusive but less secure. The top level, Always notify, prompts more often.
- Click OK to save any changes, and approve the UAC prompt that appears.
Changes take effect right away in most cases. Choosing the bottom level, Never notify, switches UAC off, and Windows may ask you to restart. Avoid that setting. To undo any change, reopen the same window and move the slider back to the default.
Best Practices for Managing User Accounts
Managing user accounts securely in Windows 11 involves using standard accounts for everyday tasks like web browsing and reserving administrator logins strictly for software installations or system changes. Keeping your accounts protected with strong, unique passwords and regularly reviewing who has access to your PC helps prevent security breaches.- Use Standard Accounts for Daily Tasks: Log in as a standard user for everyday activities like browsing the web or checking email. Only log in as an administrator when you need to install software or change system settings.
- Strong Passwords: Use strong, unique passwords for all accounts, especially Microsoft accounts. Consider using a password manager.
- Regularly Review Accounts: Periodically check the list of users on your PC. Remove any accounts that are no longer needed.
- Enable Parental Controls: If children use your PC, set up Microsoft Family Safety features for their accounts. This allows you to manage screen time, app usage, and content filtering. You can find this under Settings Accounts Family
- Understand Permissions: Know the difference between administrator and standard user accounts. Assign administrator rights only to trusted users.
Connecting Work or School Accounts
Connecting a work or school account in Windows 11 links your computer to your organization's network so you can easily access company or educational resources. You set this up through the Settings app under Accounts and Access work or school by entering your organizational email address.
You'll need administrator rights for this:
- Go to Settings Accounts
- Click on Access work or school.
- Click Connect.
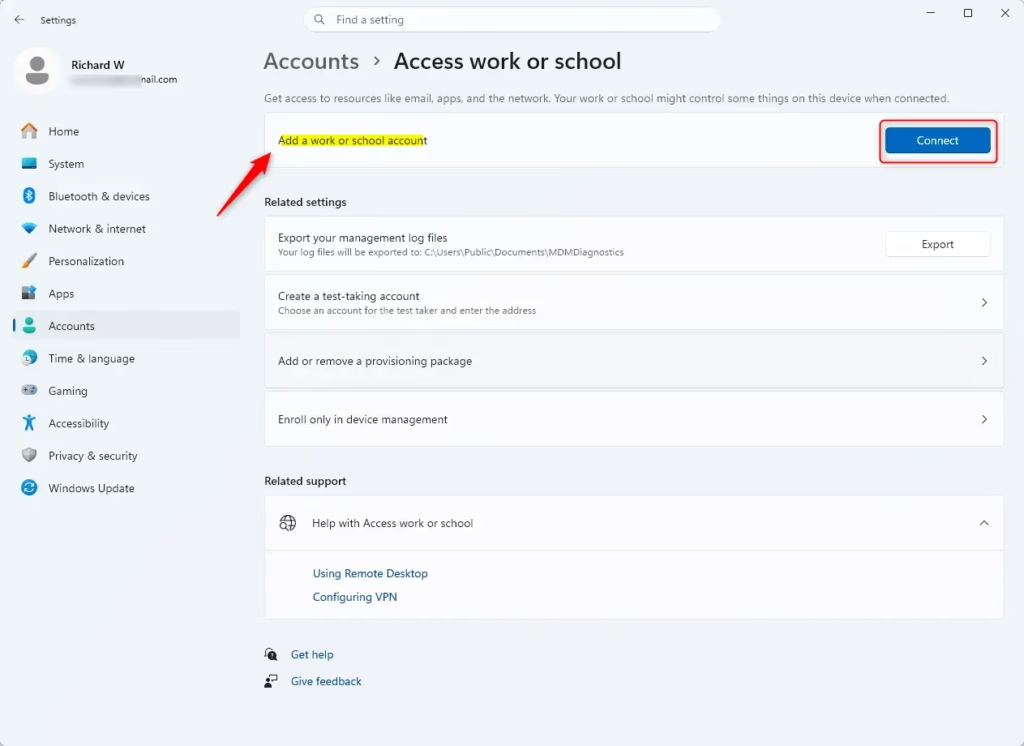
- You will be prompted to enter your work or school email address.
- Follow the on-screen instructions. This might involve signing into your organization's portal or using a specific setup method provided by your IT department.
What happens when you connect a work or school account?
Your PC is now registered with your organization. You might be able to access shared drives, printers, and company applications. Your IT administrator may also be able to manage certain settings on your PC remotely.
Disconnecting a Work or School Account
Disconnecting a work or school account in Windows 11 removes your organization's access, shared files, and policy controls from your computer. You can safely remove this connection through the Settings app by going to Accounts, selecting Access work or school, and clicking the Disconnect button.
You'll need administrator rights for this:
- Go to Settings Accounts Access work or school.
- Click on the account you want to disconnect.
- Click the Disconnect button.
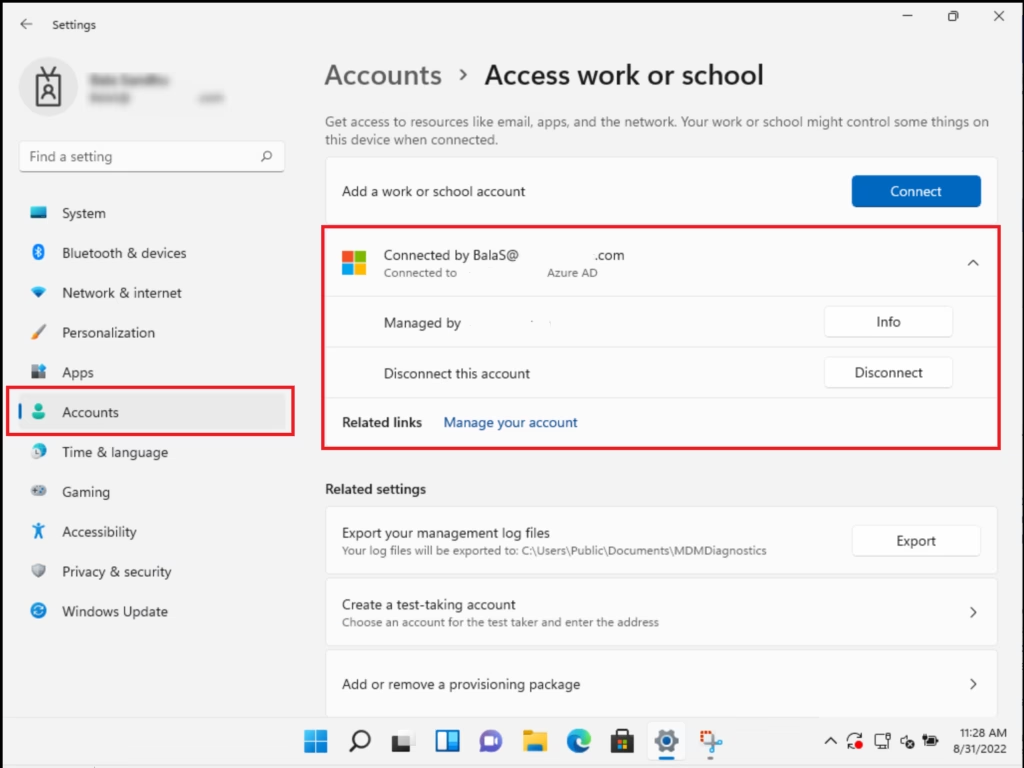
- Confirm that you want to disconnect.
- You may need to restart your computer for the changes to take full effect.
What happens when you disconnect?
Your PC will no longer be managed by your organization. You will lose access to any company resources that were available through that connection.
Summary
Understanding and managing user accounts in Windows 11 is crucial for privacy, security, and organization. Options include syncing Microsoft accounts or using private local accounts, administrator accounts for full control, and standard accounts for daily safety, with easy tools to add, change, and remove them.
Was this guide helpful?
100% of readers found this helpful (1 votes)

About the Author
Richard
Tech Writer, IT Professional
Richard is a writer at Geek Rewind who turns complex IT tasks into clear, step-by-step guides. He draws on years of hands-on experience in system administration and enterprise IT operations, focusing on Windows, Linux and WordPress: the problems people actually run into, and the fixes that work. His server and WordPress guides come from systems he runs himself. Richard builds and maintains the platform behind Geek Rewind, from its Ubuntu servers and Nginx configuration to its custom WordPress plugins. Many new tutorials start with readers' questions, and he's always glad to answer them in the comments.




No comments yet — be the first to share your thoughts!