How to Change Account Picture in Windows 11 Easily

Windows 11 shows your account picture on the sign-in screen and in the Start menu , so you can spot your profile at a glance. Changing it takes under a minute. You can use a photo of yourself, a pet, or any favorite graphic.
There are two ways to do it: the built-in Settings app, or your online Microsoft account page. If the PC is linked to a Microsoft account, a new picture follows that account to your other Windows 11 devices and Microsoft services. With a local account, the picture stays on this PC only. Both methods are below. No restart is needed for either one.
Open Settings Accounts Your info, then under Adjust your photo click Take a photo or Choose a file to set a new picture. Press Win+I to reach Settings. The new picture appears at the top of the Your info page right away, and no restart is needed.
Option 1Change Your Account Picture Using Windows Settings
It works for local accounts, which exist only on the PC, and for Microsoft accounts. You can take a new photo with the webcam or use an image already saved on the computer. You do not need an administrator account, because you are only changing your own profile.
Step 1Open Windows Settings
Start by opening the Settings app. There are two quick ways to do it:
- Press Win+I on the keyboard. The Settings app opens.
- Or click the Start button on the taskbar and select the gear icon (Settings). If you don’t see the gear, click All apps and look for Settings in the list.

Step 2Go to Your Account Info
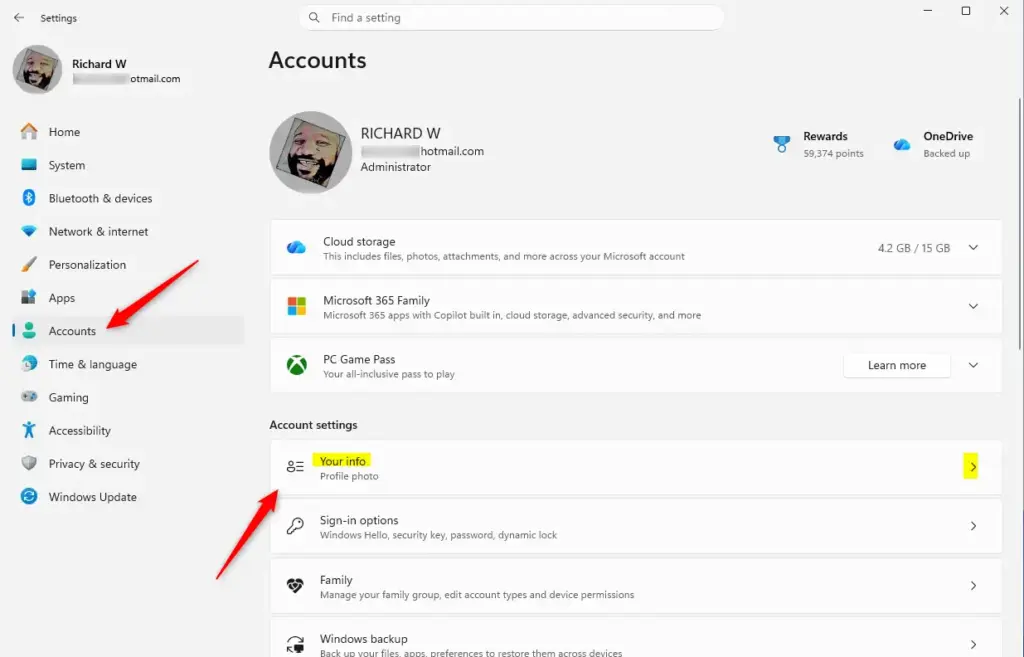
Next, go to the page that holds your profile details. The path is Settings Accounts Your info
- In the Settings window, click Accounts in the left menu.
- On the right side, click Your info. It is usually the first option in the list.
You should now see your current picture, your name, and the type of account you are signed in with. This page is where you manage the account picture and other personal details for your Windows 11 profile.
Step 3Choose How to Add a Picture
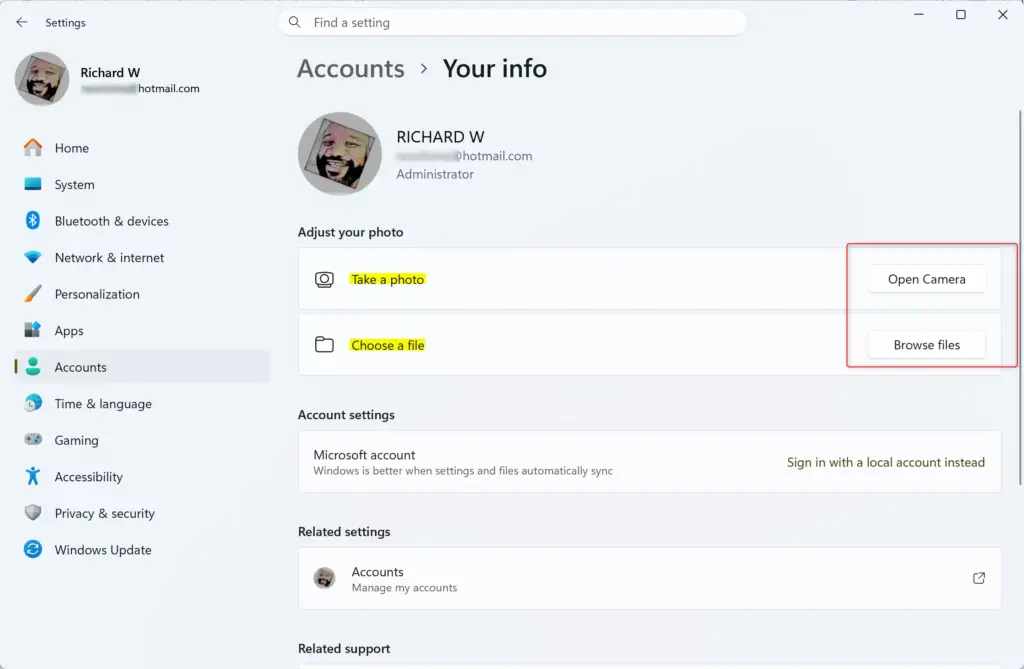
Scroll down on the Your info page until you reach the Adjust your photo section, just below your current picture. It gives you two choices:
- Take a photo: Use this if your computer has a webcam and you want to take a new picture now. On some Windows 11 versions this button is labeled Open Camera.
- Choose a file: Use this if you have a picture saved on your computer that you want to use.
If the camera option is greyed out or missing, the PC probably has no webcam, or camera access is switched off. You can check this under Settings Privacy & security Camera If you have no camera, use Choose a file instead.
Step 4Take a New Photo (If You Have a Camera)
To use your webcam, follow these steps:
- Under Adjust your photo, click Take a photo (or Open Camera). The Camera app launches.
- Position yourself or your subject in the frame.
- Click the Take photo button, usually a circular icon at the bottom of the camera window. The captured image appears for review.
- Crop the photo by dragging the on-screen borders. The picture is shown as a square or circle, so keep the face or subject in the middle.
- Click Done when you are happy with the crop.
If you don't like the result, take the photo again before you confirm it. Good lighting makes a big difference, so make sure the subject is clearly visible. If Windows asks for permission to use the camera, click Yes.
Step 5Choose an Existing Picture
To use an image that is already on your PC, follow these steps:
- Under Adjust your photo, click Browse files next to Choose a file. A File Explorer window opens.
- Go to the folder that holds your picture, for example Pictures or Downloads.
- Click the image file once to select it.
- Click the Choose picture button.
Windows 11 supports common image types such as JPG, PNG and BMP. If your image doesn't show up in the list, check its file type. Very large photos work, but a square image of moderate size will look best once Windows crops it to fit.
Step 6Finish Your New Picture
Your new picture should now appear at the top of the Your info page. You can close the Settings app. The change normally takes effect right away.
To confirm, open the Start menu and look at your profile icon at the bottom. The picture also shows on the sign-in screen and in the account settings. If you want a different one later, repeat the same steps. Choosing another picture replaces the current one.
Option 2Change Your Microsoft Account Picture Online
You can also change the picture online through your Microsoft account. This is handy if you use services like Outlook or Xbox, because the new picture then shows on all your devices and Microsoft services and keeps them consistent. It only applies to Microsoft accounts. A local account has no online profile, so use the Settings method above for it.
Step 1Go to the Microsoft Account Website
- Open a web browser and go to the Microsoft account website.
- Click Sign in and enter the same Microsoft account email and password you use on your Windows 11 computer.
If you are already signed in to Microsoft in the browser, the site may take you straight to your profile page. Otherwise, you should see your account dashboard after signing in. If you have more than one Microsoft account, make sure it is the one linked to this PC.
Step 2Add or Change Your Photo
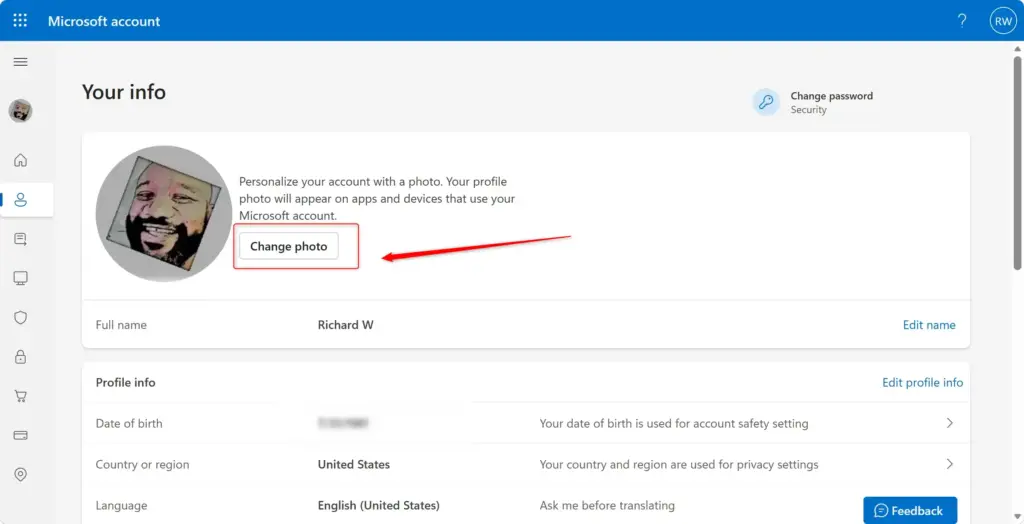
Now find your current profile image on the account page and click it, or click the link near it. You may see a prompt or link that says Add a photo, or one that says Change photo if you already have a picture. Click it to start choosing the new image.
Step 3Select and Upload Your Image
- In the window that appears, browse to the image on your computer.
- Select the picture you want.
- Click the Open button.
The image is then loaded into the page for editing.
Step 4Adjust and Save
Use the tools on the website to adjust the framing:
- Zoom in or out and move the picture until it looks right.
- Click the Save button. This uploads the adjusted picture to your Microsoft account.
The page should now show your new picture in place of the old one.
Step 5Wait for the Sync
You can close the browser now. The new picture needs time to sync across your devices. This can take anywhere from a few minutes up to 24 hours before it appears on your sign-in screen. Staying signed in and connected to the internet helps, and restarting the PC or signing out and back in can sometimes speed it up.
The version updated online serves as the primary picture for the Microsoft account, so if you later set a different one on one PC, the account's picture can change on your other devices too.
Summary
Your new account picture should now appear on the sign-in screen and across the Start menu. If an old picture still shows after a day, check that you are signed in with the right Microsoft account, then sign out and back in. To switch back to a different picture at any time, repeat either method with another image.
C:\Users\Public\AccountPictures\<SID of user>HKEY_LOCAL_MACHINE\SOFTWARE\Microsoft\Windows\CurrentVersion\AccountPicture\Users\<SID of user>Have a question about this guide?
Answered by AI from this guide. Good questions may be added to this page — please don't include personal details.
Did this guide fix your problem?

About the Author
Richard
Tech Writer, IT Professional
Richard is a writer at Geek Rewind who turns complex IT tasks into clear, step-by-step guides. He draws on years of hands-on experience in system administration and enterprise IT operations, focusing on Windows, Linux and WordPress: the problems people actually run into, and the fixes that work. His server and WordPress guides come from systems he runs himself. Richard builds and maintains the platform behind Geek Rewind, from its Ubuntu servers and Nginx configuration to its custom WordPress plugins. Many new tutorials start with readers' questions, and he's always glad to answer them in the comments.
No comments yet — be the first to share your thoughts!