How to Add Local User Account in Windows 11

Adding a local user account in Windows 11 gives another person a separate space on your computer, with its own files, desktop and settings. A local account is an offline profile. It does not need a Microsoft email address, so personal data stays on the PC while several people share it.
You can create the account in under 2 minutes from the Settings app on Windows 11 version 23H2 or 22H2. You need to be signed in with an administrator account, because a Standard account cannot create new users. This guide covers two methods: the Settings app, and the classic Netplwiz tool.
Open Settings (Win+I), go to Accounts Other users, click Add account, then choose “I don’t have this person’s sign-in information” and “Add a user without a Microsoft account”. Enter a username and optional password to create a local account. You need to be signed in as an administrator.
Why Use Local Accounts?
Local accounts are useful when other people use your computer and you want to keep your things private, or when you want separate settings on one PC. A local account keeps personal files offline and stops that user’s data from syncing to Microsoft cloud services. It works best for shared family computers, or when you want no link to an online account.
A Microsoft account is your online key to Microsoft services like OneDrive and the Microsoft Store. Signing in with one lets you sync settings across devices and reach your cloud storage. With a Microsoft account you can:
- Download apps from the Microsoft Store easily.
- Sync your settings, like your browser history and desktop theme, across different Windows devices.
- Access your online content in Microsoft apps, such as OneDrive.
A local account is tied only to the computer where you create it. It is a digital identity that lives on that one PC. Here is what that means in practice:
- Offline Use: It is not directly connected to your online Microsoft services.
- Privacy: You create a username and password just for that computer.
- App Store Access: To download apps from the Microsoft Store, you still need to sign in to the Store itself with a Microsoft account, even if your main PC login is a local account.
- No Syncing: Your settings won’t automatically transfer to other computers.
Local user accounts keep each person’s files separate on a computer. Each account has its own Documents, Desktop and Downloads folders, and its own app settings. You can create the account with or without a password.
Method 1Adding a Local Account Through Settings
This is the most common and recommended way to add a new user to a Windows 11 PC. It is built into Windows, works on both Home and Pro, and needs no extra tools.
Step 1Open Windows Settings
Start by opening the main settings for your PC. Either of these works:
- Press Windows key + I on your keyboard.
- Or click the Start button and then click the Settings gear icon.
The Settings window should open, with a list of categories down the left side.

Step 2Go to Accounts
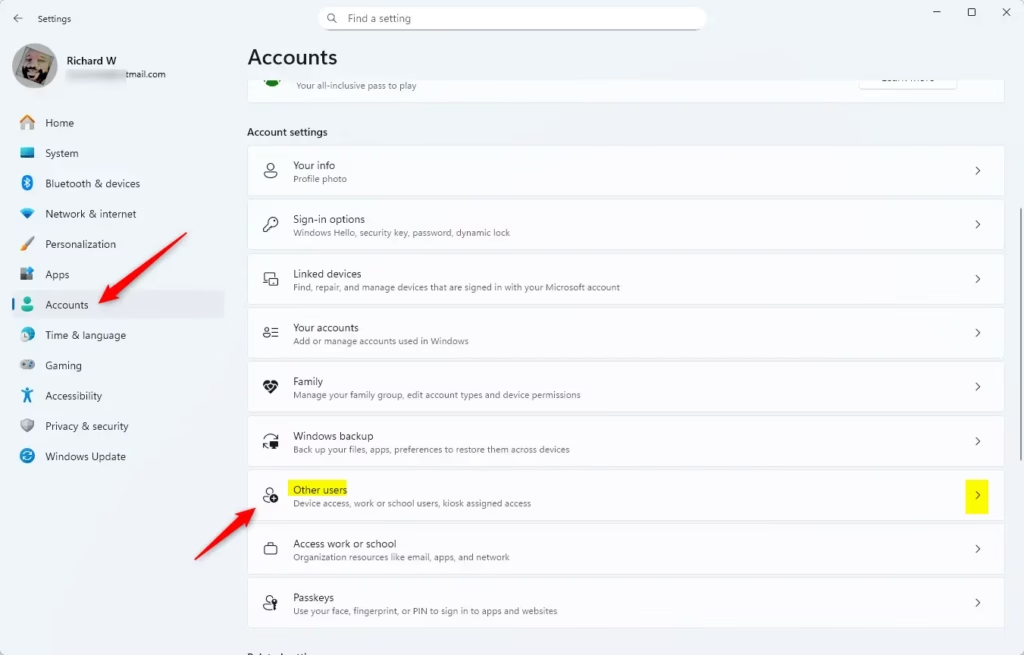
- In the left-hand menu of Settings, click Accounts.
- On the right side, click Other users. It is usually listed under the "Account settings" section.
You should now see a page listing the other people who can sign in to this PC, with an Add account button near the top. If nobody else has been added yet, the list will be empty.
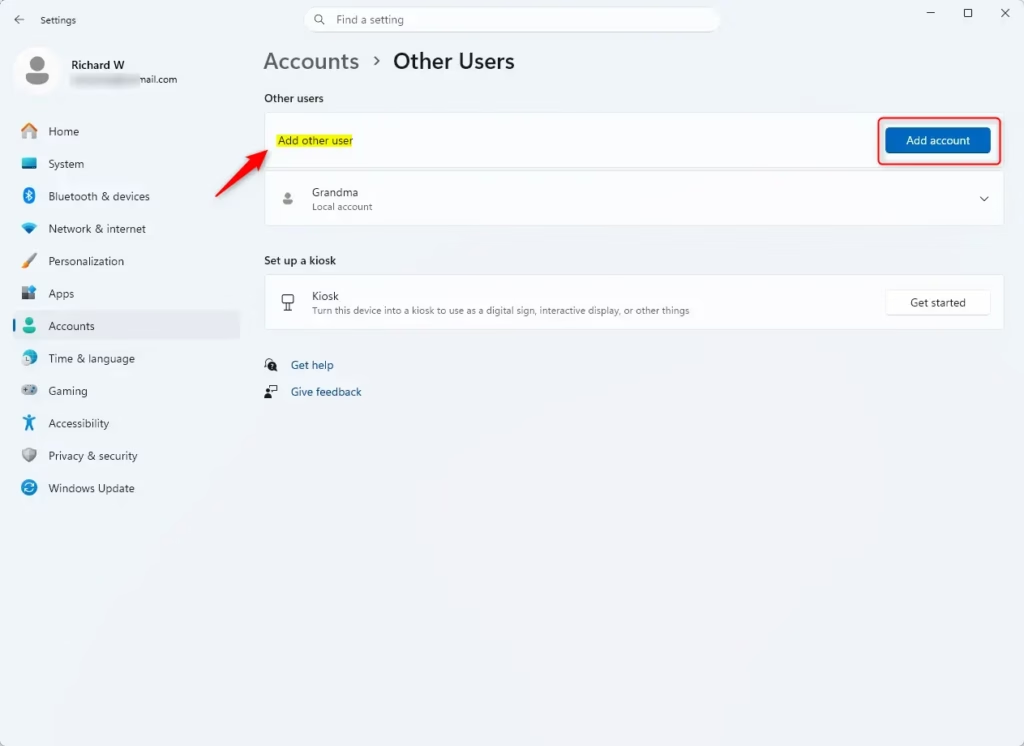
Step 3Click "Add account"
Click Add account. This starts the process of creating a new user profile and lets you set up a separate login for another person on your Windows 11 computer. A Microsoft account window opens and asks for an email, phone number or Skype name.
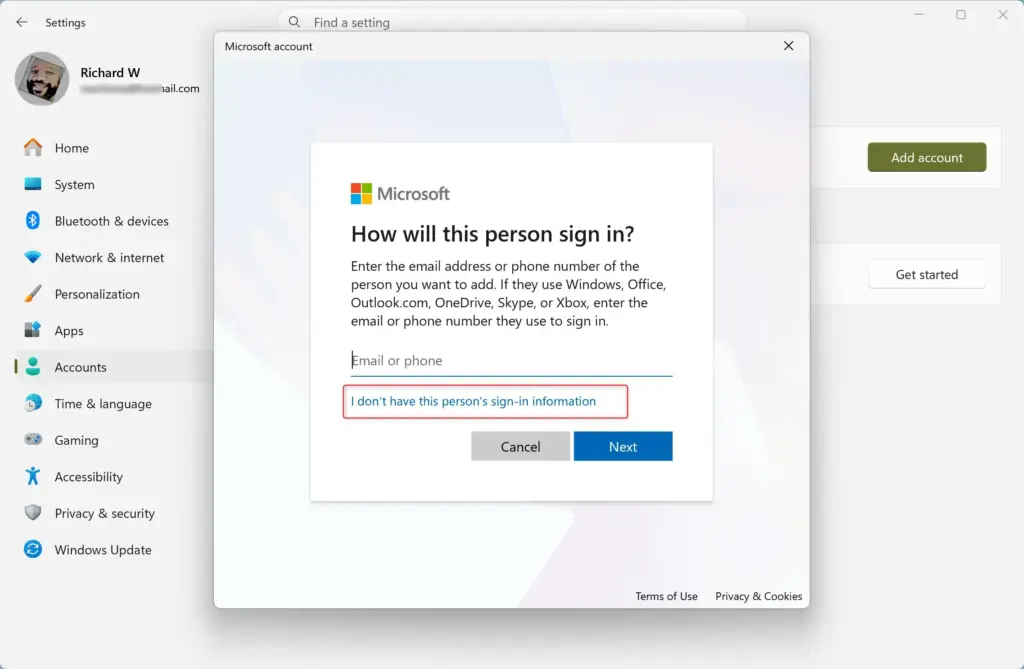
Step 4Choose "I don't have this person's sign-in information"
Windows asks you to sign in with a Microsoft account first. You don't need one for a local account, so skip this screen.
- Click the link I don't have this person's sign-in information, at the bottom of the window.
The next screen offers to create a Microsoft account. That is still not what you want, so don't fill in anything there.
Step 5Select "Add a user without a Microsoft account"
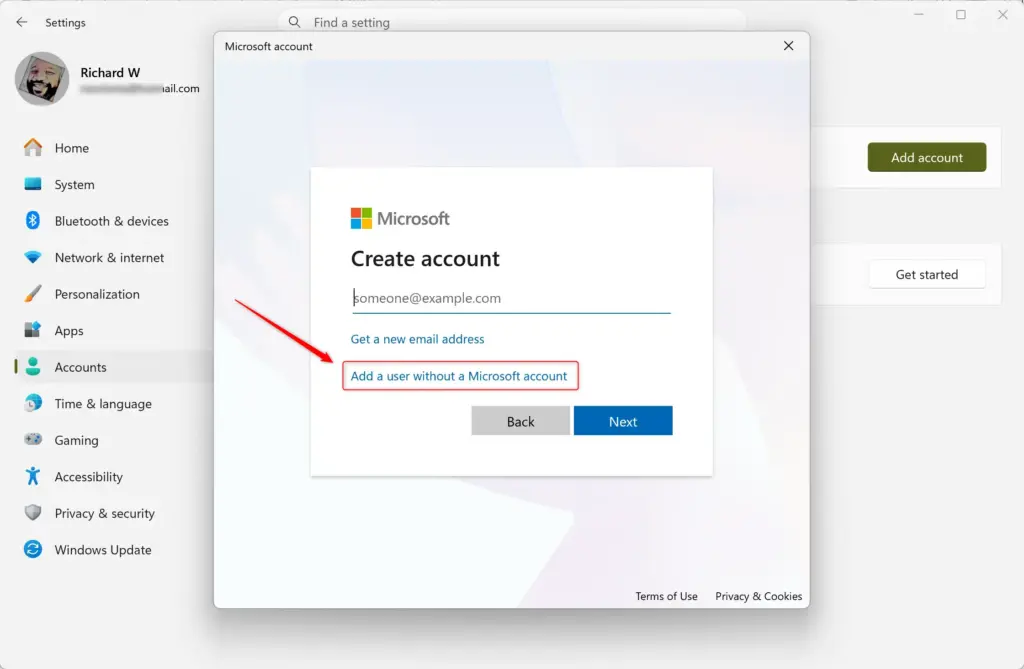
- On the "Create account" screen, click Add a user without a Microsoft account.
This is the key step for creating a local account. The screen then changes to ask for a username and password. If you don't see that link, check that you clicked I don't have this person's sign-in information on the previous screen. Wording can differ slightly between builds.
Step 6Enter the Username
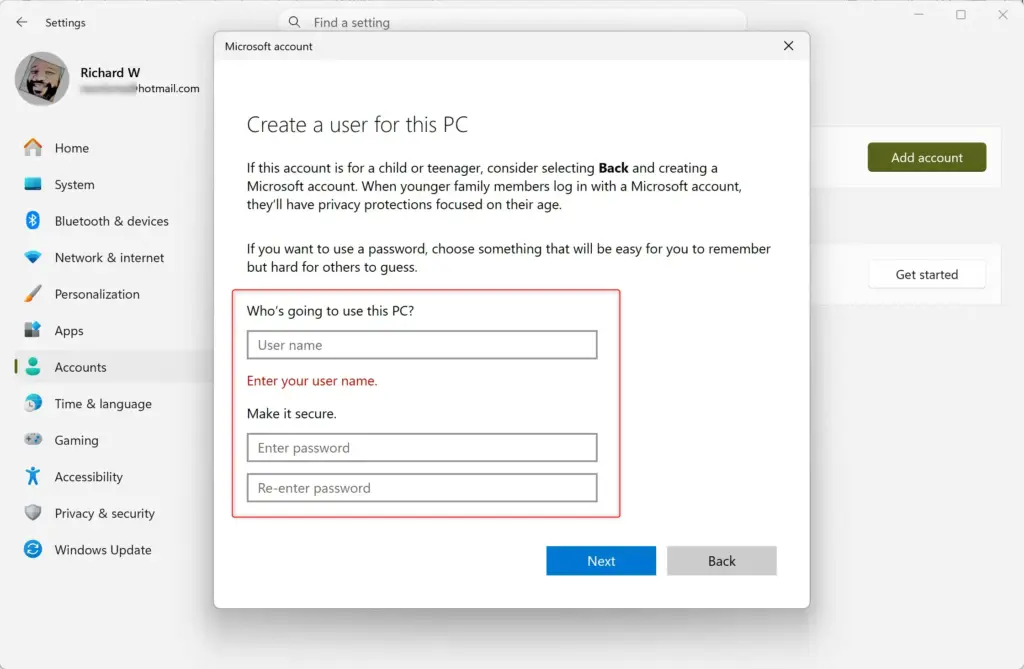
- Click the user name box.
- Type the name for the new account.
This username appears on the Windows 11 sign-in screen, and Windows also uses it to name the user's profile folder. Pick something short without unusual characters.
Step 7Set a Password (or Skip It)
A password protects the new profile from unauthorized access. Setting one is strongly recommended, especially on a shared PC.
- Type your chosen password into the first password field.
- Type the same password again in the confirmation field.
If you want an account with no password, leave both fields completely blank and go straight to the next step. Anyone can then sign in to that account by just selecting it.
Then move to the next step.
Step 8Answer Security Questions
Security questions are a backup way to regain access if you forget the password. Windows only asks for them when you set a password on the account. If you left the password blank, you won't see this screen.
- Pick a question from the first drop-down list and type your answer.
- Repeat for the second and third questions.
Choose questions with answers you will remember, and type them carefully. The answers are how you recover the account later.
Step 9Finish Up
- After you enter the username, the password (if you chose one) and the security questions, click Next.
The window closes and the local account is created.
Step 10Account Created!
Look under Other users in the Settings app. Your new profile should now be listed there, which confirms the account was created. The first time someone signs in to it, Windows takes a short while to set up the profile.
Windows creates new accounts as Standard users by default. A Standard user can run installed apps and change their own settings. They cannot install new software or make changes that affect the whole computer.
If you need to change this later, go to Settings Accounts Other users, click the account, and then click Change account type. Choose Administrator or Standard User and click OK. To undo the whole thing, select the account on the same page and click Remove. Be careful, because removing an account also deletes that user's files on this PC.
Method 2Adding a Local Account Using Netplwiz
This method uses a built-in Windows tool called Netplwiz. It gives you direct control over user accounts, and it also works on Windows 11 Home. You still need to be signed in as an administrator.
Step 1Open Netplwiz
- Press Windows key + R to open the Run box.
- Type
netplwizin the Open box. - Press Enter or click OK.
The "User Accounts" window opens.
Step 2Check the "Users must enter a user name and password" Box
Netplwiz also controls whether Windows asks for a login at every startup. This is optional and separate from adding the account, but it is worth checking while you are here.
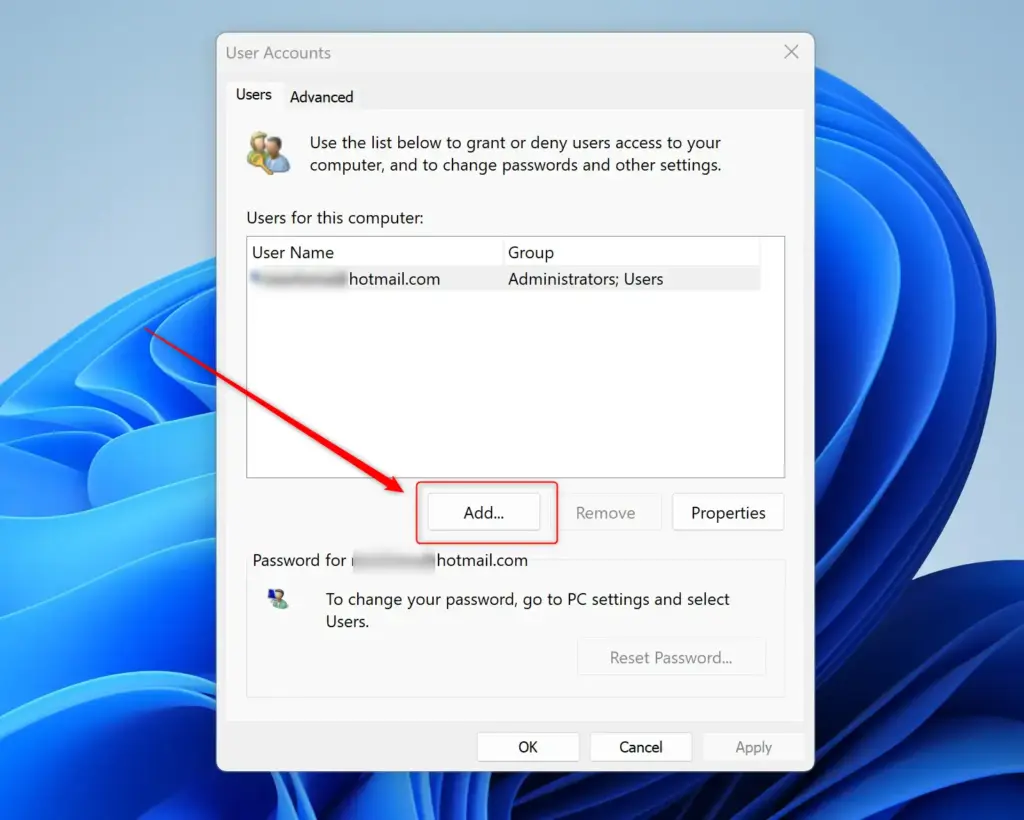
- In the User Accounts window, select the Users tab.
- Check the box for Users must enter a user name and password to use this computer.
With this box checked, Windows asks for login details at every startup.
Important: If the setting "For improved security, only allow Windows Hello sign-in for Microsoft accounts on this device" is turned on, this checkbox may be grayed out. Turn that setting off first, under Settings Accounts Sign-in options, and then reopen the User Accounts window.
Step 3Click the "Add" Button
- With the Users tab open, click the Add button.
A new window opens to start creating the account.
Step 4Choose "Sign in without a Microsoft account"
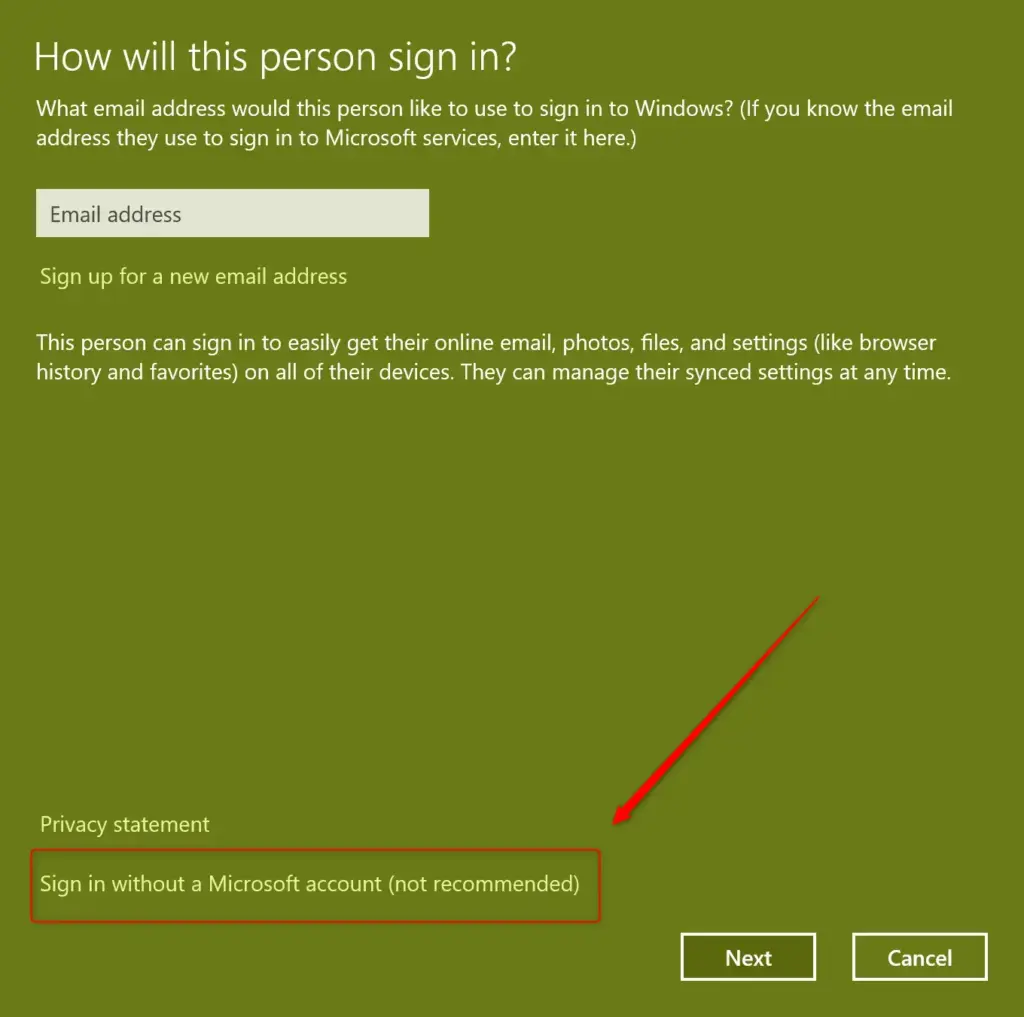
As with the Settings method, Windows tries to steer you toward a Microsoft account.
- Click the link Sign in without a Microsoft account.
The next screen shows the account type choices.
Step 5Select "Local account"
- Click the Local account button.
The form for the account details appears next.
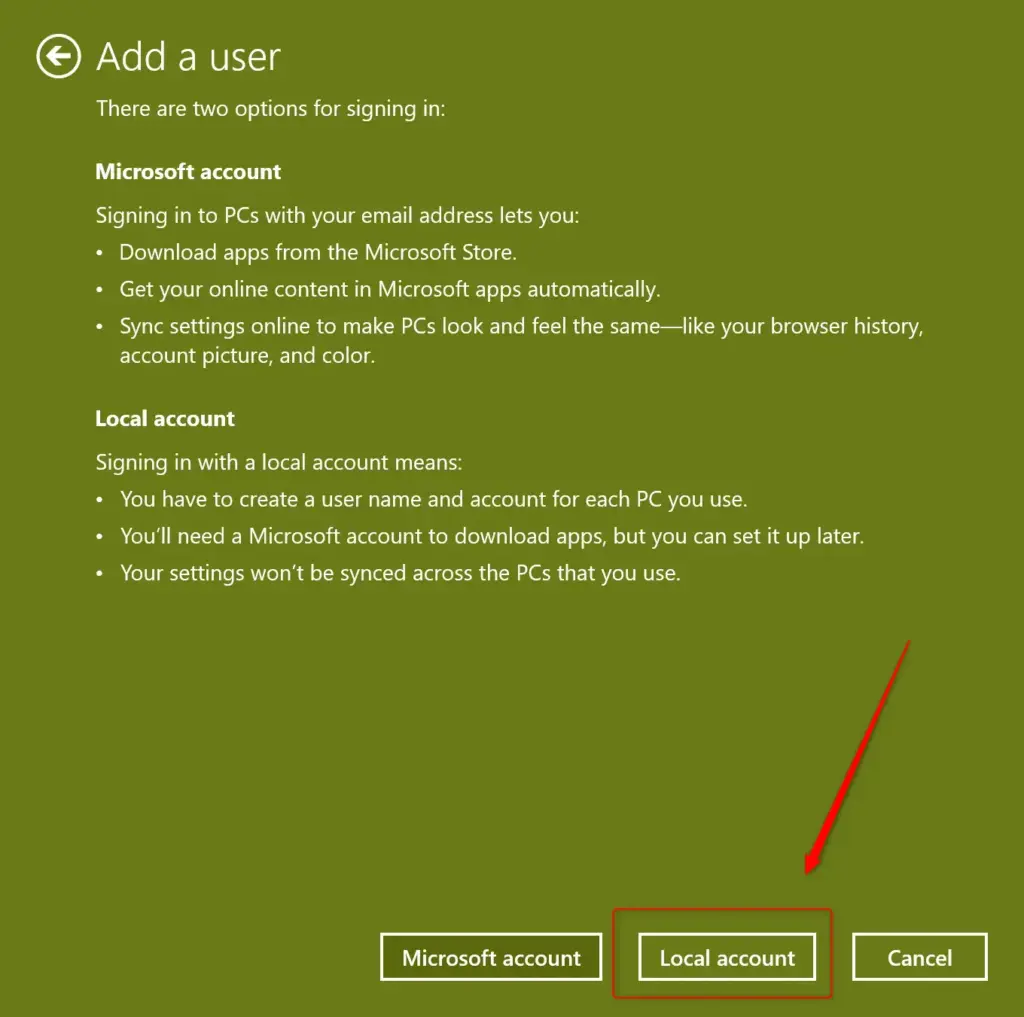
Step 6Enter Account Details
Filling in the account details is the main step in the Netplwiz method. You need a unique username, and you can choose whether to add a password with a hint. Fill in these fields:
- User name: The name for the account.
- Password: Set a password.
- Confirm password: Type the password again.
- Password hint: Add a hint to help you remember the password if you forget it.
Tip: If you don't want a password, leave the "Password" and "Password hint" fields blank. Click Next when you are finished.
Step 7Finish
- On the confirmation screen, click Finish.
The wizard closes and you return to the User Accounts window.
Step 8Close Netplwiz
- In the User Accounts window, check that the new username appears in the list.
- Click OK to close the window.
The new local account has been added. It is a Standard user by default. If you want it to have administrator access, change the account type in Settings Accounts Other users, as described in the Settings method above.
Summary
Adding a local user account in Windows 11 keeps your PC organized and secure by separating each person's files from your main Microsoft profile. You can do it with either the Settings app or the classic Netplwiz tool. New profiles are Standard users by default. You can change them to administrators later if you need full system control, and you can remove the account if you no longer need it.
Have a question about this guide?
Answered by AI from this guide. Good questions may be added to this page — please don't include personal details.
Did this guide fix your problem?

About the Author
Richard
Tech Writer, IT Professional
Richard is a writer at Geek Rewind who turns complex IT tasks into clear, step-by-step guides. He draws on years of hands-on experience in system administration and enterprise IT operations, focusing on Windows, Linux and WordPress: the problems people actually run into, and the fixes that work. His server and WordPress guides come from systems he runs himself. Richard builds and maintains the platform behind Geek Rewind, from its Ubuntu servers and Nginx configuration to its custom WordPress plugins. Many new tutorials start with readers' questions, and he's always glad to answer them in the comments.
[…] can create two system accounts: A local account or a Microsoft online account. The account you create will be of two types: Standard or […]
[…] are other ways one can change one’s account password in Windows. For example, if you have a local account, you can use PowerShell or Windows commands to reset your account password from Command Prompt or […]