Windows Hello facial recognition lets you sign in to a Windows 11 PC with your face instead of a password. It uses an infrared camera sensor to map your facial features and to block attempts to unlock the computer with a photo or video.
Advertisement
The feature needs a PC with built-in infrared hardware or an external Windows Hello-certified USB camera. A standard webcam will not work, because it lacks the near-infrared sensors Windows needs. If the Facial recognition (Windows Hello) option is greyed out or missing later in this guide, missing hardware is the most likely reason.
So should you turn it on? For most people with a compatible laptop, yes, as long as you keep a PIN as a backup. It is faster than typing a password and harder to fake than a photo-based login. This guide covers setup, tuning, removal and fixing common problems.
⚡ Quick Answer
Yes, enable Windows Hello facial recognition on compatible PCs. It’s faster than passwords and harder to spoof than photo-based login. Open Settings›Accounts›Sign-in options, click Facial recognition (Windows Hello), then Set up to scan your face and create a backup PIN. Requires a built-in or external infrared camera; standard webcams don’t work.
Advertisement
How to Set Up Facial Recognition in 🪟 Windows 11
Setting up Windows Hello facial recognition takes about two minutes. You scan your face once, and Windows also asks you to create a PIN, which becomes your fallback sign-in method. The steps below are for Windows 11, and they are the same on Home and Pro.
Before you start, check the hardware. Facial recognition needs a compatible infrared (IR) camera, either built into the PC or plugged in as a certified external unit. Without one, the face option will not appear in Settings, and no setting can add it.
Advertisement
Open Settings by pressing Win+I, or by pressing the Win and clicking the gear icon. The Settings ⚙️ window opens.
Windows 11 Start menu with Settings gear icon highlighted.
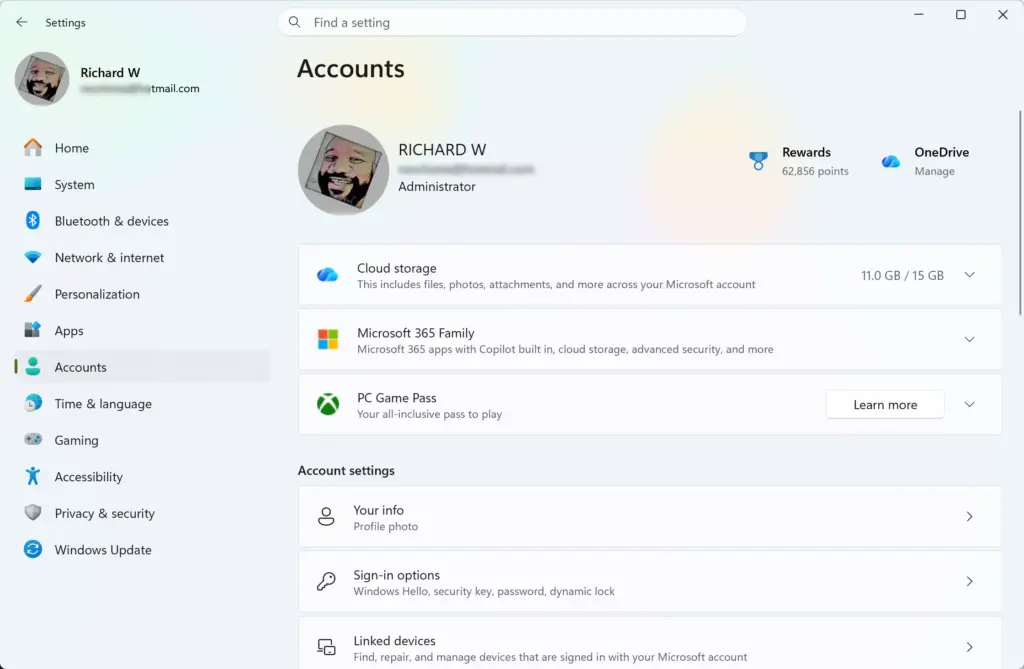
Select Accounts from the left-hand navigation menu.
Settings › Accounts
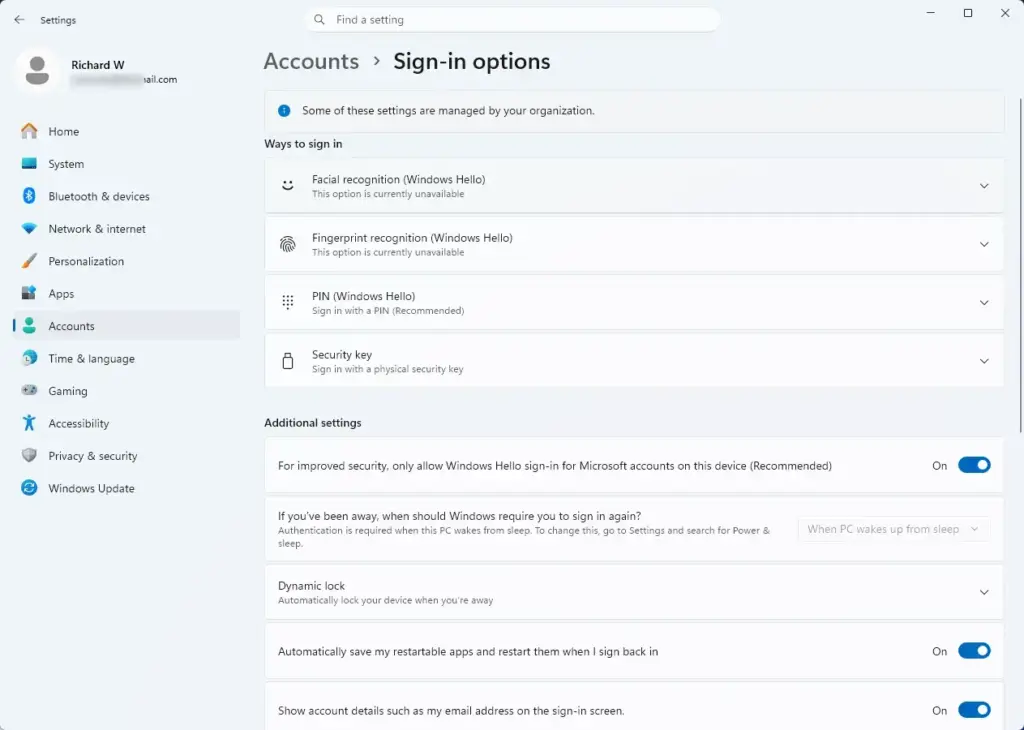
Click Sign-in options. A list of sign-in methods appears.
Settings › Accounts › Sign-in options
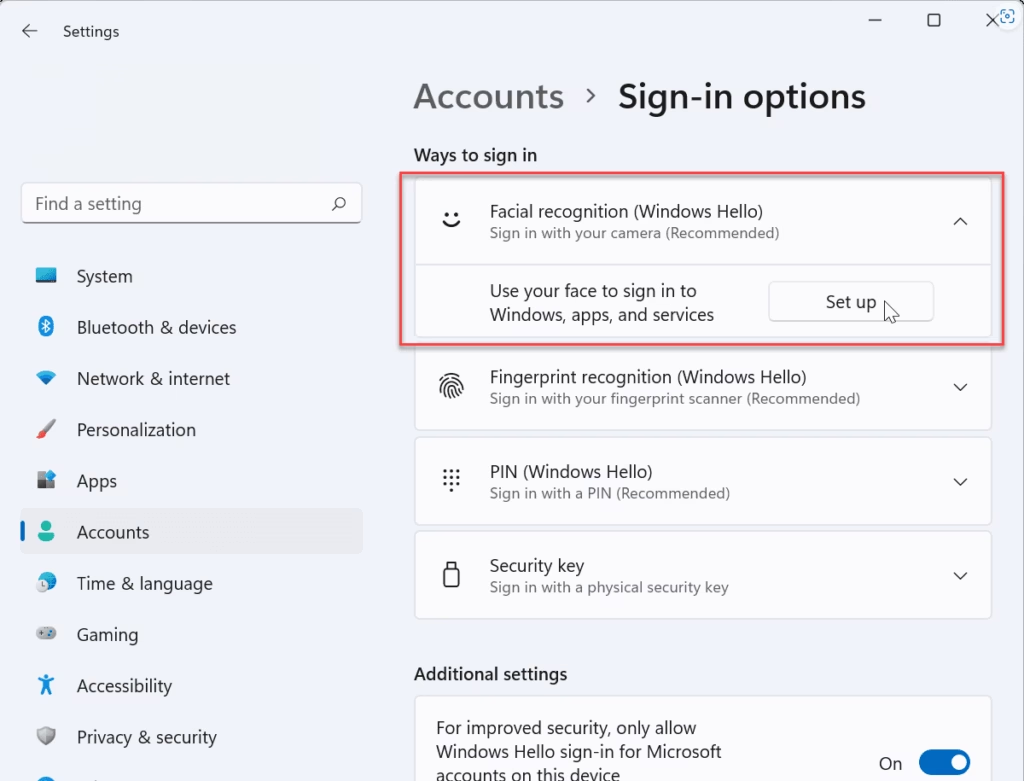
Click Facial recognition (Windows Hello) to expand the section. If it is greyed out or missing, Windows has not detected a compatible infrared camera.
Click the Set up button to launch the configuration wizard, then click Get started.
Type your current PIN when prompted to verify your identity. If you have no PIN yet, Windows asks you to create one first. Sign in with an administrator account or provide your account password to continue.
Position your face directly in front of the camera, inside the on-screen frame. Hold still while the sensor captures your facial features. Take off glasses or a hat only if the wizard has trouble reading you.
Click Close once the setup wizard confirms the scan was captured successfully.
Lock your PC with Win+L and look at the camera to test it. Windows should sign you in without any typing. No restart is needed.
Choosing Between Multiple Viable Facial Recognition Devices
If more than one camera or sensor is connected, for example a built-in infrared camera and an external USB camera, Windows needs to know which one to use for signing in. Choosing the right device stops it from trying a camera that cannot do facial recognition.
Click Facial recognition.
Facial recognition set up
Locate the dropdown menu or selection list labeled Select your preferred Hello device. This setting normally appears only when more than one compatible device is connected.
Choose your primary infrared camera or external sensor from the available hardware options. The change applies at your next sign-in, so lock the PC and test it.
Advertisement
Improving Facial Recognition Accuracy in Different Lighting Conditions
If Windows sometimes fails to recognize you in dim rooms, bright sunlight, or after a haircut, beard change or new glasses, run the improvement wizard. It adds more facial data to your existing profile rather than replacing it.
Open Settings and navigate to Accounts.
Click Sign-in options.
Select Facial recognition.
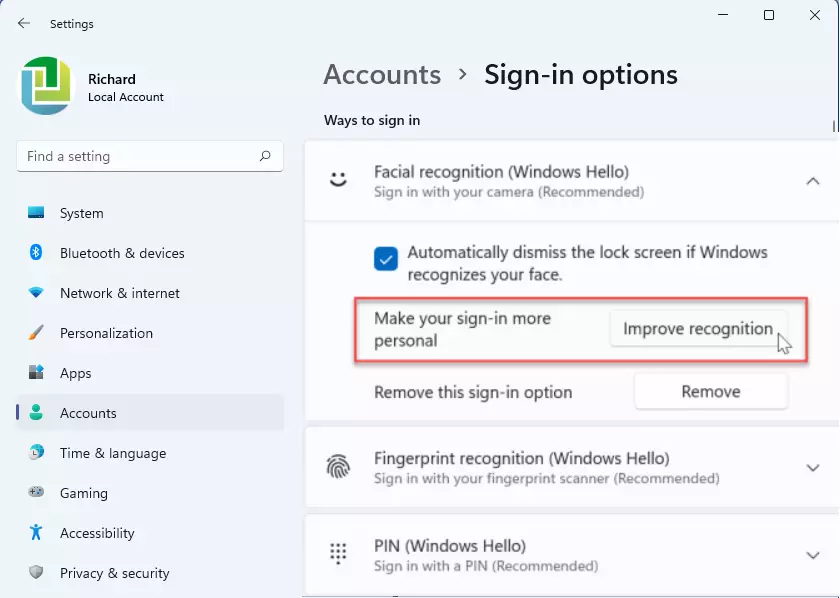
Click the Improve recognition button to launch the enhancement wizard.
windows 11 improve recognition facial
Enter your PIN to confirm your identity.
Follow the on-screen prompts while sitting in your typical lighting environment. This adds supplementary facial data. If the problem is a specific setting, such as a dark room or a bright window behind you, run the wizard again there.
Depending on your Windows 11 build, the same section may also offer an Automatically improve recognition option. When it is on, Windows refines your saved face data over time as you sign in. If you do not see it, your build does not include it, and the Improve recognition button still works.
Scroll down to the additional settings in Sign-in options to control how face sign-in behaves. One is If you’ve been away, when should Windows require you to sign in again?, which sets how long the PC can sit idle before it asks for credentials. Another is the option to require Windows Hello sign-in for Microsoft accounts on the device. The exact wording of these settings varies between builds, and some may be missing on a work or school PC managed by an organization.
Advertisement
How to Remove or Reset Your Windows Hello Face Data
⚠️WarningRemove your face data if you keep getting recognition errors, want to start clean, or plan to sell or hand over the device.
This deletes your biometric profile from the computer. It does not delete your PIN or password.
Open Settings and navigate to Accounts.
Select Sign-in options.
Click Facial recognition.
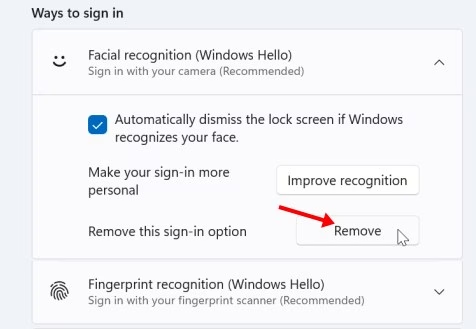
Click the Remove button next to the recognition profile to delete your stored biometric data permanently.
Face sign-in stops working straight away, and you will use your PIN or password instead.
Re-run the setup wizard if you want to register a fresh facial scan. That is also how you undo the removal.
Enhancing Security with Enhanced Sign-in Security
Enhanced Sign-in Security protects your login credentials from hardware-level attacks by pairing your biometric hardware with virtualization-based security features. It is a hardware-dependent feature and is not available on every PC.
Check the requirements before you look for the toggle. The PC needs a supported chip, such as the processors found in Secured-core hardware, plus a compatible camera or fingerprint sensor. It also needs current drivers from the manufacturer for Windows 11 version 24H2 or 25H2. Without all of these, the option does not appear.
Advertisement
Open Windows Security by searching for it in the taskbar 🖥️ search box 🔍.
Click Device security.
Select Core isolation details.
Locate Enhanced Sign-in Security and switch the toggle to On. This feature requires compatible motherboard hardware, a supported CPU, and specialized drivers provided by your system manufacturer. If you cannot find the option, your PC most likely does not support it, and there is nothing wrong with your setup.
Restart your 🔄 computer to apply the security changes.
If your PC does not support this feature, facial recognition still works. It only lacks the extra hardware-level protection. To undo the change, switch the toggle back to Off and restart.
Troubleshooting Common Windows Hello Camera Errors
Camera errors usually mean Windows cannot turn on the infrared sensor, or it reports that it cannot find a compatible camera. A missing, outdated or broken driver is the most common cause, so start in Device Manager.
Open Device Manager by right-clicking the Start button and selecting it from the menu.
Expand the Cameras or Biometric devices category. The infrared camera is often listed separately from the normal webcam.
Right-click your infrared camera driver and select Update driver.
Choose Search automatically for drivers to let Windows find and install the 💿 latest software package. If Windows says the best driver is already installed, check your PC manufacturer’s support page for a newer one.
Restart your 🔄 computer if the driver update completes successfully. Then check Sign-in options again to see whether Facial recognition (Windows Hello) is available.
Advertisement
What to do next
Windows Update is another common source of camera and biometric drivers. Go to Settings›Windows Update›Advanced options›Optional updates, and expand Driver updates. If a camera or biometric driver is listed, select it and click Download & install. Restart afterward if Windows asks.
If the driver update does not help, test the camera in a video app such as the Camera app. This rules out a physical obstruction, a privacy shutter or a camera switch that is turned off. Keep in mind that the normal webcam may work while the infrared sensor does not.
Still stuck? Open Settings›Accounts›Sign-in options and look for the Fix problems option in the face section. It leads to the Get Help app, which walks you through further checks. Availability of this link can vary by build.
📝Good to KnowAlways keep a backup sign-in method, such as a PIN or fingerprint, so you cannot get locked out if facial recognition fails.
For everyday use, face sign-in plus a strong PIN is a good balance of speed and security. Be a little more cautious on a shared PC, or if someone could hold the device up to your face while you are asleep. In those cases, a PIN or a fingerprint may suit you better.
Frequently asked questions
What are the limitations of Windows Hello?
Windows Hello facial recognition requires a PC with an infrared camera—standard webcams don't work. It won't function in poor lighting. You need to set up a backup sign-in method like a PIN or password. Some people find setup takes multiple attempts if the camera doesn't capture their face clearly.
How does Face ID know it's me?
Windows Hello maps your unique facial features using infrared light, creating a mathematical model of your face. It compares your live face to this stored model each time you sign in. The infrared camera sees through photos and videos, so it can't be fooled by a picture or screen recording of your face.
Is it better to use fingerprint or face ID?
Fingerprint is faster and works in any lighting. Face recognition is more convenient—you don't touch anything. Neither is objectively better. Choose based on your PC setup: fingerprint if your device has a reader, facial recognition if you have an infrared camera. Many people use both as backup methods.
What is the difference between Windows Hello and Face ID?
Face ID is Apple's facial recognition system for iPhones and iPads. Windows Hello is Microsoft's equivalent for Windows PCs. Both use infrared cameras to map faces securely. The main difference is the company and device—Face ID for Apple, Windows Hello for Windows machines.
Still have a question?
Answered by AI from this guide. Good questions may be added to this page — please don't include personal details.
📬 Get new Windows tips in your inbox
One email when we publish something worth your time. No spam, unsubscribe anytime.
Richard is a writer at Geek Rewind who turns complex IT tasks into clear, step-by-step guides. He draws on years of hands-on experience in system administration and enterprise IT operations, focusing on Windows, Linux and WordPress: the problems people actually run into, and the fixes that work.
His server and WordPress guides come from systems he runs himself. Richard builds and maintains the platform behind Geek Rewind, from its Ubuntu servers and Nginx configuration to its custom WordPress plugins.
Many new tutorials start with readers' questions, and he's always glad to answer them in the comments.
One email when we publish a guide worth your time — new Windows features, the fixes that actually
work, and a heads-up when Microsoft breaks something. Unsubscribe in one click.
📬 Get new Windows tips in your inbox
One email when we publish something worth your time. No spam, unsubscribe anytime.



No comments yet — be the first to share your thoughts!