Set Up a Windows Hello PIN In Windows 11

A Windows Hello PIN is a short code that signs you in to Windows 11 in place of your account password. It belongs to Windows Hello, the sign-in feature that also covers face and fingerprint. You can set one up in about a minute from Settings Accounts Sign-in options
Select Set up under PIN (Windows Hello), confirm your account password, then type the new PIN twice. Administrator rights are not needed, because the PIN belongs to your own account. Windows does not restart after you set it.
The PIN works only on the PC where you create it. Someone who sees you type it cannot use it to sign in from another device. If you use a Microsoft account, your account password is never typed at the lock screen, which makes it harder to leak.
To set up a Windows Hello PIN in Windows 11, open Settings , go to Accounts Sign-in options, select PIN (Windows Hello), then select Set up. Confirm your account password, type the new PIN twice, and select OK. The PIN must be at least 4 characters, and you don’t need administrator rights or a restart.
Before You Start
Check these points first. They explain most of the problems people hit later.
- Account type. A PIN works with a Microsoft account, a local account, and a work or school account. On a work or school PC, your organization may control the rules or block PIN setup entirely.
- Windows edition. Windows 11 Home and Pro both support a Windows Hello PIN. You don’t need Pro.
- Your current password. Windows asks you to verify your identity before it saves a PIN. Have your account password ready. With a Microsoft account, Windows may also ask for a security code sent to your phone or email, or approval in an authenticator app (an app on your phone that confirms it is you signing in).
- An internet connection. Verifying a Microsoft account usually needs one. A local account does not.
- Face and fingerprint sign-in both need a PIN first. Windows Hello asks you to set one up before it lets you add either. If you plan to use facial recognition or a fingerprint reader later, Windows Hello makes you set up a PIN first. The PIN is also the fallback when the camera or reader cannot recognize you.
Set Up a Windows Hello PIN in 🪟 Windows 11
Use this section to create the PIN. Windows checks your identity first, then asks you to choose the PIN. You can use a PIN made of numbers only, or one that also includes letters and symbols.
Open Sign-in options
Sign-in options is the Settings page where every Windows Hello method is listed. Open it first.
- Press Windows key + I to open Settings.

Windows 11 Start menu with Settings gear icon highlighted. - Select Accounts in the left pane.
- Select Sign-in options. The page lists the ways you can sign in, such as Facial recognition (Windows Hello), Fingerprint recognition (Windows Hello), PIN (Windows Hello), Security key and Password. Which ones appear depends on your hardware.
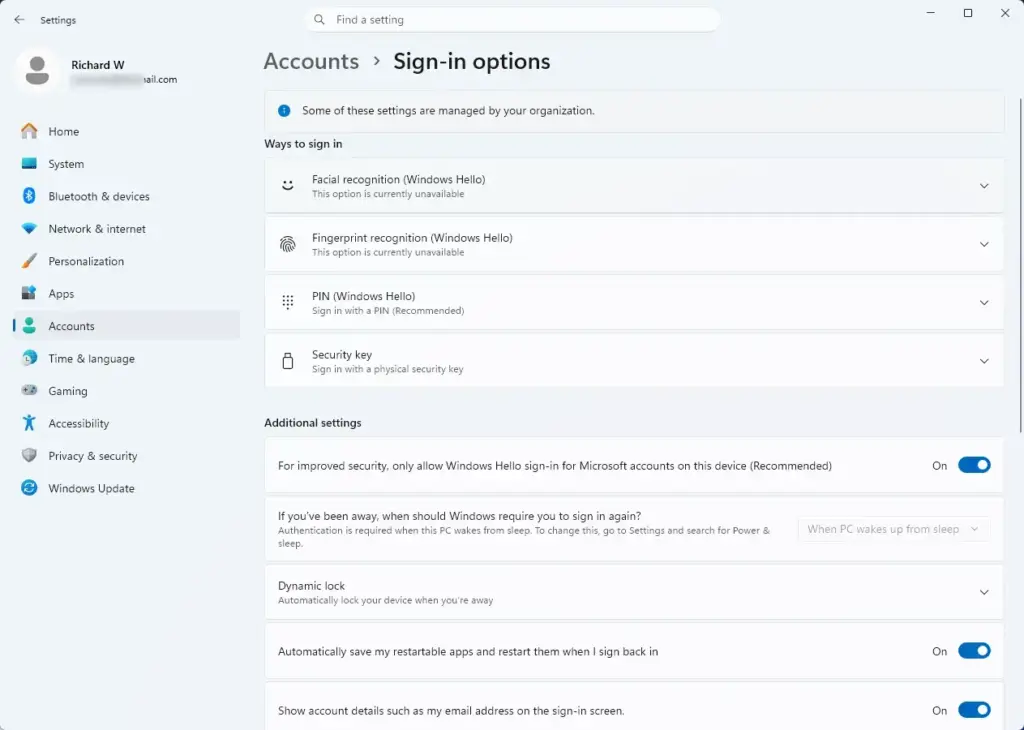
Settings › Accounts › Sign-in options
For a faster route, press Windows key + R, type ms-settings:signinoptions, and press Enter. This opens the same page directly.
If PIN (Windows Hello) is missing or greyed out, go to the "Fix problems setting up a PIN" section below before you continue.
Create the PIN
This part saves the PIN. Windows checks that you are the account owner, then asks you to choose the PIN.
- Select PIN (Windows Hello) to expand it.
- Select Set up. If a PIN already exists, you see Change PIN and Remove instead. See the sections further down.
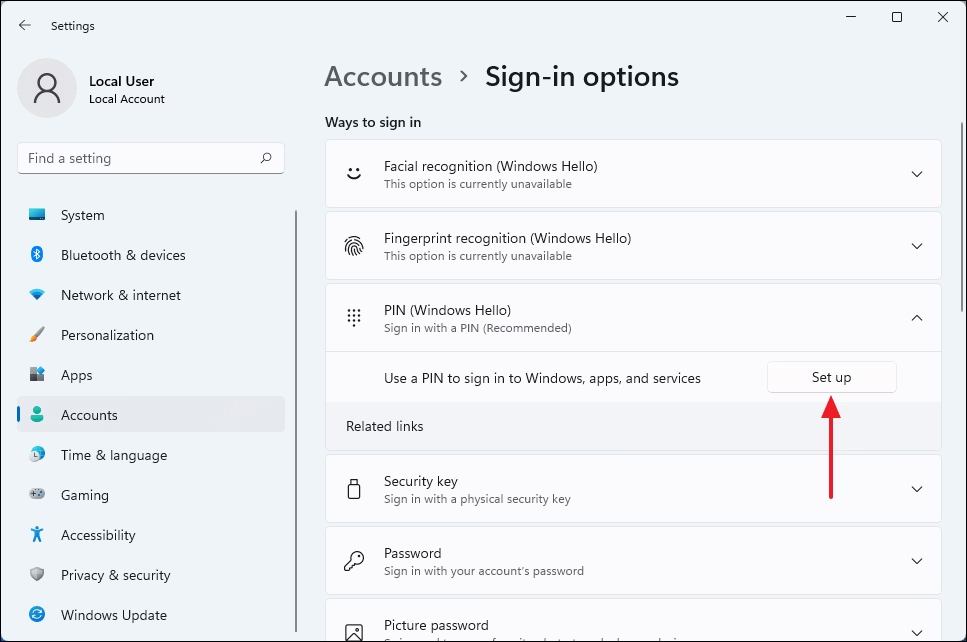
- Verify your identity when Windows asks. Type your account password and select OK. A Microsoft account may ask for an extra code or approval. Follow the prompt on screen.
- Wait for the Set up a PIN window to appear. It has two boxes, New PIN and Confirm PIN.
- Type your PIN in the New PIN box. A PIN must be at least 4 characters. It can be up to 127 characters long.
- Type the same PIN in the Confirm PIN box.
- Decide whether you want letters and symbols. By default, a PIN accepts digits only. To use letters and symbols, select the Include letters and symbols checkbox before you type. The same checkbox also lets you make a longer PIN that works like a passphrase (a phrase made of several words or characters).
- Select OK. The window closes and the Sign-in options page now shows Change PIN and Remove under PIN (Windows Hello). The PIN is now active.
If the two entries don't match, Windows keeps the OK button unavailable until they do. If you see a message saying the PIN does not meet requirements, your organization has probably set a rule. The message usually states what is missing, such as a minimum length or a required character type. The window usually states what is missing, such as a minimum length or a required character type. Follow what it says.
Choose a PIN that is hard to guess
A short numeric PIN is secure on a Windows Hello setup because it only works on your PC. It still helps to pick well.
- Avoid birth years, repeated digits and runs such as
1234. - Use six digits or more if you can. A longer PIN costs you a second to type and is much harder to guess.
- Do not reuse your bank card PIN or a PIN from a phone.
- If other people can see your screen often, consider Include letters and symbols and a longer PIN.
Test the New PIN
Test it now, while you still remember your password and can fix any problem.
- Press Windows key + L to lock the PC.
- Press any key or click the lock screen. The sign-in screen appears with a PIN box.
- Type your PIN. Windows signs you in as soon as the PIN is correct. On a numeric PIN you don't need to press Enter. If you used letters and symbols, press Enter after typing.
The PIN is now the default sign-in method for this PC. To use your password for one sign-in, select Sign-in options below the PIN box and choose the password (key) icon. This option does not appear if you turn on the "only allow Windows Hello sign-in" setting described next.
Require Windows Hello Only (Optional)
On the Sign-in options page, Windows 11 may show a toggle with this wording: For improved security, only allow Windows Hello sign-in for Microsoft accounts on this device (Recommended). The toggle appears only on some devices and builds, and mostly for Microsoft accounts.
You can sign in only with Windows Hello methods, such as your PIN. This is more secure, but you need to know your PIN. It also changes some of the steps below. The Remove button for your PIN can be greyed out while the toggle is on.
To turn it off, open Settings Accounts Sign-in options, switch the toggle to Off, and you get the password option back at sign-in. If the toggle is not visible on your PC, skip this section.
Change Your Windows Hello PIN
Change the PIN if someone has seen it or you want a longer one. You need to know the current PIN. If you have forgotten it, use the next section instead.
- Open Settings Accounts Sign-in options
- Select PIN (Windows Hello) to expand it.
- Select Change PIN.
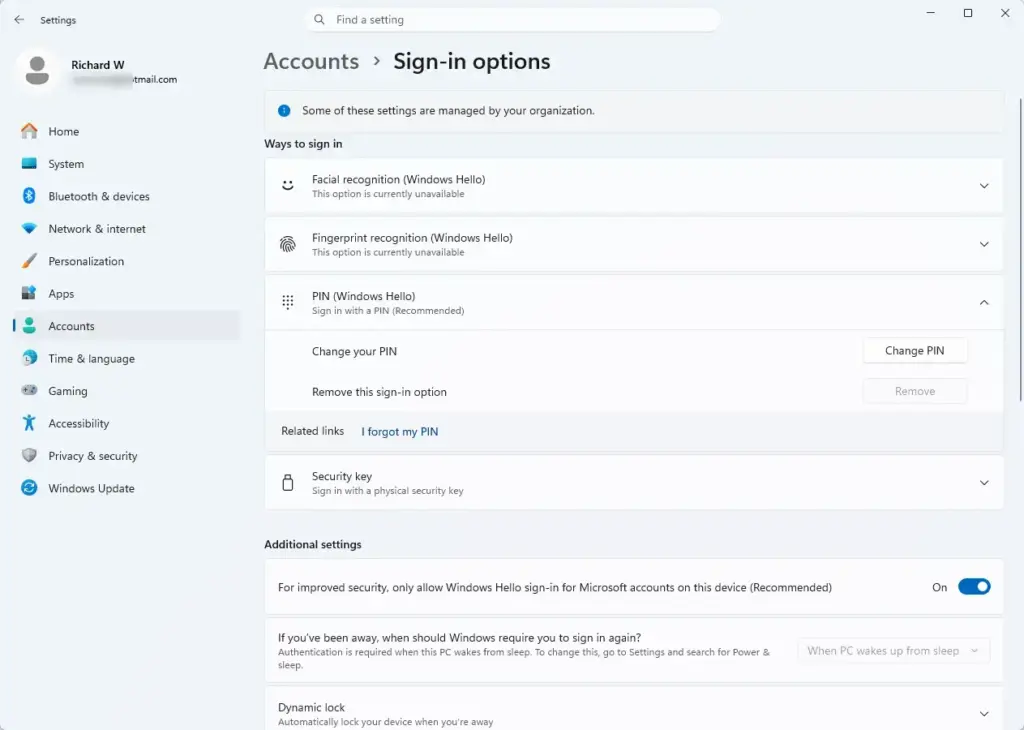
- Type your current PIN in the PIN box.
- Type the new PIN in New PIN and again in Confirm PIN. Select Include letters and symbols if you want that format.
- Select OK. The new PIN works immediately. The old one stops working.
Reset a Forgotten PIN
If you can't remember the PIN, you don't have to remove it first. Windows has a reset path that uses your account password instead.
Reset it from the sign-in screen
- On the sign-in screen, select I forgot my PIN under the PIN box. If you don't see the link, select Sign-in options first and choose the PIN option.
- Verify your account when asked. With a Microsoft account, you type the account password and may need a code or approval. This step needs an internet connection.
- Select Continue if Windows asks you to confirm.
- Type a new PIN in New PIN and Confirm PIN, then select OK. Windows signs you in.
Reset it from Settings
You can also do this while signed in with your password.
- Open Settings Accounts Sign-in options
- Expand PIN (Windows Hello).
- Select I forgot my PIN.
- Verify your identity and enter a new PIN twice. Select OK.
If you have turned on the Windows Hello-only toggle and also forgotten your PIN, the sign-in screen may not offer your password. Use I forgot my PIN and verify with your Microsoft account. That is the supported route back in.
Remove the PIN and Go Back to a Password
After removal, you sign in with your account password. Facial recognition and fingerprint recognition may also stop working, because they rely on the PIN as a fallback. Windows may remove them or ask you to set the PIN up again.
- Open Settings Accounts Sign-in options
- Expand PIN (Windows Hello).
- Select Remove. A warning appears explaining that you will need to sign in another way.
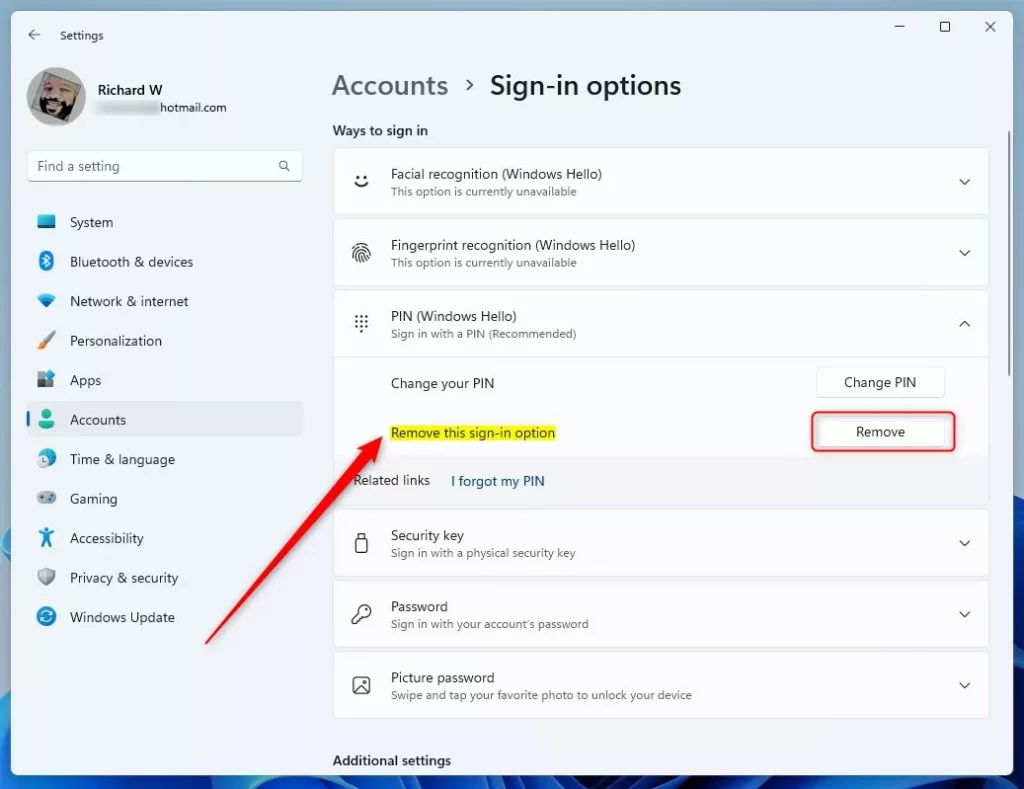
windows remove pin button not grayed out - Select Remove again to confirm.
- Type your account password and select OK. The page now shows Set up again, which means the PIN is gone.
If Remove is greyed out, turn off For improved security, only allow Windows Hello sign-in for Microsoft accounts on this device (Recommended) first, as described above. Then return to PIN (Windows Hello). The button becomes available.
Fix Problems Setting Up a PIN
Most failures come from a managed account, a missing verification step or a pending update. Work through the cases below in order.
The Set up button is missing or greyed out
- The PC is managed by an organization. On a work or school PC, an administrator can block PIN sign-in or require specific rules. If Settings shows a message such as "Some of these settings are managed by your organization", contact your IT team. You can't override it from Settings. This affects a PC joined to a work network (a domain) or linked to a work account.
- You are signed in to a guest account or a restricted account, which limits what you can change on the PC. Sign in to your own account and try again.
- The page has not refreshed. Close Settings and open it again from the
ms-settings:signinoptionsshortcut.
If you manage the PC yourself, check whether a previous administrator or a security tool applied a rule that blocks PIN setup. If you manage the PC yourself, check whether a policy was applied by a previous administrator or by a security tool.
Windows can't verify your password
- Check that the password is for the account you are signed in to. A Microsoft account uses its online password, not an older local one.
- Confirm that the PC is online. Microsoft account verification fails without a connection.
- If you recently changed the account password on another device, sign out and sign in again with the new password, then retry.
The setup window shows an error or closes
- Restart the PC.
- Open Settings Windows Update and select Check for updates. Install anything pending, then restart again.
- Try the PIN setup once more.
If the same error appears each time, note the exact wording. It can point to a policy or a damaged sign-in profile, and This page does not cover those cases in detail. Note the exact wording of the error, because it may point to a policy or a damaged sign-in profile that the steps above cannot fix.
The PIN is rejected at sign-in
- Check Num Lock if you use the number keys on the right of the keyboard. With Num Lock off, those keys don't type digits.
- Check the keyboard layout shown on the sign-in screen, especially if you use letters in your PIN.
- After several wrong attempts, Windows may make you wait before it accepts another try. If you can't recall the PIN, select I forgot my PIN.
Where the PIN Applies, and What Can Change It
Three points help you avoid surprises later.
- The PIN is per device. Setting one on your laptop does not create one on your desktop. Repeat the steps on each PC.
- It is per account. Each user on a shared PC sets up a PIN while signed in to their own account.
- Your organization can change it. If you add a work or school account to the PC, the organization may apply its own PIN rules. You can be asked to create a new PIN that meets them.
What to Do Next
If your PC has a compatible camera or fingerprint reader, go back to Settings Accounts Sign-in options. Set up Facial recognition (Windows Hello) or Fingerprint recognition (Windows Hello) so you sign in without typing anything. Your PIN stays in place as the fallback. If you ever lock yourself out, I forgot my PIN and your account password are the way back in.
How do I change my Windows PIN if I forgot it?
On the sign-in screen, select I forgot my PIN under the PIN box. Sign in with your Microsoft account password, then set a new PIN. If you use a local account, you cannot reset the PIN this way. Ask an administrator on the PC to remove the PIN, or sign in with your account password and set a new one from Sign-in options.
Why is 🪟 Windows 11 asking for a PIN instead of a password?
Windows asks for a PIN because you set one up as your sign-in method, or because your organization requires it. The PIN is stored on this PC only, so your account password is not sent when you use it. To sign in with your password instead, select Sign-in options on the lock screen and choose the password icon.
How to get Windows Hello?
Windows Hello is built into Windows 11, so you turn it on from Settings. Open Settings, select Accounts, then select Sign-in options. Under PIN (Windows Hello), select Set up and follow the prompts. Face and fingerprint sign-in appear on this page only if your PC has a compatible camera or fingerprint reader.
How to lock an HP laptop with a password?
Press the Windows key and L together to lock the screen. To make the laptop ask for your password after it wakes from sleep, open Settings, select Accounts, then Sign-in options. Under Additional settings, set the option for when Windows should require you to sign in again to When PC wakes up from sleep. Your account needs a password for this to work.
Was this guide helpful?

About the Author
Richard
Tech Writer, IT Professional
Richard is a writer at Geek Rewind who turns complex IT tasks into clear, step-by-step guides. He draws on years of hands-on experience in system administration and enterprise IT operations, focusing on Windows, Linux and WordPress: the problems people actually run into, and the fixes that work. His server and WordPress guides come from systems he runs himself. Richard builds and maintains the platform behind Geek Rewind, from its Ubuntu servers and Nginx configuration to its custom WordPress plugins. Many new tutorials start with readers' questions, and he's always glad to answer them in the comments.


No comments yet — be the first to share your thoughts!